visual_path/bin/oe20 image.im
where visual_path is typically /opt/visual (/opt/local/visual at the Computer Science Department at Clemson University). The file image.im is called the image file. It contains the initial VisualWorks environment. The default system image file is typically visual_path/image/visual.im. On the Sun Solaris platforms at Clemson, the command
vw
will start up VisualWorks with the default image. To start VisualWorks with an image other than the default, use the command
vw image-file
Enter the appropriate command to start VisualWorks on your system. You should see two windows, the VisualWorks Launcher and the Workspace.
There are two types of pop-up menus associated with each window in VisualWorks. There is the [Window] menu which is accessed by clicking the right mouse button in the window. The [Window] menu is used for closing, moving, and resizing the current window. The second pop-up menu is the [Operate] menu which is accessed by clicking the middle mouse button in the window. There may be more than one [Operate] menu per window, in which case an area will be specified in which to click the middle mouse button. To select an item from either the [Operate] or [Window] menus the mouse button used to obtain access the menu must be used.
Note: The following conventions are used for one-button and two-button mice:
Two-button mouse
One-button mouse
In windows that have a menu bar, pulldown menus are accessed by clicking on the word associated with the menu. For example, click on File located on the Launcher's menu bar to obtain the File pulldown menu. Pulldown menu selections will be specified by the menu name followed by an arrow(->) and the menu item. For example, the File->Settings option from the VisualWorks Launcher refers to the Settings option from the File pulldown menu. Many pulldown menu options also have a shortcut button on the tool bar, which will be refer to with its associated icon. For example, the Canvas Tool may be obtained by using either the Tools->New Canvas menu option or by the shortcut button  .
.
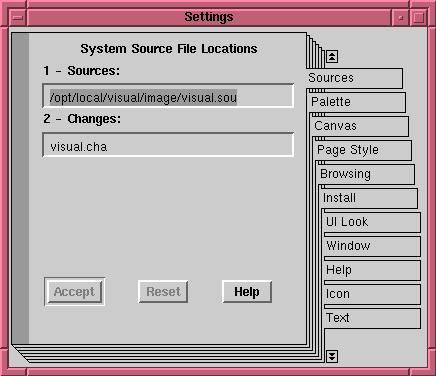
Select the help settings by clicking on the Help tab of the Settings notebook pages (not on the Help button for the Settings window). You should see the following window. Make sure that the path for the online documentation is correct. Click Accept after making any necessary changes.

Now close the Settings window by selecting close from the Settings [Operate] menu.
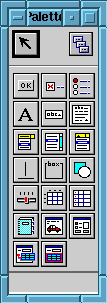
 Action Button Action Button |
 Check Box Check Box |
 Radio Button Radio Button |
 Label Label |
 Input Field Input Field |
 Text Editor Text Editor |
 Menu Button Menu Button |
 List List |
 Combo Box Combo Box |
 Divider Divider |
 Group Box Group Box |
 Region Region |
 Slider Slider |
 Table Table |
 Data Set Data Set |
 NoteBook NoteBook |
 View Holder View Holder |
 Subcanvas Subcanvas |
 Linked Data Linked Data |
 Embedded Data Embedded Data |
More information on each of these widgets is available in the online documentation (which is described below).
on the Tool Bar.
An outline of a Canvas window will appear. Move this to a preferred location on the screen and place it by clicking the mouse button. The Palette and Canvas Tool window will appear around the Canvas. Note that most other windows in VisualWorks will first appear in outline form, and you will then be required to place the window on the screen in this manner. Bringing up a Canvas should produce three new windows similar to the following:
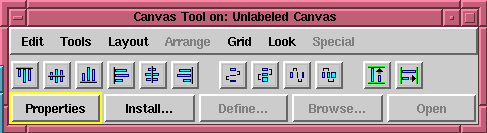
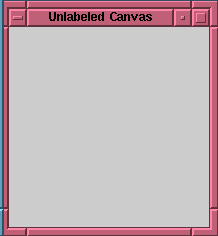
To demonstrate how these tools work, click on the action button widget on the Palette. The text "Action Button" will be displayed at the bottom of the Palette. Place an action button on the Canvas by clicking on the Canvas where the action button is to be placed. As you can see, providing a combination of widgets would enable you to create a GUI like the Palette itself. Try placing more widgets on the Canvas if you wish. Now close the Canvas Tool by selecting close from the Canvas [Operate] menu.
 . Shown below is the Online Documentation window that lists three manuals that may be used as further references. These three manuals include the following:
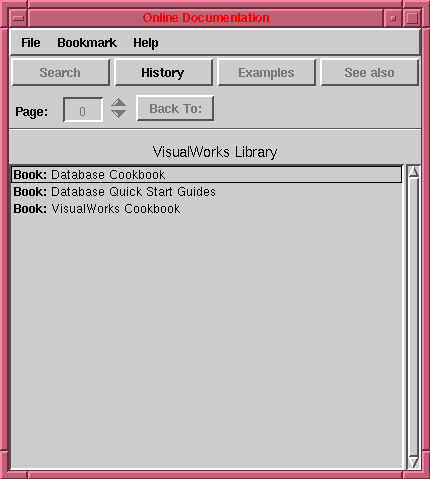
For example, suppose you needed information on how to construct a Smalltalk message. Select the VisualWorks CookBook by clicking on the book title with the mouse button. Now, select Chapter 1: Smalltalk Basics, and then select Constructing a Message. Information on your topic is now displayed in the Online Documentation window. Close the Online Documentation window.
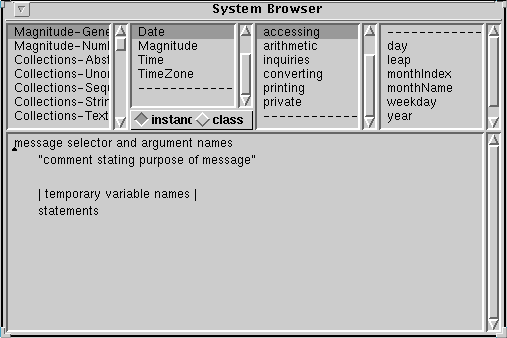
To open a System Browser, select Browse->All Classes from the VisualWorks Launcher or use the shortcut button  . Notice that a System Browser is divided into four columns across the top half of the window, and the bottom half contains a text area. These are important areas to learn. The columns (left-to-right) are the Category View, the Class View, the Protocol View, and the Method View. The text area that comprises the bottom half of the window is the Code View. These five different views will be referred to frequently in the development portion of this tutorial.
For example, select the category "Magnitude-General" and the classes associated with that category appear in the Class View. Select the Date class, and the protocols associated with that class are displayed in the Protocol View. Finally, select the accessing protocol and the methods associated with that protocol are displayed in the Method View. The System Browser should now look like the window shown below.
Notice that the Code View currently contains only a template for the code of a method. Select any method and you will see its code in the Code View. Close the System Browser by selecting close from the System Browser [Window] menu.
 of the VisualWorks Launcher.
Enter /opt/local/visual/tutorial/basic/* in the first input field, which is called the Pattern View, and Return. (Note: This is for the visual_path at
Clemson.) Select /opt/local/visual/tutorial/basic/calc.st from the file list, which is called the Names View. The File List should look like the following window.
of the VisualWorks Launcher.
Enter /opt/local/visual/tutorial/basic/* in the first input field, which is called the Pattern View, and Return. (Note: This is for the visual_path at
Clemson.) Select /opt/local/visual/tutorial/basic/calc.st from the file list, which is called the Names View. The File List should look like the following window.
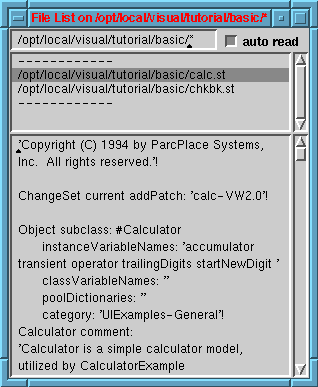
Select file in from the Names View [Operate] menu. Verify that the category UIExamples-General is now in the image by using the System Browser. Close the File List.
 . Select View->User Classes from the Resource Finder menu. Select the class you would like to start. To start the Calculator Example that we previously filed in, select the CalculatorExample class and the windowSpec resource as depicted below. (Note that the windowSpec resource is automatically selected because it is the only resource for the CalculatorExample class.) Select Start from the Resource Finder and the Calculator Example will start. When you have finished using the Calculator, close the application by selecting close from the Calculator [Window] menu. Close the Resource Finder.
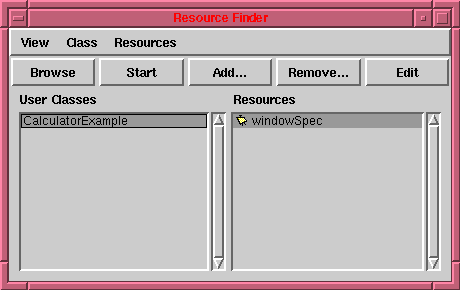
A class may have one or more "resources", which are user interfaces. To start an application, we select its class and the appropriate resource for the initial window of the application.
VisualWorks automatically creates a .cha file in the directory from which VisualWorks is started, and VisualWorks periodically records the changes made to the initial image in the .cha file. The .cha files can be useful for change management, and they can sometimes be used for error recovery (e.g., if you mistakenly delete some work that you need or fail to file out some work that you wished to save), but you may wish to delete the .cha files until you use VisualWorks in a large project.
NOTE: Any work done on the canvas will not be saved when an image is saved, unless the current canvas has been installed on a class.


