
CREATING SNOOKER BALLS
It is assumed that you have the understanding of the basic tools used in Photoshop, although this tutorial will be a step-by-step guide. By the and of this tutorial, you will be able to make the following, without the use of third party plugins, Using the standard Photoshop 5 tools:

START:
1. Click File | New
2. Select a 1cm by 1cm canvas with a resolution of 200 pixels/cm. RGB colour with white contents.
3. Press CTRL-R to toggle your rulers if they aren't on.
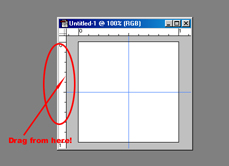
4. Now drag the ruler and position your guide at 0.5cm horizontally and vertically, by dragging the horizontal and vertical ruler as shown in the diagram below.
4. Create a new layer by selecting Layer | New | Layer. (or CTRL-SHIFT-N) (Name: Circle, Opacity 100%, & Mode: Normal. Group with previous is left unchecked).
5. You should have 2 layers in the LAYERS PALETTE. One called background and the other Circle.
6. Select the Elliptical Marquee tool from the toolbar.
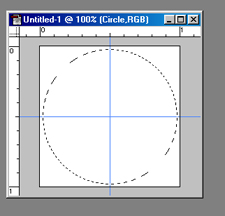
7. Holding down the keys SHIFT and ALT, position your cursor at the intersection of the 2 guides, hold down the mouse button & drag to make a circle which fills the screen.
8. Now select a really LIGHT color as your foreground colour (colour of the ball) and a DARK colour for the background (shadow of the ball). (I selected Black & White for this tutorial)
9. Double click the Radiant Gradient Tool to reveal the Radiant Gradient Options Palette. Select the "Foreground to Background" option from the dropdown menu in this palette. (Make sure that the transition is NORMAL, Opacity is 100%, Transparency & Dither is checked, whereas Reverse is unchecked).
10. Now click the edit button in this palette. You are now presented with a dialogue named "Gradient Editor". There are 2 colour bars showing the gradient between our colours. This radiant gradient tool will allow us to create a gradual blend between the colours on our (animated) balls. The tops bar consists of 2 pointers, in each extreme corner. One is labeled (F) = Foreground, and the other is labeled (B) = Background. Click once on the "F" pointer and click further under the line. A new (F) is created. Now click and drag this to position 22%. This is shown on the diagram below as item 1.
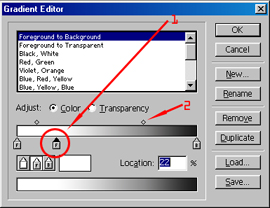
11. Now, can you see the diamonds on top of this bar? These are called Transparency Stops. You will be able to see 2 transparency stops as in the diagram above. Click & drag the transparency stop the on the right of your new (F) (This is indicated with a "2" on the diagram), and place it at position 63%. Now the second bar shows you the type of gradient we will get. Moving this Stop around can determine if we get a blend or an immediate change. Click OK to save the gradient settings.
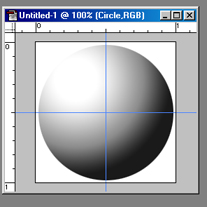
12. Now, time for action! Back to your image selection. Hold down the mouse on the upper left corner of the circle and drag to the bottom left.
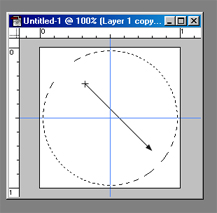
13. Do a Select | Deselect. You should have ended up with something similar to the following:
14. Now time for the numbers! Select the type tool and type an "X". Well, ok, X is not a number, but who cares, If they can have X representing a number in Maths classes, why not Photoshop classes? By the way, I hate Maths... anyway...This automatically appears on a new layer. I used "OCR A Extended". Make sure you use the background colour for this text (as in my case black). Also, make sure that your "X" is placed in the center of the ball.
15. Now select Layer | Type | Render Layer. This renders our Type layer to that we can edit it like any other layer.
16. In your layers Palette you will have 3 layers, the background, the Circle and X. The X layer should be selected. Hold down CTRL and click the Circle layer. This will re-load the circle selection, keeping the X layer active!
17. Choose Filter | Render | 3D Transform (Note: If you have too many filters, this option may have jumped to Filter | Other | 3D Transform). You should be at the 3D Transform dialogue. Here, select the Sphere tool. This is indicated by a "1", in the diagram below. (Hold your mouse on the button, to reveal its name).
18. Now take the mouse to the EXTREME UPPER LEFT corner of the grid and drag down to the EXTREME BOTTOM RIGHT of the grid. You should end up with a complete circle, which should be the same size as your selection.
19. Now click the Trackball Tool (Indicated by a "2" in the diagram), click in the middle of the circle you just created and drag it to the bottom left.
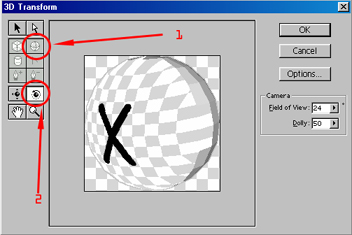
20. Click OK. You should end up with something similar to:
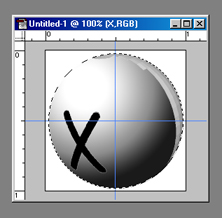
21. "What the hell is that stuff on the top right of the ball", I hear you say, fear not. As you can see the X is in a contrasting color to the "stuff", so click on Select | Deselect, to get rid of the elliptical selection. Then select the Magic Wand (making sure you are still on the X layer) and click inside the X in the image. It should be fully selected, if not check your Magic Wand Options, I had a tolerance of 2. Select Select | Inverse, to select all other area outside the X and press "Delete" on your keyboard. See? I told you it would be easy! Anyway... Do a Select | Inverse again, to make the X a selection again!
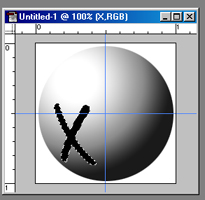
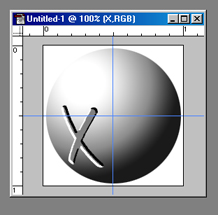
22. Time to make it a bit more groovy... Select Filter | Other | Emboss. Angle -142, Height: 6, Amount: 188. Click OK. Then select Select | Deselect. You should end up with something similar to the below image:
.
23. A little more than a snooker ball. Play around with the Hue & Saturation, and you should be able to change the colour of the ball without going through all that again!

(C) Copyright 1999. Wajid. Any literature found at this site MAY NOT be reproduced partially or in whole without my prior written consent.