
Quick Paint Version 1.39
About Quick Paint
The Limited Access of Unregistered Version
About Shareware
Term and Condition
System Requirements
Installation
Menu
Toolbar
Toolbar Behavior
Keyboard Accelerators
Command Line
Tips
Known Issues
How to Contact Us
Recently, many paint programs in the market are getting bigger and more complicated. But, we've always wanted a simple and easy-to-use paint program and that is why we developed Quick Paint. Quick Paint may not do much image processing and effects but it supports multi-buffering and powerful brushes, which are selected as a part of an image and manipulated to do rotation, sizing, outline, shading, spray, ...etc. along with simple line, bend, oval, rectangle and text drawing. It also supports multiple drawing modes. Using one or a combination of different drawing modes, allows you to draw shiny or Mandelbrot style objects, or achieve similar effects using airbrushes. We believe that Quick Paint will satisfy things for people who really want to paint.
Quick Paint is a "Shareware" program. This means that you are free to use the software free of charge for evaluation purposes. If you decide to keep this product, then you must register to purchase a license ID from us for a small fee. The unregistered version of Quick Paint contains all of the functionality of the registered version. Please refer to "regist.txt" for how to register.
The shareware concept is based upon users sharing the development cost, and also eliminating package, printing manuals and will save on the overall cost of the product. If you like Quick Paint and decide to keep it, then you must register your copy with us for a small fee. Don't forget that registering this and other shareware programs allows the authors to continue design and development on those and other new products.
By installing Quick Paint on your computer you agree to the following terms and conditions:
OS: Microsoft Windows 95 (English, Japanese) and Windows NT 4.0 (Japanese)
have been tested.
Graphics: Minimum 256 color, full color is recommended.
Memory: We tested with 16M byte system.
HD for installation: 700K byte
There is no install program for this version. Make a directory, like "QPaint" and extract all files in the zip file. "QPaint.exe" is an executable file. All files have to be located in the same directory.
File Menu

        New...                    Creates a new, empty edit window

        Open...                   Opens an existing file for editing (Known Issues)

        Save                      Saves the image to the file you're editing (Known Issues)

        Save As...                Saves the image to a specified file (Known Issues)

        Exit                      End the program

Brush Menu

        Double Width              Double the width of the brush

        Double Height             Double the height of the brush

        Half Width                Half the width of the brush

        Half Height               Half the height of the brush

        Increment Width           Increment 1 pixel of the width of the brush

        Increment Height          Increment 1 pixel of the height of the brush

        Change Handle Position    Change the handle of the brush to top right, bottom right,
                                  top left, bottom left

        Swap X                    Flip the brush right to left

        Swap Y                    Flip the brush top to bottom

        Rotate Right              Rotate the brush to right

        Rotate Left               Rotate the brush to left

        Rotate Right 22.5         Rotate the brush 22.5 degrees right

        Rotate Left 22.5          Rotate the brush 22.5 degrees left

        Select 1 of the following 6 items, from Shade 1 to Multi Color
        (Click here for examples, here for further explanation)

        Shade 1                   Add shading to the brush from top to bottom

        Shade 2                   Add shading to the brush from left to right

        Shade 3                   Add shading to the brush from top right to bottom left

        Shade 4                   Add shading to the brush from top left to bottom right

        Solid Color               Make the brush a single color

        Multi Color               Make the brush multi color (The original brush)

        Load...                   Open an existing brush file and load to the current brush

        Save As...                Save the brush to a specified brush file

Draw Modes Menu

        Select 1 of the following 9 items, from Normal Drawing to Blending...
        (Click here for examples; Tips for 256 color mode)

        Normal Drawing            Draw normally (Default)

        AND                       Draw with the color as a result of
                                  the brush color AND the background color

        OR                        Draw with the color as a result of
                                  the brush color OR the background color

        XOR                       Draw with the color as a result of
                                  the brush color XOR the background color

        ADD (Wrap Around to 0)    Draw with the color as a result of
                                  adding the brush color to the background color
                                  (Once the total gets 255 it wraps around to 0)

        SUB (Wrap Around to 255)  Draw with the color as a result of
                                  subtracting the brush color from the background color
                                  (Once the total gets 0 it wraps around to 255)

        ADD (Up to 255)           Draw with the color as a result of
                                  adding the brush color to the background color
                                  (The maximum value is 255)

        SUB (Down to 0)           Draw with the color as a result of
                                  subtracting the brush color from the background color
                                  (The minimum value is 0)

        Blending...               Draw with the color as a result of
                                  blending the brush color and the background color
                                  The dialog will ask the ratio of the brush color

        Select 1 of the following 2 items (These are not effective when Normal Drawing is selected)
        (Click here for examples; Tips for 256 color mode)

        Simple Drawing            Perform the calculation on single stroke base (Default)
                                  Single stroke means actions taken while the mouse button is down

        Burst Drawing             Perform the calculation on every movement
                                  It can only be used with Non-Continuous Drawing Mode

Mask Menu

        Select 1 of the following 5 items, from No Mask to Image Buffer 3

        No Mask                   No mask is used (Default)

        Image Buffer 0            Create a mask from entire image buffer 0

        Image Buffer 1            Create a mask from entire image buffer 1

        Image Buffer 2            Create a mask from entire image buffer 2

        Image Buffer 3            Create a mask from entire image buffer 3

        Select 1 of the following 2 items (These are not effective when No Mask is selected)

        Mask All Except the Transparent Color
                                  Once a mask is created from an entire image buffer,
                                  drawing in another image buffer is enabled in only
                                  the area where the current image transparent color is
                                  (Default)

        Mask the Transparent Color Only
                                  Once a mask is created from an entire image buffer,
                                  drawing in another image buffer is enabled in the entire
                                  area, except in the current image transparent color

Image Menu

        Clear                     Clear the edit window

        Undo                      Undo the last edit action (Known Issues)

        Redo                      Reverses the previous undo

        Image Buffer 0            Switch to image buffer 0

        Image Buffer 1            Switch to image buffer 1

        Image Buffer 2            Switch to image buffer 2

        Image Buffer 3            Switch to image buffer 3

        Next Image                Switch to the next image buffer

        Prev Image                Switch to the previous image buffer

        Copy Image Buffer         Copy an image buffer to another image buffer

        Swap Image Buffer         Swap 2 image buffers

        Image Size...             Change the image size

        256 Color Mode            Switch to the 8 bit color (256 color) mode (Known Issues)

        Full Color Mode           Switch to the 24 bit color (full color) mode (Known Issues)

        Grid Size...              Set the grid size

        Grid Size Increase        Increment the grid size

        Grid Size Decrease        Decrement the grid size

        Zoom In                   Zoom in on image

        Zoom Out                  Zoom out on image

        Grid Ruler Size...        Set the grid ruler size in pixels, when zoom is greater than 1:1
                                  (Set '0' to remove the grid ruler view)

Colors Menu

        Copy Color Palette...     Select a range from color palette number and copy to
                                  the new range

        Swap Color Palette...     Select a range from color palette number and swap them

	Shade Color Palette...    Compliment the difference of 2 color palette number

        Color Palette 0           Switch to color buffer 0

        Color Palette 1           Switch to color buffer 1

        Color Palette 2           Switch to color buffer 2

        Color Palette 3           Switch to color buffer 3

        Load Palette...           Open an existing palette file and load to the current image

        Save Palette              Save the palette to the file you opened

        Save As Palette...        Save the palette to a specified palette file

Extra Menu

        Font...                   Select font for text input

Help Menu

        Keyboard Accelerators...  Display the Quick Paint Keyboard Accelerators help screen

        Unregister...             Clean up Quick Paint registry entry

        About Quick Paint...      Display the version and the copyrights of Quick Paint
Besides controlling Quick Paint from the keyboard, or by using the menu,
you can also use the toolbar to access the most common operations simply.
The toolbar is a collection of colored push buttons and it appears at the
left of the screen below the menu. We will explain individual tool bar
buttons here. Quick Paint's basic drawing method is with a brush.
Except for a few occasion, Quick Paint draws as follows:
1. Make a brush
2. Move the brush where you want to draw
3. Click left mouse button to draw using the 1st (left mouse button) color
or click right mouse button to draw using the 2nd (right mouse button) color.
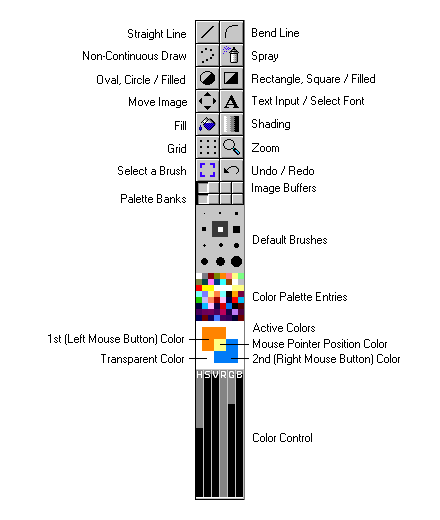
Switch to straight line drawing mode. You can draw a straight line by clicking left mouse button, moving to desired place and clicking mouse button again. ESC key to switch back to standard brush mode.
Switch to bend line drawing mode. You can draw a bend line to click 3 positions by mouse. ESC key to switch back to standard brush mode.
Switch to broken (non-continuous) drawing mode. When you draw using brush, it draws smoothly (continuously). When you select this button, it draws non-continuously.
The spray simulates painting with an airbrush or spray can. You can also use the current brush as a spray pattern.
Draw a oval, circle by clicking left top part of the button, or draw
a filled oval, circle by clicking right bottom part of this button. After
click this button, press and hold left mouse button at the start position
and drag the cursor to the opposite corner of the shape and release.
After a brush is created, move it to the position where you want to draw
and click left mouse button to draw using the 1st (left mouse button) color
or click right mouse button to draw using the 2nd (right mouse button) color.
Draw a rectangle, square to click left top part of the button, or draw
a filled rectangle, square by clicking right bottom part of this button.
After click this button, press and hold left mouse button at the start
position and drag the cursor to the opposite corner of the shape and release.
After a brush is created, move it to the position where you want to draw
and click left mouse button to draw using the 1st (left mouse button) color
or click right mouse button to draw using the 2nd (right mouse button) color.
Switch to move image mode. After click this button, press and hold left mouse button to move the image display position. Also, you can scroll the image using easier by using keyboard accelerators. Press ARROW key to scroll the image area in 10 pixel increments, the value which is set in Grid Ruler Size or 1 pixel increment while pressing the SHIFT key.
Select this button with left mouse button to use text input mode and right button to select fonts. In text input mode, press mouse button at the position you want to start drawing text and type characters from keyboard. To finish text input, push return key.
Fill closed area using the current brush colors. After selecting this button, move the cursor to the area you want to fill and click left mouse button to fill using the 1st (left mouse button) color or click right mouse button to fill using the 2nd (right mouse button) color.
Put shade to the brush, from top to bottom, from left to right, from top right to bottom left, from top left to bottom right. Keep clicking this button to change the type of shading. The color of shading are created between the 1st (left mouse button) color and the 2nd (right mouse button) color. In 256 color mode, they are created in the order of the palette entries between 2 colors. In full color mode, they are simply calculated between 2 colors. You may want to Shade Color Palette first, to get effective result in 256 color mode. (Click here for examples)
Change grid size from 1 pixel to 200 pixel. If the grid size is 4, the mouse can move every other 4 pixel. Click this button with left button to increase 1 pixel. Click this button with right button to decrease 1 pixel. The default grid size is 1 (pixel).
Select this button with left mouse button to zoom in and right mouse button to zoom out. Many functions can be used in zoom mode.
Create a brush by selecting part of an image. After click this button, press and hold left mouse button at the start position and then drag the cursor to the part you want to select and release. You will see a new brush on the screen. Also, these operation can be done by using keyboard accelerators. You can select a brush to do the same operation while pressing the SHIFT key and you can change the size of the brush for the same operation while pressing the CTRL key.
The undo reverses the last edit to the current image. The redo reverses the previous undo action. (Known Issues)
The 4 image buffers are located on the top 4 buttons of 8 buttons on the toolbar. From left to right represents image buffer 0, 1, 2 and 3. Each buffer may be used for a object, a background, ...etc. and can be switched instantly. Individual buffers can have independent color palettes, but all image buffer must have the same width and height, so if one image buffer size is changed, all other buffer sizes will be changed, too. (Known Issues)
The 4 palette banks are located on the bottom 4 buttons of 8 buttons on the toolbar. From left to right represents palette bank 0, 1, 2 and 3. Only 8 X 8 = 64 colors are displayed at Color Palette Entries, but a total 64 X 4 = 256 colors can be used by switching banks. Buffer 0 contains palette entries from 0 to 63, buffer 1 from 64 to 127, buffer 2 from 128 to 191, buffer 3 from 192 to 255.
There are 6 square and 6 round brushes as defaults. Select one from the 12 brushes for drawing.
Only 8 X 8 = 64 color palette entries are displayed but a total 64 X 4 = 256 colors can be used by switching palette banks. Click a small entry box with left button to set the 1st (left mouse button) color, click a small box with right button to set the 2nd (right mouse button) color, or press 'Ctrl+P' on a small entry box to set the transparent color. Also, press 'P' to set the 1st (left mouse button) color, 'Shift+P' to set the 2nd (right mouse button) color, or 'Ctrl+P' to set the transparent color, on the editing screen. When these colors are set, you should see the change on active color panel on the toolbar.
There are three boxes on this panel. The top left shows the 1st (left mouse
button) color and the bottom right shows the 2nd (right mouse button) color
and the center one shows current mouse pointer color. The outside area
shows the transparent color. Use Color Palette
Entries or keyboard accelerators
to change these colors. Click each area with left mouse button to edit
each colors at Color Control.
Use left mouse button to draw using the 1st (left mouse button) color or use
right mouse button to draw using the 2nd (right mouse button) color.
There are six sliders at the bottom of the toolbar for color control. From left to right represents H, S, V, R, G, B. You can change the last selected color at Active Colors, Color Palette Entries or keyboard accelerators.
Since Quick Paint's basic drawing method is with a brush, it works somewhat differently than other paint programs. Here we will explain, especially about toolbar behavior.
When you a click the button, it will be selected (reversed) and when the process is finished, it will be deselected. Oval, Rectangle, Select a Brush work in this manner, since these needs an operation to select the area. This behavior is different from other paint programs. These functions work in same way when they are executed from keyboard accelerators. Also, Text Input works similarly, since text input mode will be canceled when return key is pushed.
Brush Shading, Zoom, Grid, Undo / Redo works as trigger, but they don't need an operation to select the area. So, when you click the button, it will be immediately executed and the button will be de-selected. These functions work in same way when they are executed from keyboard accelerators.
Straight Line, Bend Line, Spray, Move Image, Fill works as drawing mode. They will not be canceled until other drawing mode is selected or the same button is re-selected. These functions work in same way when they are executed from keyboard shortcut, except fill. Fill which executed from keyboard shortcut, works as Immediate Execution Type.
Non-Continuous Drawing Mode can be on or off independently from other functions. It works in same way when it is executed from keyboard accelerators.
You can use Keyboard Accelerators to perform many of the Quick Paint
operations (except for text input mode).
The symbol "^" means "Ctrl" key and "_" means
"Shift" key.
        F1              Display the Quick Paint keyboard accelerators help screen

        ESC             Exit the keyboard accelerators help screen or
                        cancel the current mode

        ^x              Clear the edit window

        ^z              Undo the last edit action (Known Issues)

        ^y              Reverses the previous undo

        TAB             Switch to the next image buffer

        _TAB            Switch to the previous image buffer

        ^n              Creates a new, empty edit window

        ^o              Opens an existing file for editing (Known Issues)

        ^s              Saves the image to the file you're editing (Known Issues)

        ^a              Saves the image to a specified file (Known Issues)

        s               Toggle smooth (continuous) drawing and broken (non-continuous) drawing

        l               Toggle straight line drawing mode

        u               Toggle bend line drawing mode

        w               Double the width of the brush

        h               Double the height of the brush

        _w              Half the width of the brush

        _h              Half the height of the brush

        ^w              Increment 1 pixel of the width of the brush

        ^h              Increment 1 pixel of the height of the brush

        e               Change the handle of the brush to top right, bottom right,
                        top left, bottom left

        x               Flip the brush right to left

        y               Flip the brush top to bottom

        p               Set the current cursor position color to the left button color

        _p              Set the current cursor position color to the right button color

        ^p              Set the current cursor position color to the transparent color

        _Left Button    Select a new brush

        ^Left Button    Resize the brush

        [               Rotate the brush to left

        ]               Rotate the brush to right

        {               Rotate the brush to 22.5 degrees left

        }               Rotate the brush to 22.5 degrees right

        =               Reset the rotation

        r               Create a rectangle, square brush

        b               Create a filled rectangle, square brush

        c               Create a oval, circle brush

        d               Create a filled oval, circle brush

        o               Add outline using the current cursor position color

        g               Increment the grid size

        _g              Decrement the grid size

        q               Zoom in on image

        _q              Zoom out on image

        v               Toggle move image mode

	Arrow Keys	Scroll the image area in 10 pixel increments or
                        1 pixel increment while pressing the SHIFT key

        t               Toggle text input mode

        ^f              Select font for text input

        1               Add shading to the brush from top to bottom

        2               Add shading to the brush from left to right

        3               Add shading to the brush from top right to bottom left

        4               Add shading to the brush from top left to bottom right

        5               Make the brush a single color

        6               Make the brush multi color

        @               Open an existing brush file and load to the current brush

        !               Save the brush to a specified brush file

        8               Switch to the 8 bit color (256 color) mode

        0               Switch to the 24 bit color (full color) mode

        j               Toggle spray mode

        f               Fill closed area using the current brush (left button) color
QPaint allows you to open one bmp file from the command line:
Qpaint [Bmp File Name]
For example, the command line:
QPaint Image.bmp
would start the Quick Paint, and open the file Image.bmp
Windows reserves 20 colors for the system in 256 color mode. If an image uses more than 236 color palette, the color palette entries exceeding 236 colors are mapped to other color palettes and the image will not be displayed in the exact colors. To avoid this, use less than 236 colors and assign black to all 20 color palette entries or assign Windows system color to 20 color palette entries.
In other than Normal Drawing , the calculation in full color mode is performed by each R,G,B value versus the calculation in 256 color mode, which is performed by the color palette number. So, you may want to Shade Color Palette first, to get effective result in 256 color mode. (Click here for examples.)
The program loads color palette data from 'default.pal' in the same directory where the program is located. If you want to change the default color palette, change the color palette inside the program and save to 'default.pal' using Save Palette, or simply edit the file with text editor.
If you have any comments, questions or reporting bugs, ...etc., must be directed to:
Email: qpaint_support@just4u.net
Fax: 760-433-5815 (U.S.A.)
(Please make it to "ATTN: K. Kuwata")
Also, you can get the information about the newest version or download
of Quick Paint at
http://www.just4u.net/qpaint/
http://www2s.biglobe.ne.jp/~kozoo/sw/qpaint/.