Aetiket Label Printer Optimizing the Print Layout
|
|
Caution!: FileMaker Pro saves all changes as they are made to files. Be sure to make a backup copy of Aetiket.fp3 before changing the default font or print layouts. You are permitted to change the Print and Input layouts as described below. These layouts are clearly marked "Print" and "Input". Changing other layouts may cause Aetiket Label Printer to fail, and unauthorized changes will invalidate your license. If you would like to see a feature or Label sheet implemented, please feel free to write me, as I would like to pass on the benefits to all of my users. |
The below discussion only applies to users who have registered Label Printer. If you have not done so already, you may register directly online. After I receive your registration, I will send you a registration code enabling you to edit the default font and print layouts.
Printers are finicky...
Just because the layout says that the left margin is 3.16" wide doesn't mean that the margin will be printed from 3.16". Just don't blame me! (Simply look under your printer for the Made in... tag) What you have to know is that the only way to get a printer to print consistently is with patient trial-and-error optimizing of the print layouts. The right attitude is: "I'll believe it when I see it!". I have spent many hours on your behalf making Aetiket Label Printer work with most printers, but have come to the conclusion that the best way to make Label Printer work with all printers is to let my users tie their own shoes. Hence the new "Optimize Print Layouts" feature. Read on. The necessary information is here: let's roll up our sleeves!
Editing the label and print layouts requires some knowledge of FileMaker Pro layouts. This is not difficult, but if you are not familiar with editing a layout, I draw your attention to and encourage you to read the FileMaker Pro User's Guide:
"Chapter 3: Laying out and arranging information."
Printing tips for achieving consistent printing results:
- Use the same printer each time.
- Use the same page setting.
- Use the maximum page format setting (avoid A4 Small / US Letter Small).
- Test the output on a blank piece of paper before printing on expensive labels sheets.
- No printers I know of print right to the edge of the paper. Don't try.
Printers interact with FileMaker Pro in strange and undocumented ways! The best way to figure it out is through trial and error. The following is less of a tutorial than a demonstration of the tools needed to optimize the layouts. Remember to take down any dimensions before you begin any modifications: you may want to go back to where you started!
|
Layout Mode To optimize the print layouts, you must first enter the layout mode by selecting Layout from the Mode pop-up menu. |
 |
|
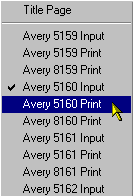
Print Layout Select the appropriate Print Layout from the Layout pop-up menu. |
 |
|
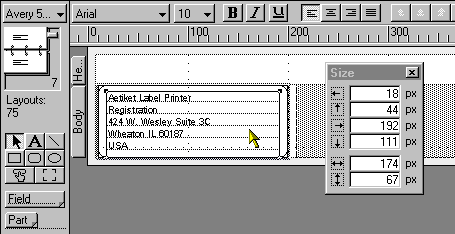
The print layout as seen in layout mode should look something like the illustration below: |
|
|
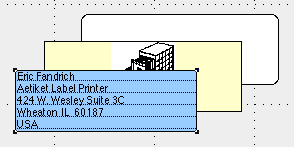
There are two parts to the layout: the Header and Body. The parts are surrounded by a light grey margin which shows the margin as defined for the layout. There are three objects, comprising two fields "Label" and "Label Graphic" superimposed on a label placement graphic element. There is also a column divider shown with a dotted line which separates the label columns. The divider also has a dimension and can be increased or decreased by grabbing it with the mouse. Print Objects The three print objects are arranged in the following order, from top to bottom: Label (a text field) These are shown in blue, yellow and white in the illustration below. |
|
 |
|
|
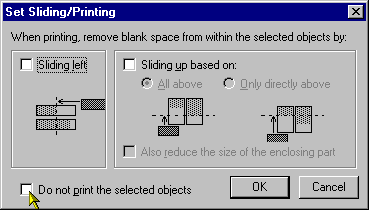
The label placement graphic normally does not print, but it is useful to turn on printing the graphic while optimizing the labels. This makes the spacing far easier to see. The printing can be turned on through the Set Sliding/Printing dialog box (found in the Format Menu). First select the placement graphic, and then open the dialog box from the menu. |
|
 |
|
|
Units of Measurement The smallest unit of measure available in FileMaker Pro is a pixel. The units of measurement can be changed between: inches, centimeters, and pixels with the floating Size palette as shown. To toggle between the sizes, simply click on the letters "px", "in" or "cm". I recommend working with pixels as they are the smallest common denominator in FileMaker Pro. When you click on a particular layout element, such as the Body Part tab or the label field, the corresponding sizes will be displayed in the Size palette. It is the most accurate to make changes to part sizes with the Size palette, as you have accuracy down to a single pixel. |
|
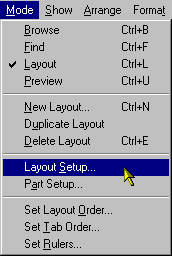
 Margins The margins can be changed in FileMaker Pro by selecting the "Layout Setup..." from the Mode menu. If you get a warning beep from FileMaker Pro when you set the margins smaller than those of your printer driver, relax. Your text may be clipped, but almost all label sheets are designed to require greater printing areas than most printers support. |
 |
|
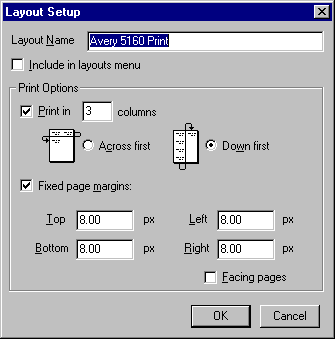
In the Layout Setup Dialog box below, you can see that the margins have been arbitrarily set to 8 pixels for all sides. In general, this will not be the case, and the margins may have to be changed for each label type. Some labels, such as the Dorab labels use no margin at all. |
|
 |
|
|
Optimizing Optimizing the print layout consists of nudging a pixel here, taking a couple pixels away there to the various parts, margins, and printing objects in the layout. When you make your first test prints, hopefully it will be relatively obvious what needs to be adjusted. In some cases, the size of the printing fields themselves may need to be changed. Experiment, and see what works best for you. |
|
Page last updated May 13, 1998
Copyright © 1997-1998 by Eric Fandrich All Rights Reserved.