ArtRage 1.1 Manual.
Welcome to ArtRage 1.1. In this manual you will find information on what the controls in the product do, and how to use the paint tools. Any time you need to see this manual you can open it by pressing H inside ArtRage.
ArtRage is a free painting package intended to give everyone a chance to play around with realistic paint tools on their computer. ArtRage was designed and developed in house at Ambient Design. For more information on the product, please visit http://www.ambientdesign.com/artrage.html, where you will find samples of things people have done with the product, and information that may help if you are having problems running it.
If you wish to make a donation to Ambient for the development of ArtRage, or future developments on the package, you can find a PayPal donation link inside the About Box, or at the site above.
Thanks for downloading ArtRage, we hope you enjoy it!
Index.
1. Getting Started.
System Requirements.
Graphics Tablet.
2. Basic Operation.
Launching The Application.
You can also launch the application by double clicking one of your Painting project files (.ptg files), or dragging one on the ArtRage icon.
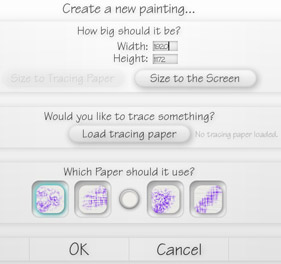
Creating A New Painting.
The top area of the dialog allows you to set the width and height of the painting. This is limited to the area of screen you have available.
The second area of the dialog allows you to load a tracing paper for the painting. This paper will be available when the painting is created, and sized to fit the canvas. If you want to make sure the canvas is the same size as the tracing paper, use the ëSize to Tracing Paperí button in the top area of the dialog.
The third area of the dialog allows you to select which paper type to use for painting. The paper type defines how the paint strokes look as you apply them, and can be changed later if you wish. By default, the Fine Paper type is selected, but you can also select (in order left to right), Fine Canvas, Coarse Paper, or Coarse Canvas. Single click to select a paper to use.
In the middle of these paper types is a circular colour thumbnail that allows you to select a colour for the canvas you wish to paint to. Click and drag this colour thumbnail and a set of colour pickers will appear, allowing you to select a colour.
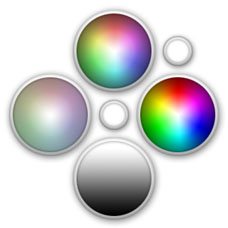
The different circles in the colour picker represent the following things:
If you change your mind and do not wish to select a colour, point at the central circle again and release the mouse button.
When you have selected settings for the new painting, click OK to create it, or Cancel if you have changed your mind.
Basic Painting.
The results of painting vary depending on the tool youíre using. Some tools place matter on the canvas that can later be smeared while others simply apply colour, for example. Hereís a list of the tools and how they behave:
Painting An Image From Outside ArtRage.
Note for more advanced users that you can load a PNG that contains an Alpha Channel, and paint will only be added to the canvas where there is something in that channel.
Tip: Try loading the same image in to the Tracing Paper, that way you can repaint parts of it and blend them in with the original!
Choosing Colours.
Hiding The Controls.
At any time, you can Control Click on the canvas, or press Enter to hide all of the tools or return them to visible state if they are already hidden.
While you are painting, if your brush goes within the region of one of the panels, that panel will vanish from sight to clear the canvas for painting. It will reappear when you release the mouse button or lift the pen from the tablet.
You can also press the Hide buttons on any of the panels to collapse the panel down. On the Brush picker panel, the Hide button is the grey circle at the bottom left. On the Colour Picker panel the Hide button is the coloured circle at the bottom right. For the two menu bars at the top, the Hide buttons are the blue grips at the end of the bar. More details are found below.
Zooming.
If you have created an image that is bigger than the screen, you will need to be able to zoom in and out so that you can see all of it. You will also need to be able to move it round to get to bits you canít currently see. Zooming and dragging in ArtRage is done using the tools in the Menu Bar (see below). Dragging the canvas around can also be done using Control Click. If you Control Click, hold the button and drag, the canvas will be moved around.
3. Files.
Loading and saving paintings is done from the File Menu in the Menu Bar.
4. The Name Bar.
The Name Bar sits at the top left of the applicationís window. It is collapsed by default, but can be opened by clicking the blue grip. This bar extends to display the name of the current painting and has no other operational use.

5. The Menu Bar.
The Menu Bar sits at the top right of the applicationís window. It is open by default, but can be closed by clicking the blue grip. This bar displays the menus, and a number of controls for Undo/Redo, sizing your window, and zooming in and out of your painting.

The File Menu.
The Edit Menu.
The Tools Menu.
The Help Menu.
Zoom Controls.
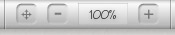
From left to right, these controls are:
Buttons.

The buttons along the right of the bar are (in order, left to right):
6. The Colour Picker.
The Colour Picker sits at the bottom right of the screen and provides controls for selecting colours and managing how colours behave.
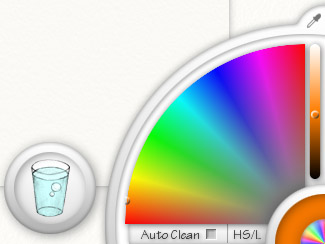
The colour picker is split in to a number of important sections. The bottom right circle indicates the currently selected colour. The bar and colour arc above give control over the three components of colour. The HS/L indicator in the image indicates the colour mode weíre displaying (in this case, Hue and Saturation in the arc, Luminance in the bar). The Auto Clean button indicates if a brush that dirties itself automatically cleans itself when you mouse up. The eyedropper icon lets you select colours from the canvas. The glass to the left is used to clean the brush head if it is dirty.
Colour Wheel.
You may find that some colour modes have a better range of colours for the painting youíre doing.
To use the components of the wheel, just click and drag inside them. As you drag, the current colour indicator will update to display the colour you have selected.
Eyedropper Button.
Quick Tip: You can also sample colours by holding down the Option key and clicking or click/dragging in the canvas.
Hide Button.
Auto Clean.
If you want to manually clean the brush head, click the glass of water next to the colour picker.
Note that if you are using a tool that does not get dirty, or have Auto Clean checked, the glass of water slides off the bottom of the screen out of view.
7. The Brush Picker.
The Brush Picker sits at the bottom left of the screen and provides controls for selecting which tool to use.
The Brush Picker is used to select which tool to use, set the size and pressure range of that tool, and in some cases set a style for it. To select a tool, click its icon in the Picker.
The tools are, in clockwise order from the outer circle:
Oil paint sits right at the corner next to the grey Hide button.
Hide Button.
Tool Modes.
Clicking on this button changes the mode. The modes are:
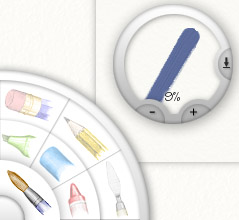
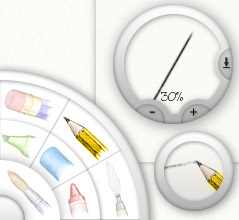
Size and Pressure.

To change the size of your brush, you can click on the + or - buttons and add/subtract 1% from the size. If you prefer, you can click and drag inside the brush size preview, which makes faster changes to the size.
To adjust the pressure value of a tool, you need to use the Pressure button, which is at the right hand side of the brush size panel, and looks like a down pointing arrow. Clicking this tool brings up the Pressure Slider.

You can click and drag inside the slider grip to change the pressure adjustment of the tool. When the grip is in the centre of the slider, no pressure adjustment is applied. Move it left to reduce the pressure of the tool, move it right to increase the pressure of the tool. When you let go of the grip, the slider closes. If you decide you do not wish to adjust pressure, just hit Escape or click outside the slider to dismiss it.
Quick Tip: You can quickly adjust the pressure clicking, holding, and dragging on the pressure button rather than just clicking it to bring up the slider.
8. The Trace Picker.
The Trace Picker is only partially visible by default, at the bottom centre of the screen. It contains controls for loading and manipulating Tracing Paper.

Pointing at the Trace Picker causes it to slide on to the screen.

When the Picker is visible like this, you can click it to load a tracing paper.
Tracing Paper Mode.
When you click to load a tracing paper, a file dialog appears and allows you to select an image to load for tracing. Once you have done that, a small preview of the image appears in the Trace Picker.

Clicking in the Trace Picker again opens up a menu containing Trace Mode options:
When there is a tracing paper loaded, you can press the Spacebar or Command + t at any time to show or hide it.
Tips On Tracing.
Whether the colours are chosen automatically is important. If you wish, you can load a trace image, turn off ëChoose Colours Automaticallyí, and sketch in the outline of the areas you wish to paint using a black pencil. Then you can turn the colour selection back on and ArtRage will choose the colour from the trace image below.
You can load different tracing images without losing anything you have already painted, which lets you blend images together.
9. The Canvas Picker.
When you choose the ëSelect Canvasí item in the Tools Menu, a dialog appears that allows you to select which canvas type you wish to paint on to.
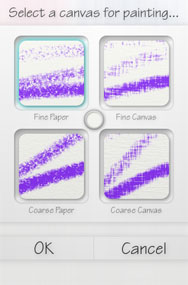
This dialog contains four thumbnails relating to the type of canvas that can be selected. You can either click a thumbnail to select the canvas type, then click OK, or double click the thumbnail you wish.
Note that when you change the type of canvas, paint strokes that you have already applied will not be adjusted. So, if you have applied a number of light chalk strokes, picking up the peaks in your old canvas, the new canvas will not change the look of your old strokes.
In the middle of these paper types is a circular colour thumbnail that allows you to select a colour for the canvas you wish to paint to. Click and drag this colour thumbnail and a set of colour pickers will appear, allowing you to select a colour.
The different circles in the colour picker represent the following things:
If you change your mind and do not wish to select a colour, point at the central circle again and release the mouse button.
ArtRage 1.1, © Ambient Design Ltd. 2005. ArtRage makes use of the Freetype text rendering engine.