

The term dynamics, as used in 3DS MAX, refers to a system of controls that generate keys to produce animation that simulates real-world physics. For example, using standard keyframing techniques to animate a bouncing ball, you create keys that move the ball down to the floor, create keys to squash the ball, create more keys to move the ball back up, and so on. Using a dynamics system, you assign physical properties to the ball and the floor (friction, amount of bounce, etc.), specify which object will collide against which other object (the ball with the floor), place an effect, such as gravity, in the scene, and then let the dynamics system calculate a solution over a range of frames. The result is a number of keys that produce an animation in which the ball drops, due to the gravity effect, collides with the floor and reacts naturally based on its surface characteristics.
Surface dynamics properties: These specify the characteristics of an object’s surfaceits bounciness, friction, and so on. A rubber ball, for example, bounces high and has a “sticky” surface, while a bowling ball doesn’t bounce as high (depending on the surface it hits) and has a more slippery surface.
Effects: Effects are special space-warp objects that emulate natural phenomena, such as wind or gravity. In a dynamics simulation, you must place gravity in the scene if you want the objects in your simulation to fall.
Collisions: Collisions are the interactions between two objects that touch during the simulation. The reaction to a collision depends on such things as the velocity of the two objects and their surface dynamic properties. Because any dynamics simulation is processor-intensive, you must specify each object that might collide in the simulation. For example, when bouncing a ball, both the floor and the ball are assigned collisions.
In 3DS MAX, the dynamics system is accessed in the following areas of the interface:
This section outlines all of the surface dynamics controls in the Utilities Panel Dynamics Parameters. The sub-dialogs that some of these controls display are separately cross-referenced because in many cases the dialogs are far more detailed than the surface controls of the command panel.
Bouncing a Ball (Example)

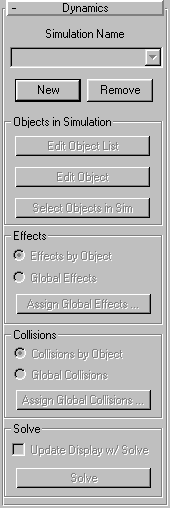
Simulation Name: This is the label for the pop-up list displaying the name of the current simulation. You can create any number of simulations in your scene. Each must have a unique name and is stored in the .max file. As an example, you might have a simulation named Bouncing Ball that bounces a ball down a flight of stairs, while another simulation, named Paper Airplane flies a paper airplane across the room.
Combo list: Displays the name of the current dynamics simulation, and lists all simulations in the scene. All of the settings in the remaining controls in the command panel are specific to the displayed simulation.
New: Click to create a new simulation. The name of the previous simulation (if there is one) is numerically incremented. You can edit the name in this field to rename any existing simulation.
Remove: Click to remove the current simulation displayed in the pop-up list. Dynamic simulations can use a lot of memory. Removing old or unused simulations reduces the size of your .max files. When you remove a simulation, all of the timings and other settings are deleted. However, any keys that were generated by the simulation remain.
The buttons in this area let you add and remove objects from the simulation, and edit the various properties of the objects that are included in the simulation.
Edit Object List: Displays the Edit Object List dialog, which lets you specify which of all objects in the scene are to be included in the simulation.
Edit Object: Displays the Edit Object dialog. This is the main “control room” of the dynamic utility.
Select Objects in Sim: Click this to add all objects in the simulation to the current selection set. In addition to being generally for selecting the participating objects, a specific use for this is to bring just those selected objects into TrackView for further manipulation, keyframe reduction, and so on.
The options in this area let you specify which effects are included in the dynamics calculation.
Effects by Object: When this option is chosen, only those effects that are assigned to specific objects through the Assign Object Effects button in the Edit Object dialog are considered in the calculation.
Global Effects: When chosen, only those effects included in the Assign Global Effects dialog (accessed by clicking the button of the same name) are included in the calculation.
Assign Global Effects: Displays the Assign Global Effects dialog.
The options in this area let you specify which collisions are included in the dynamics calculation.
Collisions by Object: When chosen, the collisions assigned to specific objects through the Assign Object Collisions button in the Edit Object dialog are included in the calculation.
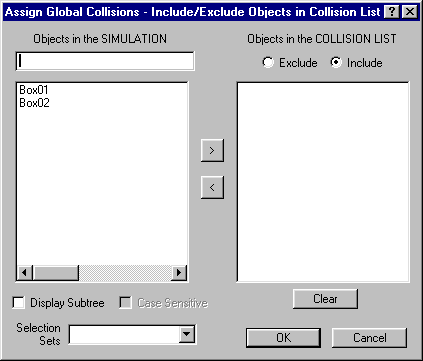
Global Collisions: When chosen, the collisions assigned in the Assign Global Collisions dialog (accessed by clicking the button of the same name) are included in the calculation.
Assign Global Collisions: Displays the Assign Global Collisions dialog.

Update Display w/ Solve: When this is checked, each frame of the solution is displayed in the wireframe viewports during the calculations. Note that this slows down the calculation process.
Solve: Click to calculate the dynamics solution, generating keys over the range of frames specified in the Timing area. A progress bar appears in the status/prompt area. You can press ESC if you want to cancel the calculation.