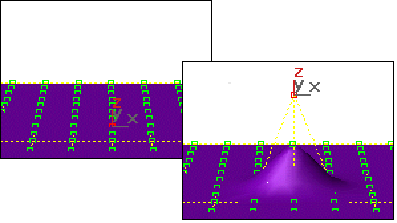


This topic describes the controls for point and CV sub-objects. A rollout labeled CV or Point contains the CV or point sub-object controls for NURBS curve and surface objects.
The selection controls and other common controls are described in Common Sub-Object Controls. There are differences between the controls for CVs and points. These differences are described as they arise in the sections that follow.
Caution: When you move CV sub-objects, 3DS MAX must calculate the effect over a region of the surface. Although the calculations are optimized, this is a more involved process than simply moving vertices in an editable mesh. Because of this, if you manipulate large numbers of a NURBS surface's CVs -- by transforming, animating, applying modifiers, and so on -- you will notice a drop in interactive performance.
Each CV has a weight, which you can use to adjust the CV’s effect on the curve or surface. Increasing the weight pulls the surface towards the CV. Decreasing the weight relaxes the surface away from the CV.
For CV Curves and Surfaces (but not Point Curves or Surfaces), you adjust the rational weights of the sub-object selection by using the Weight field and spinner.
Increasing weight is a way to harden a curve -- that is, to sharpen its curvature at a particular location.
By default, the weight is 1.0 for the CVs of NURBS objects you create in the Create command panel or the NURBS sub-object creation rollouts. The weight of CVs in 3DS MAX geometry that you convert to NURBS can vary, depending on the object’s original shape.
You can change the Weight when multiple CVs are selected. Using the Weight field or spinner while multiple CVs are selected assigns all of them the value you choose. Because weights are relative to each other (rational), using the Weight control when all CVs are selected has no visible effect.
Tip: You can increase the curvature of an indentation in a surface by increasing the weight of the CVs surrounding the indented area. This is easier and often more effective than trying to move the indented area’s CVs.
You can add points or CVs to a curve or surface, or remove them. (You can also add or remove points or CVs, and otherwise edit a NURBS surface, by using the surface sub-object rollout, as described in Editing Surface Sub-Objects.)
Caution: When you add points (with Refine or Extend) or delete points or CVs, you lose the animation controllers for all points or CVs on the curve or surface.
When you refine a CV surface, as you move the mouse over the surface, a preview of the CVs that will be added, and their locations, appears in blue.
The controls for deleting points or CVs differ slightly between Point Surfaces and CV Surfaces.
Note: A point curve must have at least two endpoints. A CV curve must have at least one more CV than the degree of the curve.
For surfaces, the controls for adding points differ between CV Surfaces and Point Surfaces.
If a Point Curve sub-object is present in the NURBS object, you can use the Curve button to add points to it as well as to the surface.
You can connect a point to a point or a CV to a CV. (You can’t fuse a CV to a point, or vice versa.) This is one way to connect two curves or surfaces. It is also a way to change the shape of curves and surface.
Fusing points does not combine the two point sub-objects. They are connected but remain distinct sub-objects that you can unfuse at a later time.
Fused points behave as a single point until you unfuse them. Fused CVs behave much like a single point, but the property of multiplicity for coincident CVs also applies. (See "NURBS Concepts" and "Creating NURBS Curves," above.) The fused CVs have proportionally more influence on the curve, which can become more sharply curved in the fused CVs’ vicinity, or even angular if more than two CVs are fused together.
The Affect Region controls for NURBS curves and surfaces are like the Affect Region controls for 3DS MAX Editable Mesh objects. Affect Region controls make a point or CV behave as if surrounded by a "magnetic field." Unselected points or CVs within the field are drawn along smoothly while you move the selected one.
With this feature, you can sculpt the points or CVs of a curve or surface—for example, drawing a sphere into an egg, or gently curving a flat surface into hills and valleys.

The Affect Region area of the CV or Point rollout contains the controls for this feature. The Affect Region check box is turned off by default.
Before you begin, you might need to increase the number of CVs or points on the surface. This allows smoother and more complex reshaping effects. See the earlier section on "Adding and Deleting Points and CVs."
A single point or CV works well for many purposes. Moving a point or CV along a single axis is the most useful for smoothly raising and lowering surfaces. For multiple points or CVs, you can also use Rotate or Scale.
Move is the most common transform. Rotate and Scale can be used with a non-local transform center.
Tip: If Affect Region appears not to be working, the Falloff value might be too small for the size of your surface. Click Edit Curve, and in the Edit Affect Region Curve dialog (described below), increase the value of Falloff so it encompasses other points or CVs.
These are the Affect Region controls:
Affect Region: Turn on this check box to make point or CV transforms affect a region of the curve or surface.
Affect Neighbors: Turn on this check box to have the transform affect not only points or CVs on this curve or surface but all points or CVs within the Falloff region, whether they are on this curve or surface or on other curves and surfaces in the NURBS object.
Same Type Only (only for Point Curves and Surfaces): Turn on this check box to have the transform affect only neighboring points of the same type -- that is, either curve points, surface points, or independent points.
Edit Curve: Click to edit the curve 3DS MAX uses in affecting the region. See the next subsection for a description of the Edit Affect Region Curve dialog.
Edit Curve lets you redefine the affected region for subsequent operations. Editing the curve does not change any existing region, only the next one you create. You can experiment with a curve setting, undo it, and try another setting with the same selection.
When you click Edit Curve, the Edit Affect Region Curve dialog appears.
The Edit Affect Region Curve dialog has these controls to reshape the Affect Region curve:
Falloff: Distance in current units from the center to the edge of a sphere defining the affected region. Use higher falloff settings to achieve more gradual slopes, depending on the scale of your geometry. Default = 20.
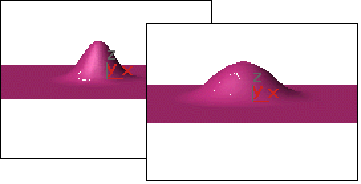
On the left, Falloff = 20 (the default)
On the right, Falloff = 40
Pinch: Raises and lowers the top point of the curve along the vertical axis. Sets the relative "pointedness" of the region. When negative, a crater is produced instead of a point. At a setting of 0, Pinch produces a smooth transition across this axis. Default = 0.
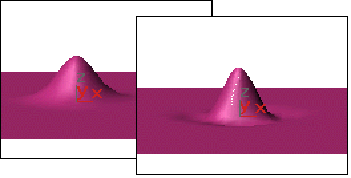
On the left, Pinch = .5
On the right, Pinch = 2
Falloff and Bubble have their default values.
Bubble: Expands and contracts the curve along the vertical axis. Sets the relative "fullness" of the region. Limited by Pinch, which sets a fixed starting point for Bubble. A setting of 0 for Pinch and 1.0 for Bubble produces a maximum smooth bulge. Negative values for Bubble move the bottom of the curve below the surface, creating a "valley" around the base of the region. Default = 0.
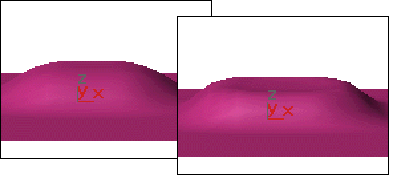
On the left, Bubble = 1
On the right, Bubble = 6
Falloff and Pinch have their default values
Keyboard shortcut: DEL
3DS MAX deletes the point or CV, and updates the shape of the curve.
The appropriate Delete buttons are enabled.
3DS MAX deletes the point, row, or column.
The appropriate Delete buttons are enabled.
3DS MAX deletes the row, column, or both.
3DS MAX adds a point or CV at the location you clicked.
When you refine a CV curve, neighboring CVs move away from the new CV, in order to preserve the original curvature.
3DS MAX adds a row, column, or both close to the point where you clicked the surface. .
Neighboring CVs move away from the new CVs, in order to preserve the surface’s original curvature.
3DS MAX adds a row, column, or both close to the point where you clicked the surface. The new points are placed on the surface so they preserve the surface’s curvature.
The point or CV you choose first acquires the position of the second point or CV, and becomes dependent to it. If the first point or CV had an animation controller, the controller is discarded. If the second point or CV has an animation controller, the first point or CV acquires it, too.
Now you can move and otherwise edit the two points or CVs independently.
A region around the selected point or CV is transformed accordingly.