

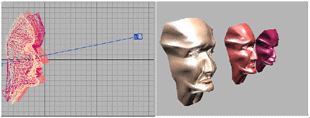
Seed object, target objects
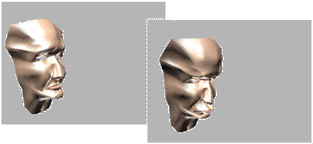
The resulting animation
A morph object combines two or more objects by interpolating the vertices of the first object to match the vertex positions of another object. (This operation is similar to tweening in 2D animation.) Morphing is an animation technique.
The original object is known as the seed object. The object into which the seed object morphs is known as the target object.
You can morph one seed into multiple targets; the seed object's form changes successively to match target objects' forms as the animation plays.
Before you can create a morph, the seed and target objects must meet these conditions:
If these conditions don't apply, the Morph button is grayed out.
You can use any kind of object as a morph target, including an animated object or another morph object, as long as the target is a mesh that has an equal number of vertices to the seed object.
You create morphs in the Create command panel. The Geometry button must be active and you must choose Compound Objects from the object category dropdown list. The Morph button is enabled if the scene geometry allows you to create a morph.
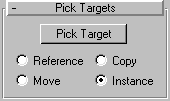
When you pick target objects, you designate each target as a Reference, Move (the object itself), Copy, or Instance, according to the radio button selection in the Pick Targets rollout for morph objects.
This choice specifies how the morph object uses the target object. Base your selection on how you want to use the scene geometry after you create the morph.
Copy: When selected, the morph object uses a copy of the target. The original target object is unchanged.
Use Copy when you want to reuse the target geometry for other purposes in the scene.
Move: When selected, the morph object uses the target object itself, moving it into the morph. The original target object disappears and is no longer available after the morph is created.
Use Move if you've created the target geometry to be only a morph target, and have no other use for it.
Instance: When selected, the morph object uses an instance of the target object. If you later change the original target object, the morph object changes as well; and if you change the morph target, the original object changes.
Use Instance to synchronize morphing with animated changes to the original target object.
Reference: When selected, the morph object uses a reference to the target object. If you later change the original target object, the morph object changes as well; but if you change the morph target, the original object does not change.
As previously mentioned, you can use an animated object or another morph as the target of a morph.
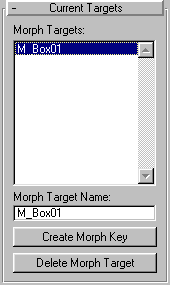
Morph Targets Display: Displays a list of the the current morph targets.
Morph Target Name: Use this field to change the name of the selected morph target in the Morph Targets Display.
Create Morph Key: Adds a morph key for the target at the current frame.
Delete Morph Target: Deletes the currently highlighted morph target. If there are morph keys that reference the target that was deleted, then those keys are deleted as well.
Tip: When you create lofts that you want to use as morph seeds and targets, make sure that Morph capping is on and Adaptive Path Steps is off. All shapes in the loft object must have the same number of vertices, and each shape should have both Adaptive and Optimize set to off.
Other shape-based objects, such as those with Extrude or Lathe modifiers, should also have Adaptive and Optimize set to off.
Warning: The selected object is permanently converted to a morph object as soon as you click Morph, whether or not you proceed to select a target object. The only way to restore the original object is to undo the Morph click.
The name of the seed object appears at the top of the Morph Targets list in the Current Targets rollout.
The following topic explains the purpose of each method.
As you select each target, its name is added to the Morph Targets list. If an object cannot be a target, for example, it has a different number of vertices than the morph seed, 3DS MAX doesn't let you select it.
If you select a target object while you are not at frame 0, creating the target also creates a morph key. You can create additional morph keys from targets you've already selected, as the following steps describe.
The Animate button does not have to be on to set morph keys.
The Create Morph Key button is enabled when a target object name is selected.
3DS MAX places a morph key at the active frame.
To preview the effect of the morph, you can drag the Time Slider back and forth. You can view and edit the morph keys in Track View, which also lets you view the morph's target object parameters.