

Although NURBS curves and surfaces are analytically generated, to generating and displaying them requires curves to be approximated by line segments, and surfaces by faces. You use the controls described in this section to set approximation parameters, and the kind of approximation used.
The Surface Approximation rollout controls how surface sub-objects in the NURBS model are approximated for the purposes of rendering and viewport display. It is important to know that NURBS can be approximated differently in viewports and in the renderer. Typically you will want to set viewport display to be clear and quick, while you will want rendered display to be smooth, accurate, and "realistic." However, the approximation you choose for viewports creates a mesh, and the kind of mesh you choose can affect the behavior of modifiers that you later apply to the NURBS model.
Surface approximation parameters aren’t animatable.
Note: If the size or shape of a surface changes over time, the tessellation used to approximate it can change as well. This has the advantage of improving render time in animations. It has the disadvantage that you can't apply image motion blur to NURBS objects whose tessellation changes during animation.
The first two controls in this rollout are radio buttons so you can select which kind of display output, viewport or renderer, these parameters control.
Viewports: When chosen, the rollout affects how surfaces in the NURBS object are displayed interactively in viewports, including shaded viewports, and by the preview renderer.
The Viewports surface settings are also used when you apply a mesh modifier such as Mesh Select to the NURBS object. This is important because it can affect the scene’s geometry.
Renderer: When chosen, the rollout affects how surfaces in the NURBS object are displayed by the renderer, and by the draft renderer for Quick Render.
The controls in this area affect the display of the NURBS surface in viewports. They are disabled while Renderer is chosen.
U Lines and V Lines: The number of lines used to approximate the NURBS surface in viewports, along the surface’s local U and V dimensions, respectively. Reducing these values can speed up the display of the surface, but reduce accuracy of the display. Increasing these values increases accuracy at the expense of time. Setting one of these values to 0 displays only the edge of the object in the corresponding dimension.

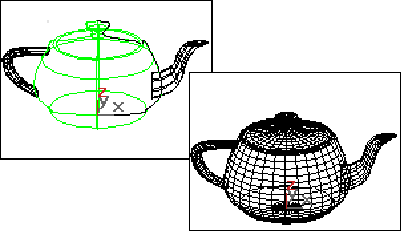
Iso and mesh displays of a NURBS teapot
Iso Only: When chosen, all viewports display iso line representations of the surface. Iso(parametric) lines are similar to contour lines. The lines show where the NURBS surface has a constant U value or V value or both. Iso line representations can be less crowded and easier to visualize than wire mesh representations.
Iso and Mesh: (The default.) When chosen, wireframe viewports display iso line representations of the surface, and shaded viewports display the shaded surface.
Mesh Only: When chosen, wireframe viewports display the surface as a wire mesh, and shaded viewports display the shaded surface. In wireframe viewports, this option lets you see the surface approximation used for viewports.
The controls in this area affect the display of the NURBS surface in either viewports, if Viewports is chosen, or by the renderer, if Renderer is chosen. You can choose between three algorithms. Each approximates NURBS surfaces by tessellating them in a different way.
Note: When Viewports is chosen, you must also choose Mesh Only in order to see the effect of the Mesh Parameter settings in wireframe viewports.
Tip for Viewports: Use Parametric or Curvature for quick display. The algorithm creates the mesh, so if you modify the NURBS object with Mesh Select, choose the algorithm that gives the result you need. If you use modifiers heavily, Spatial or Parametric are usually better than curvature, because of their regular tessellation. Curvature-dependent tesselation can cause problems with some 3DS MAX modifiers.
Tip for the Renderer: Use either Spatial or Curvature to obtain the most accurate rendering. Curvature can be the more efficient choice for rendering animated surfaces.
Parametric: Generates a fixed tessellation based on U Steps by V Steps. Increasing these parameters increases accuracy at a cost of speed, and vice versa, but in general this is the quickest and least accurate way to approximate a NURBS surface.
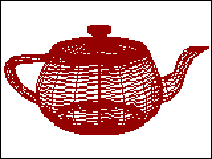
Parametric mesh of the NURBS teapot
Spatial: Generates a uniform tessellation made of triangular faces.
The Edge parameter specifies the maximum length of a triangular face in the tesselation, in current 3DS MAX units. Decreasing this value increases accuracy but increases rendering time.
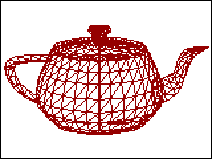
Spatial mesh of the NURBS teapot
Curvature: (The default.) Generates a variable tessellation based on the curvature of the surface. The tessellation has a finer grain where the surface is more curved. Changing surface curvature dynamically changes the curvature tessellation.
The Distance parameter specifies how far the approximation can deviate from the actual NURBS surface. Distance is a percentage of the diagonal of each surface’s bounding box. Each surface in an object is tessellated based on its size, independently of other surfaces, and scaling a surface doesn’t change its tessellation. Decreasing this value increases accuracy but increases rendering time. When you set Distance to 0.0, 3DS MAX ignores this parameter and uses the Angle to control accuracy.
The Angle parameter specifies the maximum angle between faces in the approximation. Decreasing this value increases accuracy but increases rendering time. When you set Angle to 0.0, 3DS MAX ignores this parameter and uses the Distance to control accuracy.
When both Distance and Angle are 0.0, the surfaces degenerate and can become flat surfaces.
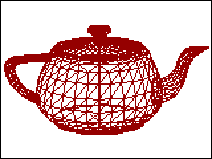
Curvature mesh of the NURBS teapot
View-Dependent (for the Renderer only): When turned on, takes the object’s distance from the camera into account while calculating its tessellation. This can improve rendering time by not generating fine-grained tesselations for objects that are in the distance of the rendered scene. The view-dependent effect only works when you render camera or perspective viewsit doesn’t work in orthographic views. This control is disabled while Viewports is active.
Merge: Controls the tessellation of surface sub-objects whose edges are joined or very nearly joined. When input to a modifier -- such as Mesh Select -- requires a mesh, and when NURBS surfaces are tessellated for production rendering, by default 3DS MAX adjusts the tessellation of adjoining surfaces to match each other, in terms of the number of faces along the edges. The Merge parameter controls how this is done. If Merge is zero, adjoining faces are unchanged. Increasing the value of Merge increases the distance 3DS MAX uses to calculate how edges should match, guaranteeing no gaps between the surfaces when they are rendered. Default = 0.01.
In most cases, you don't need to adjust Merge. If rendering shows gaps between nearly adjoining faces, increase Merge to eliminate them.
Technically, the Merge value is one tenth of one percent of the diagonal of the object's bounding box. In other words, a Merge value of 1.0 (higher than necessary for most purposes) is 0.1 percent of the length of the diagonal. Because Merge is based on the object's dimensions, you can scale the NURBS model without affecting the Merge setting.