- Display the New project Dialog box :
- Project > New (Ctrl + N)
- Choose options and when you've entered the right settings click on OK !
This dialog box is not a revolution but you should be careful about one or two things :
- You can naturally enter the Name of the project.
Click in the text field to edit it. A simple advice make it appealing to you. Some people get used with storing their images something like that 0034157.jpg and spend most of their time trying to remember what this image file contains.
An interesting topic is the Format drawer where you can choose the actual size of your image in a range of standardised and predefined formats.
- Click to open the drawer
- Scroll down to choose an image format (predefined size and resolution)
- Click again to modify the settings of your selected format in the Width, Height and Resolution edit boxes
- An example
Choosing Video Pal for example automatically adjusts the Width and Height values as well as the resolution to 720 x 576 with a rez of 72 dots/inch. Note that doing that the size of your project is simultaneously calculated and appears right under the color mode drawer.
![]() Photonyx supports working with high size
images and you can loose in image quality if converting it afterwards to a larger format .
So start to work with an high rez and size format and reduce it as late as possible at the
end of your workflow.
Photonyx supports working with high size
images and you can loose in image quality if converting it afterwards to a larger format .
So start to work with an high rez and size format and reduce it as late as possible at the
end of your workflow.
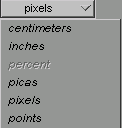
- Width and Height display you the size in pixels, cm, inches ... of the new project.
- You can also enter values directly in the edit box to choose more precisely.
- To change current units, click on the drawer and scroll to choose your prefered unit.
- Change the units of Resolution exactly the same way as you change Width and Height unit settings..
![]() Resolution as much to do with image
quality. By choosing an high level of resolution your project will take more space on
disk.
Resolution as much to do with image
quality. By choosing an high level of resolution your project will take more space on
disk.
You can choose the Color mode of your project.
Contents is for changing the initial background of your new project.
- Transparent opens a the project with a transparent backgroud (it exists but it't empty of any color)
- Black opens a project with a pure black backgroud.
- White same as above bur with a white background.
- Canvas Size simply displays the memory space your project will take once created.

