 Create
an option group by using a wizard
Create
an option group by using a wizardYou can create an option group on your own or, if you are working in a form or report, you can use a wizard to create an option group. A wizard speeds up the process of creating an option group because it does all the basic work for you. When you use a wizard, Microsoft Access prompts you for information, and then creates an option group based on your answers.
In a data access page, you use option buttons to represent the different values that you can save in the underlying field of the option group. In a form or report, you can use check boxes, option buttons, or toggle buttons to represent the different values that you can save in the underlying field.
Create
an option group by using a wizard
 in the toolbox if it's not already
selected.
in the toolbox if it's not already
selected. .
.Create an option group on my own
in the toolbox if it's
selected. This turns off the wizard..To create an unbound option group, click where you want to place the group frame.
To create a bound option group, click Field List  on the
toolbar
to display the field list, and then drag the appropriate field or column from the field list to the form, report, or data access page.
on the
toolbar
to display the field list, and then drag the appropriate field or column from the field list to the form, report, or data access page.
Note The control won't be bound if you try to create it by clicking the form, report, or data access page instead of dragging the selected field from the field list.
 , Option Button
  , or the Toggle Button tool
  . In the data access page toolbox, click the Option Button
tool.
. In the data access page toolbox, click the Option Button
tool.
Do one of the following:
On
a form or report, if necessary, click the control, click Properties
 on the toolbar, and
then change the
OptionValue property to the value that you want the option group to
have when you click that control. When you add the first control to an
option group on a form or report, Microsoft Access sets its OptionValue property to 1.
on the toolbar, and
then change the
OptionValue property to the value that you want the option group to
have when you click that control. When you add the first control to an
option group on a form or report, Microsoft Access sets its OptionValue property to 1.
On a data access page, click
the option button, click Properties
on the toolbar, and then change the Value property from on to the value that you
want the option group to have when you click that button.
If the option group is bound, the value of the control's OptionValue or Value property is the value that Microsoft Access stores in the underlying table when you click that control.
 OptionValue or
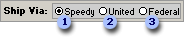
Value property set to 1
- clicking this button sets the value
of the Ship Via option group to 1 and, if the option group is bound,
stores that value in the underlying table.
OptionValue or
Value property set to 1
- clicking this button sets the value
of the Ship Via option group to 1 and, if the option group is bound,
stores that value in the underlying table.
 OptionValue
or
Value property set to 2 - clicking this button sets the value of the Ship Via
option group to 2 and, if the option group is bound, stores that value in
the underlying table.
OptionValue
or
Value property set to 2 - clicking this button sets the value of the Ship Via
option group to 2 and, if the option group is bound, stores that value in
the underlying table.
 OptionValue
or
Value property set to 3 - clicking this button sets the value of the Ship Via
option group to 3 and, if the option group is bound, stores that value in
the underlying table.
OptionValue
or
Value property set to 3 - clicking this button sets the value of the Ship Via
option group to 3 and, if the option group is bound, stores that value in
the underlying table.
Tip
To facilitate data entry, you can make the most commonly chosen option the default by setting the DefaultValue property of the option group.