OLAP Cube Wizard: Step 2
In this step, you organize the descriptive data into dimensions. Each dimension becomes a field in the reports that are based on the cube. By organizing the fields in levels of detail, you allow users of the reports to select the level of detail to view, starting with a high-level summary and then focusing on details, and vice versa.
You must designate at least one dimension for your cube. You can designate fields that provide isolated facts and don't belong in a hierarchy ù such as a field that determines whether a product is taxable ù as dimensions with a single level. Your cube will be more useful for reports, however, if you organize some of the fields into levels. For example, you could organize three fields into a Product dimension that includes three levels: product division, product group within the divisions, and individual product.
If you use date or time fields as dimensions, the wizard automatically creates levels for these dimensions. You can then select the levels to make available in reports. For example, you could select weeks, quarters, and years, or you could select weeks, months, and years.
To complete this step, do the following:
- From the Source fields list, drag each top-level dimension field to the Dimensions box onto the area marked Drop fields here to create a dimension. You must create at least one dimension.
You can include each field only once. To use the same field in more than one dimension, your query or selection of source data must include one instance of the field for each dimension in which you want to use it. To add more instances of the field, click Cancel to exit the wizard; then add the fields to your query or selection, and run the wizard again.
- To create a level within a dimension, drag a field from the Source fields list onto an existing dimension or level in the Dimensions box, as in the following example.
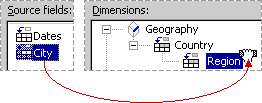
To create a City level under the Region level, drag the City field onto the Region level.
Click the  or
or  boxes to display or hide levels.
Fields containing greater detail should be at lower levels. To move a field to a lower or higher level, click the field in the dimension and drag it onto a lower or higher field within the dimension.
For date and time fields, the wizard creates levels automatically only when you create a new top-level dimension with the field. When you add these fields as levels in existing dimensions, the wizard does not create the date and time levels for you.
- For date and time dimensions, select the check boxes for the levels you want to make available in reports and clear the check boxes for levels you don't want to include. You can include either the Week level or the Month level; but not both because months do not contain an even number of weeks.
- To change the name of a dimension or level, click the name once to select it and a second time to rename it,
and then type the new name. You cannot change the names of levels in date and time dimensions.
The field names you assign in the wizard will appear in the reports you create from the cube. Whether you can change the field names in the reports depends on the type of reports you create.
More information
Keyboard shortcuts for this step of the OLAP Cube Wizard
Overview of the OLAP Cube Wizard