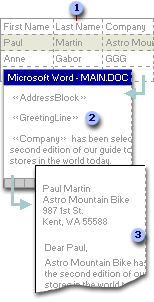
Use the Mail Merge Wizard to create form letters, mailing labels, envelopes, directories, and mass e-mail and fax distributions. To complete the basic process, you:
Open or create a main document.
Open or create a data source with individual recipient information.
Add or customize merge fields in the main document.
Merge data from the data source into the main document to create a new, merged document.

 Data source with
recipient information, such as names and addresses
 Main document
with merge fields that are placeholders for recipient information
 Resulting merged
document
The wizard guides you through all of these steps. If you prefer to work outside the wizard, you can use the Mail Merge toolbar. Either way, the end result is that each row (or record) in the data source produces an individual form letter, mailing label, envelope, or directory item.
Note You can use mail merge to create any type of document that maps fields to data, not just mailings or directories. For example, if your videotape collection is listed in a spreadsheet, you can use the Labels option to create videotape labels.
 More information about mail merge data sources
A data source is a file ù for example, a Microsoft Outlook Contact List ù that contains the data that varies in each copy of a merged document.
How data sources work in a mail merge
You can think of a data source as a table. Each column in the data source corresponds to a category of information, or data field ù for example, first name, last name, street address, and postal code.
The name of each data field is listed in the first row of cells, which is called the header record. Each subsequent row contains one data record, which is a complete set of related information ù for example, the name and address of a single recipient.
When you complete the merge, individual recipient information is mapped to the fields you included in your main document.
Connecting to a data source
By default, you connect to data sources in the Select Data Source dialog box. If you already have a data source to use (such as a Microsoft Outlook Contact List or Microsoft Access database), you can connect to it directly from the Mail Merge Wizard.
If you don't, you can also create one directly from the wizard. If you only want a simple address list, the Mail Merge Wizard guides you through the process of creating a Microsoft Office Address List. Or you can create a more complex one from within the Select Data Source dialog box.
Selecting specific recipients from the data source
Once you connect to your data source, the recipient information appears in the Mail Merge Recipients dialog box, where you can select exactly which recipients to include in the merge.
For example, if you want to target customers in specific postal code areas, you can select only those customers. You can also use this dialog box to perform more advanced filtering and sorting operations.
 More information about mail merge fields
You use merge fields to customize the content of individual documents. When inserted into your main document, they map to corresponding columns of information in your data source. If Microsoft Word doesn't find the information it needs by mapping merge fields automatically to the headings in the data source, it gives you the opportunity to do so as you're inserting address and greeting fields or previewing the merge.

Address and greeting fields
Word uses two merge fields to insert the basic information for each recipient:
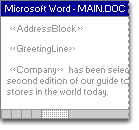
The AddressBlock field is the placeholder for the name and address.
The GreetingLine field is the placeholder for your chosen salutation.
You can customize the content in each of these fields. For example, in the address you may want to select a formal name format (Mr. Joshua Randall Jr.); in the salutation, you may want to use "To" instead of "Dear."
Additional merge fields
You can further personalize each document by including additional merge fields. For example, suppose you're creating a letter to notify local businesses that they've been selected for inclusion in your annual city guide. Instead of manually typing the name of each individual company in the body of the letter, insert the Company field: "««Company»» has been selected for the second edition of our guide..." Word inserts the correct company name into each letter when you complete the merge.
Advanced information: controlling how Word merges data
Here are some examples of using fields to control how Word merges data:
- ASK and FILLIN fields display a prompt as Word merges each data record with the main document. Your response is printed in the specific form letter, contract, or other merged document resulting from the data record.
- IF (If...Then...Else...) fields print information only if a condition you've specified is met. For example, you can use an IF field to inform clients who live in a particular ZIP Code area that you are opening a nearby branch office.
- SET (Set Bookmark) fields allow you to assign text, a number, or other information to a bookmark. You can use the information multiple times in the resulting merged documents. If the information changes, then you can edit the SET field once rather than searching through the main document and changing each occurrence.
You can also use MergeRec, MergeSeq, Next, NextIf, and SkipIf fields in a mail merge.