 on the
Standard toolbar.
on the
Standard toolbar.Microsoft Word offers a number of ways to make a table. The best way depends on how you like to work, and on how simple or complex the table needs to be.
on the
Standard toolbar.You can also do any of the following:
 Use the Insert Table command
Use this procedure to make choices about the table dimensions and format before the table is inserted into a document.
Click where you want to create a table.
On the Table menu, point to Insert, and then click Table.
Under Table size, select the number of columns and rows.
Under AutoFit behavior, choose options to adjust table size.
To use a built-in table format, click AutoFormat.
Select the options you want.
Draw a more complex table
You can draw a complex table ù for example, one that contains cells of different heights or a varying number of columns per row.
The Tables and Borders toolbar appears, and the pointer changes to a pencil.
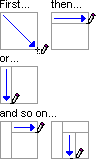
 on the Tables and Borders toolbar, and then click the line you want to
erase.
on the Tables and Borders toolbar, and then click the line you want to
erase.
Note Hold down CTRL to automatically apply text wrapping while you draw the table.
Create a table inside another table
Create nested tables to design Web pages. Think of a Web page as one big table that holds other tables ù placing text and graphics inside different table cells helps you to lay out the different parts of your page.
The Tables and Borders toolbar appears, and the pointer changes to a pencil.
Note If you have an existing table, you can copy and paste it inside of another table.