How?
How?
Some parts of a table can only be seen if you display all formatting marks by clicking Show/Hide

on the Standard toolbar.
To select:
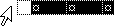
- A cell
- Click the left edge of the cell.

- A row
- Click to the left of the row.
- A column
- Click the column's top gridline or border.
- Multiple cells, rows, or columns
- Drag across the cell, row, or column.
- Or select multiple items that are not necessarily in order. Click the first cell, row, or column you want, press CTRL, and then click the next cells, rows, or columns you want.
- Text in the next cell
- Press TAB.
- Text in the previous cell
- Press SHIFT+TAB
- The entire table
- Click the table move handle, or drag over the entire table.
Note You can also select rows, columns, or the entire table by clicking in the table and then using the Select commands on the Table menu, or by using keyboard shortcuts.