


Glare
Glare is a plug-in filter for Photoshop and other paint programs. It creates glaring haloes around the brightest parts of an image to create an impression of dazzling brightness.
To use this software, you need a paint program which accepts standard Photoshop 3.0 plugins.
Just put the plug-in filter into the folder where your paint program expects to find it. If you have Photoshop, the folder is Photoshop:Plugins:Filters or Photoshop:Plug-ins. You must restart Photoshop before it will notice the new plug-in. It will appear in the menus as Filters->Flaming Pear->Glare.
Most other paint programs follow a similar scheme.
If you have Paint Shop Pro: you have to create a new folder, put the plug-in filter into it, and then tell PSP to look there. In PSP's menus, choose File-> Preferences->General Program Preferences... and click the Plug-in Filters tab. Use a "Browse"button to choose the folder. The plugin will appear in the menus as Image->Plug-in Filters->Flaming Pear->Glare.
Glare has five main controls to produce bright haloes.
Diameter sets the size of the haloes.
Cutoff specifies how bright parts of the image have to be before they start contributing to the haloes. At the maximum value, almost nothing will glare. At the minimum value, even quite dark regions will act as if they are glowing. The proper value to use varies from image to image.
Brightness simply sets the basic brightness of the glare.
Gamma influences how rapidly the brightness of the haoles falls off from the center to the edges. Lower values will produce slower falloff, and the whole picture will appear brighter.
Saturation says how strongly colored the haloes are. Surrealistic effects are possible by setting using the very highest and lowest values. The central setting of zero will produce colorless grey haloes.
Glue defines how the image produced by Glare will combine with the original image. Normal mode replaces the original image entirely; the other modes produce a variety of colorful effects. Some of the modes are the same as those offered by Photoshop's layers.
Load (the red button) lets you open a settings file.
Save (the blue button) lets you save your settings in a file.
Randomize (the button with dice) chooses random values for all the controls. This is ideal for searching for new effects.
Variation (the button with a green wavy line) changes the randomness in the image. Clicking it will change the specific way the image is smeared, but the overall look will be the same.
Try loading the settings files that come with Glare to see what it can do, or click the dice until you see something you like.
Here are some example effects that you can do. Open a favorite picture for these examples -- you won't see anything if you start with a blank canvas. The best pictures for Glare have clearly defined bright and dark areas, and the bright areas depict sky or sources of light.
Select part of the picture, and invoke Glare.
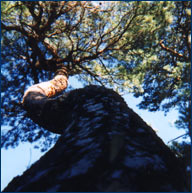  |
1. Basic glare. With this view up the trunk of a tree, these settings produce a straightforward glare effect: Diameter 150 If you click the dice button to see various random effects, this is the sort of thing you will see most often. You can use this tree image (just drag it off the web page) to test the Cutoff control. At a Cutoff value of 98 for , only the patches of sky will glow. At values near zero, everything but the trunk will glow. |
 |
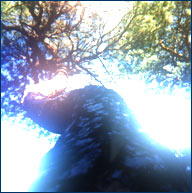
2. Less glarre, stronger colors. Reduce Brightness and increase Saturation to the max. Now the hues are less washed-out. |
 |
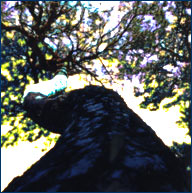
3. Weird colors. Raise Brightness again and reduce Saturation to -200. You'll get reversed colors in the haloes. |
 |
4. White haze. Increase Diameter to the max and set Saturation to zero. This will prodce a broad haze over the whole picture. |
 |
5. Speckles. Use a very small Diameter of about 6 and turn Brightness and Gamma far up. You'll see tiny, unrealistic blotches of glare. For more strange-looking variations, try using glue modes other than "normal" with this effect. |
Click the dice button to see more effects.
You can place an order online here. A secure server for transactions is available.
If you prefer, you can place an order offline by using the "Register" program that comes with the software.
Purchasing the software removes the time limit. You will get an unlocking code by email in a message titled "Thanks for your payment."
Answers to common technical questions appear on the support page, and free upgrades appear periodically on the download page.
Trouble with your order? Orders are handled by Kagi, which can be reached at admin@kagi.com .
For bug reports and technical questions about the software, please write to lloyd@flamingpear.com .