[Top] [Prev] [Next] [Bottom]
[Contents]
An Example Project
In this example we'll create two ways of presenting the same data:
Project Root Page
- 1. Create a new Sapphire/Web project and call it JavaT3.
- 2. Create a new HTML document in the Document Manager called home.html.
- 3. Add the following between the <BODY> and </BODY> tags
<A HREF="Table">HTML Table</A><BR>
<A HREF="Class">Class</A><BR>
- These are the links to your display pages.
- 4. Save your work.
HTML Table Display
- 1. Create a new HTML document called table.html.
- 2. Add the following between the <BODY> and </BODY> tags
<BR>
<TABLE BORDER>
<CAPTION>Authors</CAPTION>
##Sa_authors##
</TABLE>
- This HTML orders your data into a table.
- 3. Bind the
HREF=Table link from home.html to table.html with the DSQL Object BD_Authors which you will find in the Sapphire Tutorial pubs2 database.
- 4. Select the output fields you wish to see, binding them to data site
authors, and use the Detail population call SaPopulateTable, which will provide all the internal HTML formatting for the contents of a table
Test
- 1. Use Sapphire's Test button to make and load the project into your browser
- 2. Select the HTML Table link; clicking it should give you this:
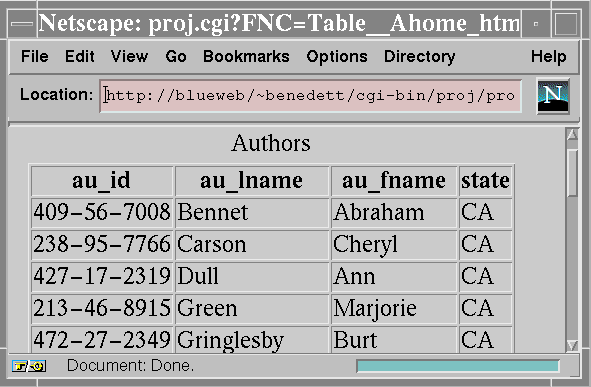
Figure 4-1 Listing the authors in an HTML table (Navigator for UNIX)
Class
This example adds a Java Applet, Sa.SaJavaDrill.class, to the project.
- 1. Create a new HTML document called class.html.
- 2. Add the following between the <BODY> and </BODY> tags
<h2>Class</h2><hr>
<applet		code=Sa.SaJavaDrill.class
		codebase="/saclasses"
		width=390
		height=320>
<param name="rsurl" value=" saact='Class' ">
<param name=indexCols value="0">
</applet><hr>
- This HTML will invoke an applet to present your data.
- 3. Bind the
HREF=Class link from home.html to class.html with a NULL binding.
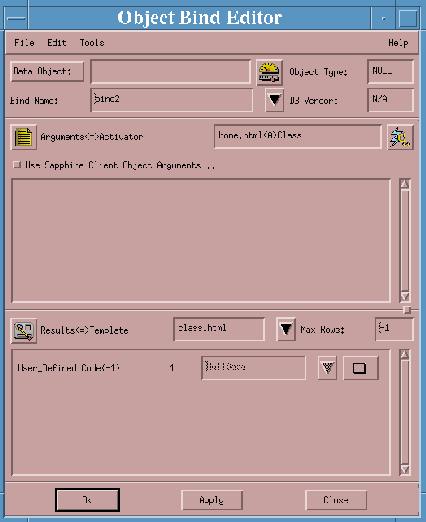
Figure 4-2 Binding home.html to class.html
- 4. Open the Object Bind Editor (New Activator) and in the Activator Selector select the activators from the class.html document. From these, select
saact=class.
- 5. For this binding, you select no template at all, so it appears to go nowhere.
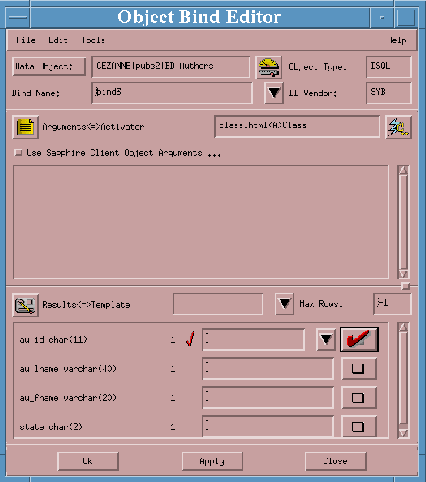
Figure 4-3 Binding class.html<a>class
- a. Use
BD_Authors as the Data Access Object for this binding.
- b. Leave the output template blank.
- c. Leave the Data Site column blank in the Results Columns.
- d. In the first row, pop up the Results Detail Dialog, as shown, and select
SaPopUrlRowSet.
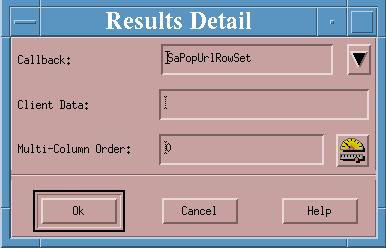
Figure 4-4 The Results Detail editor
Test
- 1. Click the Test button to compile and link your project. The project will load.
- 2. Click the
Class link.
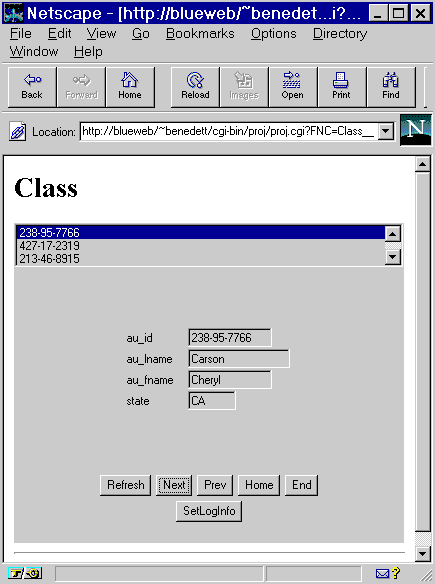
Figure 4-5 Author display using Java applet (Navigator)
- 3. Click into the upper area. This is a scrolling list of authors. You can use the keyboard arrow keys to move through this, click on individual records with the mouse, or use the four controls - Next, Prev, Home, and End - at the bottom of the display. Each of these methods will change the detail display shown on the rest of the page.
Explanation
With the display above you are automatically provided with a Master-Detail display, four navigational control buttons, and a login info button (which stays grey, as none is required. Here's how.
This is the code after the binding has been made:
<applet		code=Sa.SaJavaDrill.class
		codebase="/saclasses"
		width=390 height=320>
<param name="rsurl"
value=" saact='http://HeartOfGold/Scripts/JavaT3/
	JavaT3.exe?FNC=JavaEmbeddedRowset__Aclass_html' ">
<param name=indexCols value="0">
</applet>
saact='<CGI Program>?FNC=JavaEmbeddedRowset__A<Template>'
Now let's add a popup display to show some more information about the record we are inspecting with the rowset and the class.
- 1. Make a copy of class.html, calling it class2.html.
Add this document to the project. Add a new anchor to home.html and bind it with a null binding to class2.html. Check that this new page functions correctly, as did class.html.
- 2. Add the following lines to the class2.html template just before the </applet> tag, without deleting the old lines.
<param name="rsurl1" value=" saact='JClassPop' ">
<param name="label1" value="JClass LiveTable View">
<param name="title1" value="JClass Table View">
<param name="rsview1" value="SaJTablePop">
<param name="visibleCols" value="5">
<param name="visibleRows" value="10">
- 3. Save your work. Notice the extra activator that now appears under class2.html,
saact=JClassPop.
- 4. Make the anchor
class2.html<A>JClassPop an alias to class.html<A>class.
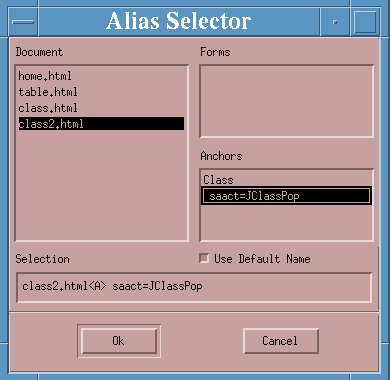
Figure 4-6 Alias Selector
- Notice that you need only to edit one binding to alter the whole connection.
Test
- 1. Use the Test button to start re-compilation of the project. Click
class2.
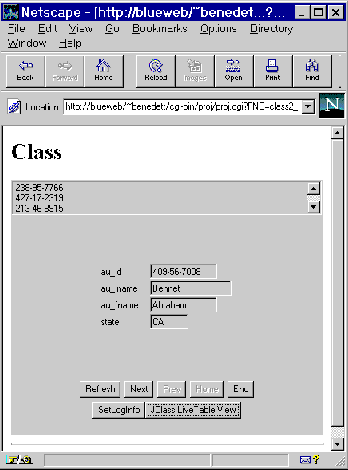
Figure 4-7 Java applet with pop-up capability
- 2. Notice the new button,
JClass LiveTable View, at the bottom of the screen. Click it and this screen will appear.
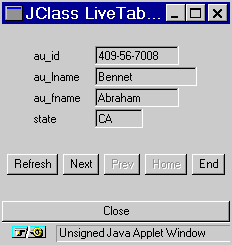
Figure 4-8 LiveTable View pop-up
- 3. Again, you can use all the controls to navigate the records displayed in this window. Click the
Close button across the bottom of the window to close it.
Explanation
The extra lines supplied more parameters to the Sa.SaDrillDown class.
[Top] [Prev] [Next] [Bottom]
[Contents]
info@bluestone.com
Copyright © 1997, Bluestone. All rights
reserved.