[Top] [Prev] [Next] [Bottom]
[Contents]
Insert, Update, and Delete with the VBScript Framework
Project Creation
- 1. Create a new Sapphire project. Name it
saiud.
- 2. Open the Document Manager. Create a new document named home.html and click on
Style. Choose anchor.html instead of default.html from the combo box for the style and click Ok. You will not need to modify this document.
- 3. Create another document named sacontrol.html with the style sacontrol.html. This is a minimal HTML file with the Sapphire ActiveX Control in it.
- a. If necessary, modify the
codebase line to accurately describe the location of SaRowSet.ocx. This file should be in the directory htmlroot/saocx. You may need to modify the line to be:
codebase=http://server/~username/saocx/SaRowSet.ocx
- b. Add the following line to the sacontrol.html page right after the end object tag,
</OBJECT>:
##Sa_FILE=saactx.vbs##
- c. Add the following line right after the begin body tag,
<BODY>.
##Sa_FILE=vcfrm_i.htm##
- Note that the file extension is
.htm, not .html.
- 4. Create a third document named saactx.vbs with the style saactx.vbs. This file contains VBScript "glue" to hook the Sapphire/Web ActiveX Control to any HTML form.
- 5. Copy
$SAPPHIRE/contrib/saact/vcfrm_i.htm from the Sapphire/Web distribution to your project directory.
- 6. From the Document Manager, Add
vcfrm_i.htm to your project. You may have to adjust the Filter text field in the Add window so that you can see files that end in extensions other than .html.
The NULL binding
Using the Object Bind Editor, create a NULL binding from the default anchor in home.html to sacontrol.html. When the anchor in home.html is clicked, the project application will generate the sacontrol.html page and include the files named in the Sa_FILE sites.
Test the project and click on the anchor in home.html.
Since the control is signed, you must answer "Yes" or "Yes to All" for the question of running the control. This display is Bluestone's digital signature certificate. You may have to answer "Yes to All" each time you load a page that uses ActiveX.
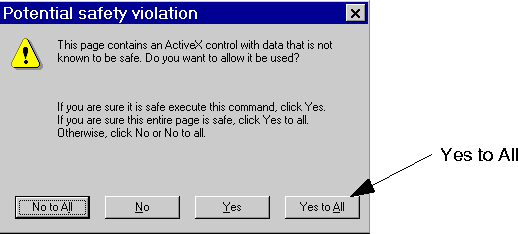
Figure 5-2 Warning window
Once you have done this, you should see the document displayed below. None of the buttons will work yet.
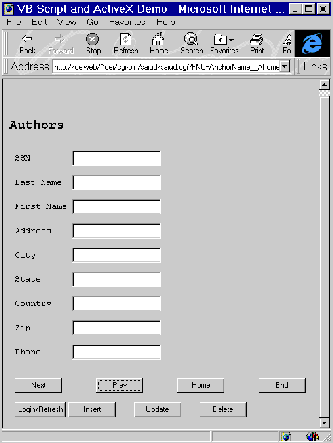
Figure 5-3 The Authors form using the VBScript Framework
Binding to saact=fselect
- 1. Open the Object Bind Editor and choose the document sacontrol.html and the anchor
saact=fselect as the anchor. Click Ok.
- 2. Choose the DSQL object
D_AUTHORS_INFO.
- 3. Choose the Detail button for the first column (
au_id).
- 4. From the Results Detail combo box choose
SaPopUrlRowSet as the callback function. Note that you should always choose this callback for the urlSrc property of the control.
- 5. Click Ok. Save your binding.
- 6. Test the project.
- a. Click the anchor on home.html to get to your interface page.
- a. Click the Home button to display the first row of data.
- b. Click the End button to display the last row of data.
- c. Use the Prev and Next buttons to move between rows. Notice how quickly you can navigate the list. Because you have used client objects, you can browse the list without involving your Web server.
- d. Click Refresh to refresh the data in the Sapphire/Web ActiveX Control. Insert, Update, and Delete are not yet functional.
From Internet Explorer, choose View->Source. Examine the subroutines Next_OnClick, Prev_OnClick, Home_OnClick, and Prev_OnClick. Each calls a method of the row set to change the current row and then calls a display function to display the current row in the form. The display subroutine, SaDisplayForm, updates the form display.
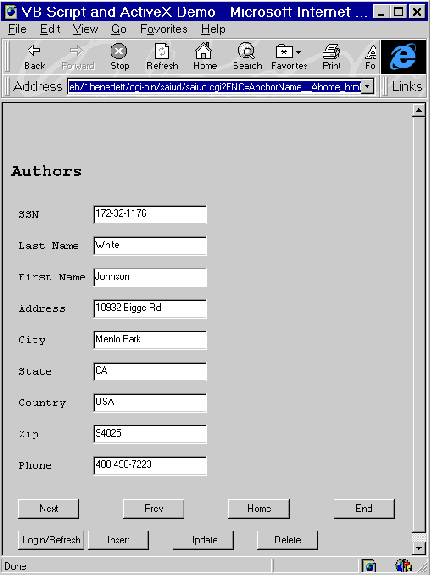
Figure 5-4 The ActiveX author display
Binding to saact=finsert
- 1. Open the Object Bind Editor and choose the document sacontrol.html and the anchor
saact=finsert as the anchor. Click Ok.
- 2. Choose the DSQL object
D_INSERT_AUTHOR.
- 3. Notice on the Object Bind Editor the button labeled "Use Sapphire/Web Client Object Arguments". Click this button.
- 4. Choose the previous binding,
bind2, from the bind selector (this corresponds to the data source for the row set). This allows the arguments for the insert to be attached to "form" arguments. The form is the row set simulating form post. The names of the form "fields" are the columns from the row set.
- 5. Choose the appropriate items from the argument combo box for all 9 columns. You should be able to match the names one-for-one. If you have bound the arguments correctly, Sapphire/Web has written the following code fragments for the arguments as:
SaGetNInputValue("au_id", 0)
SaGetNInputValue("au_lname", 0)
SaGetNInputValue("au_fname", 0)
SaGetNInputValue("phone", 0)
SaGetNInputValue("address", 0)
SaGetNInputValue("city", 0)
SaGetNInputValue("state", 0)
SaGetNInputValue("country", 0)
SaGetNInputValue("postalcode", 0)
- 6. Click Ok. Save your binding.
- 7. Test the project.
- a. Click the anchor on home.html to get to your interface page.
- b. Select the first author. Click Insert. A Message box appears with an error message-you've tried to duplicate an author.
- c. Enter a brand-new author. You can use the data from another author if you modify the author's SSN.
- d. Click Insert.
- e. Find the new author.
Binding to saact=fdelete
- 1. Open the Object Bind Editor and choose the document sacontrol.html and the anchor
saact=fdelete as the anchor. Click Ok.
- 2. Choose the DSQL object
D_DELETE_AUTHOR.
- 3. Notice on the Object Bind Editor the button labeled "Use Sapphire/Web Client Object Arguments". Click this button.
- 4. Choose the previous binding,
bind2, from the bind selector (this corresponds to the data source for the row set). Reply "No" in the "Clear all argument values?" dialog box
- 5. Choose
au_id from the argument combo box.
- 6. Click Ok. Save your binding.
- 7. Test the project.
- a. Click the anchor on home.html to get to your interface page.
- b. Select the author you inserted before. Click Delete. Navigate the list. That author should be absent.
- c. Notice that the script functions are designed to leave the deleted information in the text fields. This allows the user to see what they have deleted and to use Insert to correct an accidental deletion.
Binding to saact=fupdate
- 1. Open the Object Bind Editor and choose the document sacontrol.html and the anchor
saact=fupdate as the anchor. Click Ok.
- 2. Choose the DSQL object
D_UPDATE_AUTHOR.
- 3. Click the "Use Sapphire/Web Client Object Arguments" button.
- 4. Choose the previous binding,
bind2, from the bind selector (this corresponds to the data source for the row set). This allows the arguments for the insert to be attached to "form" arguments. The form is the row set simulating form post. The names of the form "fields" are the columns from the row set.
- 5. Choose the appropriate items from the argument combo box for all 9 columns except
au_id. You should be able to match the names one-for-one. Do this for all columns except au_id. For the au_id argument choose old_au_id. The control sends the old data as well as the new data for update operations, allowing the developer to build arbitrary where clauses. The characters old_ are prepended to the database column name.
- Sapphire/Web has written the following code fragments:
SaGetNInputValue("au_lname", 0)
SaGetNInputValue("au_fname", 0)
SaGetNInputValue("phone", 0)
SaGetNInputValue("address", 0)
SaGetNInputValue("city", 0)
SaGetNInputValue("state", 0)
SaGetNInputValue("country", 0)
SaGetNInputValue("postalcode", 0)
SaGetNInputValue("old_au_id", 0)
- 6. Click Ok. Save your binding.
- 7. Test the project.
- a. Click the anchor on home.html to get to your interface page.
- b. Insert a new author.
- c. Find the new author.
- d. Now change one or more fields (except the
au_id field).
- e. Click Update.
- f. Find the updated author. The information should have changed.
Enabling Login
From your browser, select View->Source. Examine the VBScript subroutines for Insert_OnClick, Update_OnClick, and Delete_OnClick. Each calls a common sub-routine, UpdateRowSet, and then calls the corresponding method to perform its action. Also notice the sub-routine, sajsset_OnErrMsg, which captures error messages from the control.
To make the server application "login" aware, you will need to complete these steps:
- 1. From the Project Window, select
Edit->Project Code... .
- 2. Add the following line of code to the project's final code section:
SaSetupLogin();
- 3. You will also have to add two text fields to the HTML form in
vcfrm_i.htm:
username <INPUT TYPE="text" NAME="username" VALUE="" >
password <INPUT TYPE="password" NAME="password" VALUE="">
- 4. Now the text fields for login information can be used. The Sapphire/Web tutorial database will allow any login values.
[Top] [Prev] [Next] [Bottom]
[Contents]
info@bluestone.com
Copyright © 1997, Bluestone. All rights
reserved.