
At initialisation the ROM code is copied into RAM, and from that point on the memory map is
almost entirely within the RAM area.
The base OS provides several BBC micro style capabilities. For example, a limited set of OS_Byte
and OS_Word calls. Others, such as OS_WRCH direct their output to the printer.
The master system clock runs at 8MHz. This is divided by four to produce the 2MHz timing that that microprocessor requires.
The on-board Econet interface (that same type as used in the Master and RiscOS machines) will interrupt the microprocessor via NMIs. However it is possible to mask out the Non-Maskable Interrupts (!), and this is what the FileStore does during disc accesses.
The floppy disc controller is a 2793 FDC which is programmed to support 250kbps data transfer (MFM encoding).
The parallel printer connection uses a 26-way IDC plug connected to a ribbon cable connected to a Centronics plug. This is the same method used to attach a BBC microcomputer to a printer. The pin-outs are:
   1   |STRB      Data ready strobe (active low)
   3   D0         Data, bit 0
   5   D1         Data, bit 1
   7   D2         Data, bit 2
   9   D3         Data, bit 3
  11   D4         Data, bit 4
  13   D5         Data, bit 5
  15   D6         Data, bit 6
  17   D7         Data, bit 7
  19   |ACK       Data Acknowledge (active low)

  Even numbered pins from 2 to 22 are GND (0v).

  The remaining pins are not connected.
The FileStore provides an automatic clock. This kicks in when the FileStore detects an error in
the data received or transmitted; or when it detects no existing clock signal. The internal
clock is derived from the system master clock. 0.5µS pulses are fed into latches and
counters. You can alter links 3 to 7 to set the required clock rate.
There seem to be some "horror stories" about the clock cutting in when another clock
is already there (so you have two active clocks and the network acts erratically - how bad
does it get? does it warrant being called a "horror story"???) so the easy way to
disable the onboard clock is to not make any of the timing links.
The onboard clock will output a maximum of 1µS MARK and 1µS SPACE; but unfortunately
the FileStore won't keep up with it!
My FileStore works up as far as a 1:4 clock speed, which with the Filer gives a stunningly
pathetic 11K/sec transfer rate. :-)
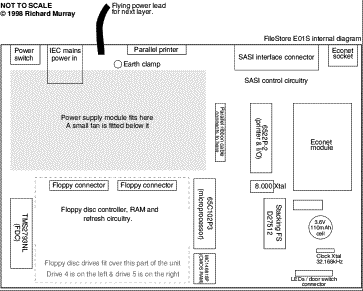
The clock links on both types of FileStore are at the lower right of the circuit board, links 3 to 7:
   E01 :

        1 2 1 2 4

        X o o o X   Times on left are MARK,
        X o o o X   times on right are SPACE.

     LK 3 4 5 6 7   Default is LK3 & LK7 - 1:4, 200kHz


   E01S :

        1 2 1 2 4

        X o o o X   Times on left are MARK,
        X o o o X   times on right are SPACE.

     LK 7 6 5 4 3   Default is LK3 & LK7 - 1:4, 200kHz

And...
To put the unit back together, perform the above steps backwards!
Do NOT forget...