
The RISC OS Repton 3 games faithfully reproduce the original BBC games, except that they run some 25% faster (in single-tasking mode) than in the BBC version. However, the BBC version only had a 160 horizontal pixel resolution in a 4-colour mode, whereas the RISC OS version is run in one of four modes - 320×256, 320×480 (pixel-doubled vertically, to maintain the aspect ratio), 640×480 (if the current game file uses high-resolution graphics) or in a desktop window; always in 16 colours. (The original 1988 release only single-tasked in 320×256 in 16 colours, and the 1998 release added the high resolution graphics.) Unlike the BBC version, you can test your newly designed characters and levels directly in the game section.
 |
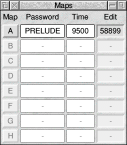
The editor is initially accessed by selecting Edit maps from the Repton 3 iconbar menu, or by clicking Adjust on the Repton 3 icon. This will open a window displaying the accessible maps. |
 |
The maps window also displays the passwords and time limits; for any level for which an edit code is displayed, these may be edited. If you change either, then the change is accepted as soon as you move the caret away from that field (via the keyboard); if you clear the field first or move the caret elsewhere by clicking, any changes which you've made will be discarded. |
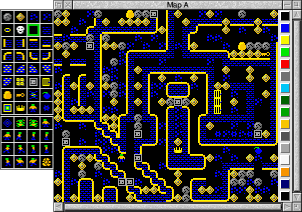
First, you'll have to select a map for editing - click on one of the buttons labelled A to H. This will cause two windows to be opened - one displaying the map, and another displaying the icons representing the available objects and characters. (Henceforth, these shall be referred to as 'objects'.)

To place an object in the map, click Select in the map window. You can drag Select to place more than one object. If you use Adjust, you'll delete whatever objects are under the pointer. If you want to select a different object, click on one of the icons in the attached window; it will be highlighted with a green border. (If the map window has the input focus, you can select another object by using the cursor keys.)
You cannot place more objects of a particular type than listed in the Limit per screen here. If you need to create another object somewhere but can't, you'll first have to delete an existing object of that type.
If the object being placed is a transporter, the pointer will be changed to a ![]() ; click somewhere to place the transporter's destination. A
; click somewhere to place the transporter's destination. A ![]() will be placed here to indicate that it is a transporter destination. You can Shift-click Select on a transporter to move the pointer to its destination. Deleting a transporter will automatically remove its destination.
will be placed here to indicate that it is a transporter destination. You can Shift-click Select on a transporter to move the pointer to its destination. Deleting a transporter will automatically remove its destination.
When you've finished editing, you must store the map by selecting the Store map option from the menu. (If the map editing window has the input focus, you can press Ctrl-S to store it as the current level.) If there is something wrong, e.g. Repton has no starting position, you will not be allowed to store the map until this has been corrected.
To the right of the map in the map editing window, there is a column of icons, each showing one of the colours used in the game. To edit a colour, click on its icon; a standard colour picker window will be opened. Note that the topmost colour (colour 0) is fixed as black and cannot be edited.
Note, however, that the 1988 release of Repton 3 made a few assumptions about the palette.
When you select Edit sprites from the menu, Repton 3 will export the sprites to Paint. You will see that there are 48 numbered sprites, each 32×32 pixels in low resolution mode, and 64×64 pixels in high resolution mode; these numbers are important, since they identify which character (and which animation frame) to which the sprite belongs.
To include the modified sprites in the currently loaded Repton 3 game file, you must open the save box and drag the icon to a Repton 3 window or its iconbar icon. The sprite sizes do not matter; if not correctly sized, it will be centred with any undefined area being set to black and any overflow being discarded.
The edit code for each level in a blank set of levels (as created by the Clear option) is 71414. For a completely blank level, the code is 71280.
 |
|
| Character | Limit per screen | |
|---|---|---|
| Repton | 1 | Placing Repton on the screen determines his starting position. Repton must have a starting position. |
| Rock | - | Rocks will fall if unsupported. |
| Diamond | - | All of the diamonds in the level must be collected. |
| Earth | - | Repton can dig his way through earth. |
| Barrier sections | - | The flat-topped variety will support rocks and eggs, but they'll roll off the curved-top sections. |
| Skull | - | Skulls are deadly if touched. They can be good objects to use when constructing mazes. |
| Fungus | - | A dangerous creeper, it grows fairly rapidly and is deadly on contact. |
| Crown | 1 | There must be one crown on each level. |
| Egg | 4 | Eggs, when cracked, hatch into fearsome monsters. |
| Safe | - | Each safe contains a diamond. |
| Key | - | When Repton obtains a key, all of the safes are opened, revealing their diamonds. If there are any safes, then a key must be present. |
| Spirit | 8 | Spirits must be carefully placed so that they will follow the walls to their left. |
| Cage | 8 | When a spirit enters a cage, it changes into a diamond. There must be at least as many spirits as there are cages. |
| Time capsule | - | Collecting a time capsule resets the time bomb's clock. |
| Time bomb | 1 | Repton must defuse the time bomb once he has collected all of the treasure and killed all of the monsters. |
| Transporter | 4 | These cause you to be rematerialised at some other location. However, each transporter may only be used once. |
|
|
|