|
Transfer
Entry
The
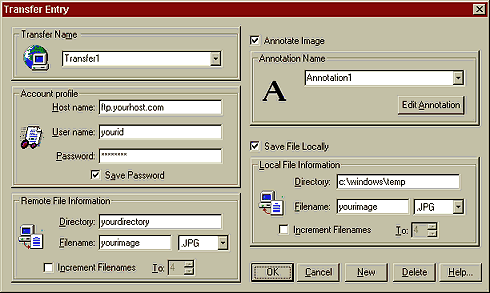
Transfer Entry dialog box allows you to set up all
the information necessary to transfer an image to a remote
location. You can name your transfer, set up an account
profile, remote file information, local file information and
select a certain annotation name to coincide with this
particular transfer.
- Transfer
Name
This is
the name which you give to this particular transfer
entry.
- Account
Profile
This
allows you to select the Host name your image is
sent to (you can either type in a Host
name or IP address), the FTP User
name which gives you access to your FTP/WWW server,
and the Password which belongs to the designated
User name.
- Remote
File Information
Under
Directory you place the directory name where you
want your image sent on the Internet. For example,
<www.yourcompany.com/yourimage.jpg>. You need to
name the file under Filename and select a file
extension so any web browser can decode and receive the
image automatically. You can also select a certain number
of Incremented Filenames in order to send a series
of images.
- Annotation
Name
This
allows you to select a particular Annotation to go with
this transfer.
- Local
File Information
Under
Directory you place the local directory name on
your computer where you want your images saved. You need
to name the file under Filename and select a file
extension. You can also select a certain number of
Incremented Filenames in order to save a series of
images.
|
