|
This is an advanced technique, and requires that you have
some knowledge of scripting in FileMaker Pro: to integrate
Aetiket Label Printer, you need to be able to write a script
using ScriptMaker in your own database.
This help page will lead you step by step through the
necessary steps and is organized into two sections: a
simple how to list, and
a more detailed step
by step discussion. Step 3 of the step by step
instructions is quite detailed, and designed to assist users
who are not familiar with creating their own scripts.
In brief, integrating Aetiket Label Printer is as
accomplished as follows:
SIMPLE HOW TO:
In Aetiket Label Printer:
1. Set the "Input
Method" preference to "Foreground" or "Background" and
the "Import File" preference to "Labels.fp3"
In your own FileMaker Pro solution:
2. Select and export
your label data to a file called: "Labels.fp3"
(See Using Aetiket
Label Printer with FileMaker Step 2 for more
details)
3. Create and run
a script that calls the "Remote Import" script in Aetiket
Label Printer.
STEP BY STEP:
Step 1 Setting the
Preferences:
Label Type
|

|
When calling Aetiket Label Printer with a
script, the current default label type in the
Preferences is used.
|
Import Method
There are two options for the Import Method
preference: "Foreground" and "Background"
If "Foreground" is selected, you are led to a setup
page during the import process in which the label type,
row and column numbers can be set by the user. The number
of labels is automatically set by the number of labels
imported.

When "Background" is selected, the default values set
in the preferences are used. This means that the default
label type as well as the current label row and column
position are used. Aetiket Label Printer functions in the
background, but the shareware dialog boxes and error
messages may be seen by the user. Foreground is
recommended.
Import File
The import file preference should be set to
"Labels.fp3"

Step 2
Select and export your label data to a file
called: "Labels.fp3". This step is covered in detail in
Step 2 of Using
Aetiket Label Printer with other FileMaker databases
Step 3 External
Scripts
Below, I lead you step by step through the
process of crafting the scripts, but if you are unsure of
what external scripts imply, I draw your attention to the
FileMaker Pro manual chapter 5: "Using ScriptMaker and
buttons" (FileMaker Pro 3.0 manual) or direct you to
FileMaker Pro Help.
Create a
Script
Create Export
Step
Create Remote Call
Step
Set Export
Fields
CREATE A SCRIPT
|
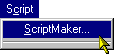
In your FileMaker Pro solution, open
ScriptMaker from the Script menu: we will create
one script that will both export your label data
and call Aetiket Label Printer to print it.
|
|
After choosing "ScriptMaker" from the menu, the
"Define Scripts" window will open. Create the Script by
typing its name as below:

|
Click the "Create" button:
|

|
The script will have been created, and the next step is
to create the export step.
CREATE EXPORT STEP
|
|
Having clicked Create, you will be in the
"Script Definition Window".
|
|
In the Script definition window, click the
"Clear All" button:

|
|
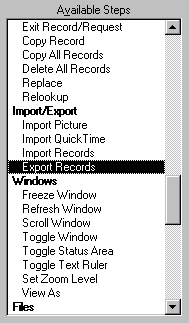
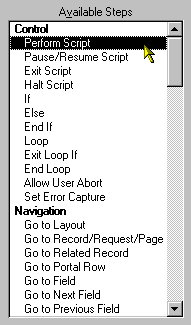
From the "Available Steps" list,
double-click the "Export Records"
Step.
|
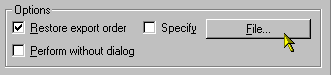
Specify the file to export to by clicking on the
appropriately named button:
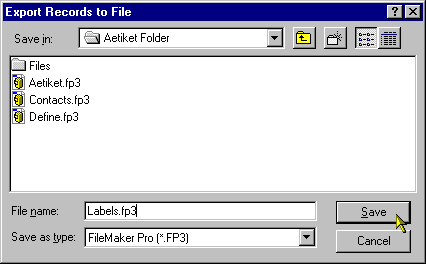
Specify the file to export as follows then click on
save, remembering to select the FileMaker Pro file
type:
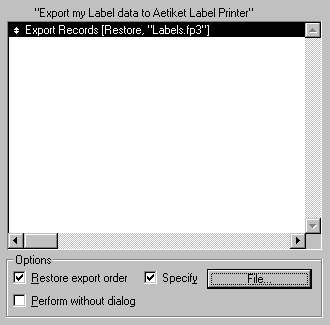
Your Script Definition window should now look like
this:
CREATE REMOTE CALL STEP
|
|
Next, we need to call a script in Aetiket
Label Printer. This enables the two databases to
communicate together.
|
|
From the Available Steps list, select the
"Perform Script" Step.
|
|
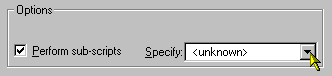
|
Specify the script to perform by selecting the
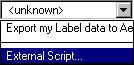
<unknown> menu:
Select External Script... from the menu:
Select the Change File button:
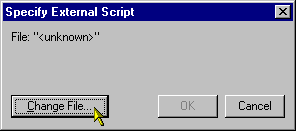
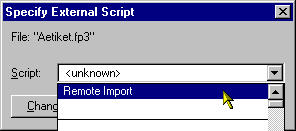
Select Aetiket.fp3 then click the Open button:

Select <unknown>, then "Remote Import" from the
pop-up menu. I have predefined this script in Aetiket
Label Printer for you to execute remotely.
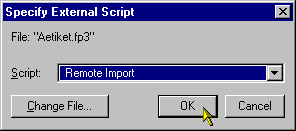
This is how the Specify External Script window should
look once you have selected "Remote Import". Click OK to
continue:
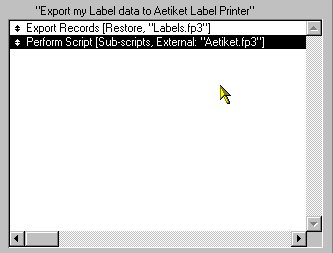
This is how the Script window should look after you
click OK. There are two scripts defined: one exports the
records to a file called Labels.fp3, and the other calls
the external script "Remote Import" in Aetiket Label
Printer.
Click OK in the Script Definition window.
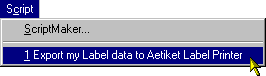
You should now be able to select your script from the
Script menu. This is how the Script menu should look when
you are finished. The Export my... script can be selected
from this menu at any time.
SET EXPORT FIELDS
When you run the script you have created, it will
prompt you for the Export Field order as shown in the
window below. The field you chose to export is what will
be sent to Aetiket Label Printer:
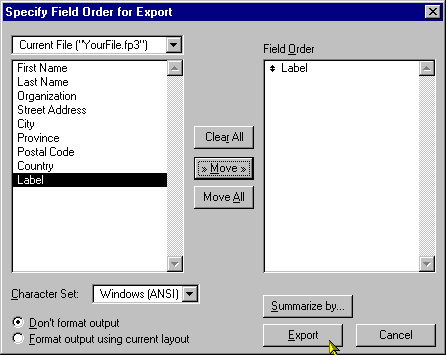
Here you specify the data that you wish to
export to Aetiket Label Printer. In this example, I have
a chosen a field which is conveniently called "label".
Any field will do as long as it isn't a container field.
It also has to be just one field. Any other fields
exported will be ignored.
One last note: to keep the Export Field Order dialog
window from showing up every time you run your script,
check the "Perform without dialog" button in the Scrip
Definition window as shown below:

That's it! I hope that this has been useful for the
casual FileMaker Pro user. FileMaker Pros will know what to
do, and probably don't need the hand holding. For the rest
of us, however...
|