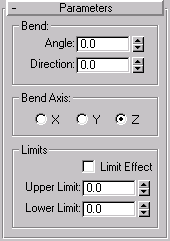


Bends The current selection up to 360 degrees about a single axis. The Bend modifier produces a uniform bend in an objects geometry. You can control the angle and direction of the bend on any of three axes. You can also limit the bend to a section of the geometry.

Angle: Sets the angle to bend from the vertical plane (1-360).
Direction: Sets the direction of the bend relative to the horizontal plane (1-360).
X/Y/Z: Select one of these to specify the axis that will be bent. Note that this axis is local to the Bend gizmo and not related to the selected entity.
Limit Effect: Check this to apply limit constraints to the bend effect.
Upper Limit: Sets the upper boundry in world units from the bend center point beyond which the bend no longer affects geometry.
Lower Limit: Sets the lower boundry in world units from the bend center point beyond which the bend no longer affects geometry.
The object bends to this angle beginning at the lower limit, by default the location of the modifiers center.
The object swivels around the axis.
You can reverse angle and direction by changing a positive value to a negative value.
The bend is applied between these limits. The surrounding geometry, while unaffected by the bend itself, is rotated to keep the object intact. This is analogous to bending a pipe the unbent sections rotate but remain straight.
The limit settings remain on either side of the center as you move it. This lets you relocate the bend area to another part of the object.