

The MeshSmooth modifier smoothes geometry in your scene by adding faces at corners and along edges. The effect of MeshSmooth is to round over corners and edges as if they had been filed or planed smooth.When you apply MeshSmooth, an extra face is added for every vertex and edge. Use MeshSmooth parameters to control the size an number of new faces, and how they affect the surface of the object.
Note: If MeshSmooth detects an invalid mesh, it disables itself and displays an error message in its Parameters rollout stating “MeshSmooth Error - See Help.” The disabled MeshSmooth modifier ignores any changes to its parameters. MeshSmooth works only with meshes where no more than two faces share a single edge. Edges shared by more than two faces are usually the result of manual mesh editing. Try editing the mesh below the MeshSmooth modifier to remove invalid faces.
Note: Enhancements made to the MeshSmooth modifier may cause minor variations to the number of faces and vertices in a MeshSmooth modified object created in Max 1.x and imported into Max 2.0.
Cleaner Submaterial Assignment: The reassignment of material IDs has been improved, so when you apply MeshSmooth to an object assigned a Multi/SubObject material, the boundaries between the submaterials are cleaner and less likely to produce the fractal-like patterns of interlocking materials.
Mapping Coordinates and Vertices: MeshSmooth maintains mapping coordinates and supports color vertices. Note that, for best result with complex mapping coordinates, use the Quad Output checkbox option.
Works with "Ratsnest" Meshes: The MeshSmooth modifier now works with what were previously considered invalid meshes. For purposes of this function, a valid mesh would be a mesh in which each edge shares no more than two faces. An invalid mesh (sometimes called a ratsnest) is one in which an edge might share three or more faces. (You can create such a mesh by making a box, creating a vertex outside of the box, and then building a face between the new vertex and two corners of the box.)
Previously, when you applied MeshSmooth to an invalid mesh, its parameters appeared, but they had no effect on the object. Now, MeshSmooth can be used to modify such an object.
Cleaner Submaterial Assignment: The reassignment of material IDs has been improved, so when you apply MeshSmooth to an object assigned a Multi/SubObject material, the boundaries between the submaterials are cleaner and less likely to produce the fractal-like patterns of interlocking materials.

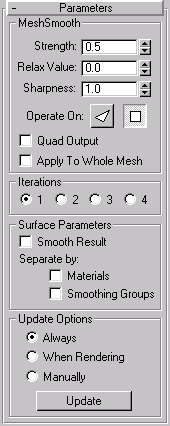
Strength: Sets the size of the added faces using a range from 0.0 to 1.0.
Relax Value: Applies a positive relax affect to smooth all vertices. See the help topic for the Relax modifier.
Sharpness: Determines how sharp a corner must be before faces are added to smooth it. Sharpness is calculated as the average angle of all edges connected to a vertex. A value of 0.0 prevents the creation of any faces. A value of 1.0 adds faces to all vertices even if they lie on a plane
Operate On: Face/Polygons: These two radio buttons replace the old Eliminate Hidden Edges checkbox. When the polygon button is chosen, it’s the same as checking Eliminate Hidden Edges, and when the Face button is chosen, it’s the same as unchecking Eliminate Hidden Edges.
Quad Output: When this is checked, MeshSmooth produces only four-sided facets (assuming you don’t look at the hidden edges, since the object is still made up of triangular faces). If you apply this with default parameters to a whole object, like a box, its topologically exactly the same as Tessellate, edge-style. However, rather than using tension to project face & edge vertices out of the mesh, you use the MeshSmooth Strength to relax the original vertices and the new edge vertices into the mesh.
Note: Although the above two options might seem similar, they’re not. The Face/Polygon buttons specify which type of facets to work on, while the Quad Output checkbox determines the type of facets to output.
Apply To Whole Mesh: When checked, any subobject selection passed up the Stack is ignored and MeshSmooth is applied to the entire object. Note that the subobject selection is still passed up the Stack to any subsequent modifiers.
1/2/3/4: Use the options in the Iterations area to choose how many times to apply MeshSmooth. Each iteration generates new faces using the vertices created from the previous iteration.The number of vertices and faces in an object can increase as much as 4X for each iteration. Applying four iterations to even a moderately complex object can take a long time to calculate.You can press Escape to stop calculation and revert to your previous iteration setting.
Use options in the Surface Parameters area to apply smoothing groups to the object and restrict the MeshSmooth effect by surface properties.
Smooth Result: When checked, the same smoothing group is applied to all faces.
Seperate by Materials: When checked, prevents the creation of new faces for edges that separate Material Ids.
Seperate by Smoothing Groups: When checked, prevents the creation of new faces for edges that separate faces that do not share at least one smoothing group.