

Deforms an object based on a shape spline or NURBS curve path. You can animate the object’s position along the path, stretch it along the path, or rotate and twist it about the path. There’s also a world space modifier version of this see Path Deform (WSM).
Generally, you use the Path Deform Modifier when you want to keep the object in place, but deform it to a path, and use the Path Deform (WSM) when you want to move an object to a path while keeping the path in the same world space.
The Path Defrom (WSM) modifier replaces the space-warp version that shipped with previous versions of 3DS MAX, and is incompatible with previous versions. See Path Deform (WSM). For more details on this and how to fix incompatibilities from the previous version.
To use this modifier, you apply it, then click the Pick Path button and select a shape or curve consisting of a single open or closed spline. Once the object is assigned to the path, you can then adjust the various parameters to deform or animate the object along a gizmo copy of the path.

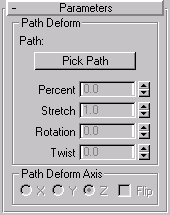
Provides controls that let you pick the path and adjust the object’s position and deformation along the path.
Path: Displays the name of the selected path object.
Pick Path: Click this, and then click a shape or NURBS curve to use as the path. A gizmo appears that’s the shaped like a copy of the path with the gizmo path aligned (as a default) with the local Z axis of the object. Once the path is assigned, you can adjust the deformation of the object using the controls below. Note that the path you pick should consist of a single, open or closed spline. If you use a path object consisting of multiple splines, only first spline is used.
Percent: Moves the object along the gizmo path based on a percentage of the path length.
Stretch: Scales the object along the gizmo path, using the object’s pivot point as the base of the scale.
Rotation: Use this to rotate the object about the gizmo path.
Twist: Twists the object about the path. The twist angle is based the rotation of one end of the overall length of the path. Typically, the deformed object takes up only a portion of the path, so the effect can be subtle.
X/Y/Z: Choose one of these options to rotate the gizmo path to align with a specified local axis of the object.
Flip: Check this to flip the direction of the gizmo path 180 degrees.
The first two examples, below, demonstrate the basic differences in orientation and the relationship between the object and its path when using the Path Deform Modifier and the Path Deform (WSM).
Looking at the axis tripod for the extruded text object, you can see that its Z axis runs from back to front relative to world space.
A circular gizmo appears. The circle runs through the local Z axis of the text object. Because of its orientation, its effect is minimal, but you can see a slight wedge-shaped deformation from the top view.
The circle gizmo rotates to run through the specified axes, deforming the text object differently with each change.
The text object is further deformed by its relative position to the gizmo.
The deformation of the text object alters because its gizmo is an instance of the shape object.