

Let you maintain and preview materials and maps. The sample windows show spheres by default. Each window previews a single material. You can change the material by using the Material Editor controls, and you can assign the material to objects in the scene. The easiest way to do this is to drag the material from the sample window to objects in viewports.
A sample window is "hot" when the material in the window is assigned to one or more surfaces in the scene. When you use the Material Editor to adjust a hot window, the material in the scene changes at the same time.
You can have the same material (with the same name) in more than one sample window, but only one window containing that material can be hot. You can have more than one hot sample window, as long as each has a different material.
If you drag-copy a material from a hot window to another window, the destination window is not hot. This is one way to work on a material in the Material Editor without directly affecting the scene. You can also "cool" a hot window by clicking the Make Material Copy button below the sample windows. This basically copies the material in the sample window on top of itself so that it's no longer used in the scene.
Note: Maps that use environment coordinates (Cylindrical Environment, Shrink-Wrap Environment, or Spherical Environment) are now displayed in the sample windows so you can get a better idea of what they look like. The method of doing this “fakes” the view vector to be the normal to the surface. This provides better visual feedback when you use sample spheres; don’t use sample cylinders or cubes for environment-mapped materials.
You can drag and drop materials from sample windows to objects. You can also drag to and from map and material buttons. Specifically, you can drag from:
And you can drag to:
You can assign materials to objects in the scene by dragging a material button, sample window, or Browser listing into the viewport and over an object. When you release the mouse, the material is assigned. If you drag a material over two or more selected objects, an alert message asks if you want to assign the material to the object or to the selection. Choose the option you want, and click OK.
Note: The content dragged from a sample window is always the top level of the sample window, regardless of which level is currently displayed. Thus, if the sample slot contains a material, you can’t drag from the sample slot to a map button, even if you’re at the map level of the material.
When the Browser is set to browse from the Material Library, you can drag materials and maps from elsewhere into the Browser, and add them to the library this way. For example, you can drag a sample window into the Browser, or a projector map into the Browser.
You cannot drag and drop from the modal version of the Browser (when OK and Cancel buttons are present).
Note: Drag-and-drop distinguishes between material maps and bitmaps. A bitmap is an image file, such as a TGA or JPEG file. A material map can include bitmaps, but it can also be a parametric image such as Checkers or Noise. You can drag any map window or button to any other map window or button: including the sample windows. However, you can drag a bitmap from one button only to another button that specifies a bitmap file.
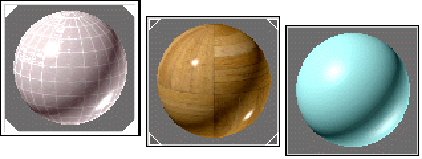
The corners of a sample window indicate whether the material is a hot material assigned to the scene.

Left: "Hot" material assigned to currently selected object
Middle: "Hot" material -- assigned to scene but not to current object
Right: "Cool" material -- active but not assigned to scene
Specifically, these are the possibilities:
When you right-click the active sample window, a popup menu appears. For other sample windows, click or right-click once to select them, then right-click to use the popup.
The popup has these options:
Drag/Copy: Sets dragging a window to copy mode. When this item is checked, dragging a sample window copies the material from one sample window to another, or from the sample window to an object in the scene or a material button.
Drag/Rotate: Sets dragging a window to rotate mode. When this item is checked, dragging in the sample window rotates the sample object. This is an aid to previewing the material. Drag over the object itself to rotate the object about its X or Y axis; drag in the corners of the sample window to rotate the object about its Z axis. In addition, if you press SHIFT before dragging in the center, the rotation is constrained to the vertical or horizontal axis, depending on your initial drag direction.
If you have a 3-button mouse and are using Windows NT, the middle mouse button rotates the sample object while Drag/Copy mode is active. This doesn't work in Windows 95.
Reset Rotation: Resets the sample object to its default orientation.
Render Map – Renders the current map, creating a bitmap or an AVI file (if the map is animated). Only the current map level renders. That is, the rendering shows the image displayed when Show End Result is turned off.
If you’re at a material level instead of a map level, this menu item is disabled.
Options: Displays the Material Editor Options dialog. This is an alternative to clicking the Options button.
Magnify: Generates a magnified view of the current sample window. The magnified window appears in its own, floating (modeless) dialog. You can display up to 24 magnified widnows, but you can’t display the same sample window in more than one magnified window at a time. You can resize magnify windows. Clicking a magnify window activates the sample window, and vice versa.
Shortcut: Double-click a sample window to display the magnified window.
The magnify window’s title bar displays what is in the editable material name field. It varies depending on which level of the material is active.
You can turn off the Auto toggle to prevent the magnified window from updating automatically. This can save rendering time, especially when you have resized the manified window to make it larger. You can update the window manually by clicking Update.
Dragging a different sample window to the magnify window changes the contents of the magnify window.
3 X 2 Sample Windows: Specifies a 3 x 2 array of sample windows. (The default: 6 windows.)
5 X 3 Sample Windows: Specifies a 5 X 3 array of sample windows. (15 windows.)
6 X 4 Sample Windows: Specifies a 6 X 4 array of sample windows. (24 windows.)
By default, the sample object in a sample window is a sphere. You can use the Sample Type flyout to change this to a cube or a cylinder. You can also create a custom sample object by creating a MAX scene that shows the object.
The scene you create should contain a single object that fits into an imaginary cube that is 100 units on each side. The object must be at the root level of the scene – it can’t be linked to other objects. If more than one object is in the scene, only the first object listed in the Track View hierarchy is used as the sample object.
If the object is of a type that doesn’t have a Generate Mapping Coords toggle, apply a UVW Map modifier to it.
After you have saved the single-object scene as a .max file, use the Material Editor Options dialog’s Custom Sample Object area to specify the file. When you specify the file, a new button appears at the right of the Sample Type flyout – this button, which shows an object with a question mark, displays the sample object file you chose.
If the sample object scene contains only the object, sample windows display it with the default sample window lighting. If the scene also contains a camera and lights, you can use the camera to specify the view, and the lights to light the object as you choose. For this to take effect, you must turn on the Load Camera and/or Lights toggle in the Custom Sample Object area.
The active sample window is displayed with a white border around it.
The sample window shows a sample object shaded with a material. (By default, the sample object is a sphere.) The sample object is lit by a light source above it and slightly toward the viewer. For the sphere, the highlight is in the upper-left quadrant, the diffuse color shows most clearly above and to the left of the highlight, shading toward the ambient color at the sphere's lower right.
The new shape appears in the sample slot, with the material mapped to it.
The flyout gives you three options: sphere (the default), cylinder, or box.
The Render Map dialog appears.
A virtual frame buffer appears displaying the map. If Save to File is checked, the image is also saved to disk.
The object should fit into an imaginary cube that’s 100 units on each side. Also, the object must be at the root level of the scene: it can’t be linked to other objects.
If more than one object is in the scene, the Material Editor uses the first object listed in the Track View hierarchy.
If the object has a Generate Mapping Coords toggle, turning it on is optional. The Material editor uses the default . If you want to use coordinates other than those built into the object, assign a UVW Map modifier and set up your own coordinates.
Your custom object appears in the sample window.
If the size of your object is not quite right for the sample window, adjust its size and resave the scene. To update the sample window so it uses the newly saved .max file, open the Material Editor Options dialog, and then click OK.
If more than one camera is in the scene, the Material Editor uses the first camera listed in the Track View hierarchy.
Sample windows set to use the custom object now display the object as seen through the camera. If lights are in the scene, those lights are used in the sample window instead of the default lights.