

The Sphere button produces a full sphere, which you can then resize to an exact hemisphere or other portion of a sphere.
The defaults produce a smooth sphere of 16 segments with the pivot point at its center.
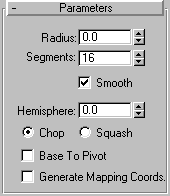
Radius: Set this to specify the radius of the Sphere
Segments: Sets the number of polyginal divisions the Sphere has.
Smooth: When selected (the default), faces of the sphere are blended together, creating a smooth appearance in rendered views.
Hemisphere: Sets possible values from 0.0 to 1.0. During creation, the default is always 0.0, producing a full sphere. Increasing values after creation progressively “cuts off” the sphere, starting at the base. A setting of 0.5 produces a hemisphere, and 1.0 reduces the sphere to nothing. Default=0.0.
Chop and Squash toggle creation options for Hemisphere.
Chop: When selected the number of vertices and faces in the sphere are reduced by “chopping” them out as the hemisphere is cut off. This is the default.
Squash: Maintains the number of vertices and faces in the original sphere, “squashing” the geometry into a smaller and smaller volume toward the top of the sphere. Since the geometry is maintained, you can use different versions of a squashed sphere for morph objects.
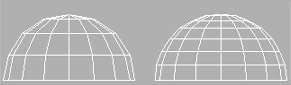
Effects of Chop and Squash during hemisphere cut-off
Base To Pivot: Check this to move a sphere upward along its local Z axis so the pivot point is at its base. When unchecked, the pivot point is on the construction plane at the center of the sphere. Default=clear.
Checking Base To Pivot lets you animate a hemisphere so it appears to grow out of the construction plane or sink into it. It also lets you place spheres so they rest on the construction plane, like pool balls on a table.
Effect of using Base to Pivot setting
Generate Mapping Coordinates: Check this to automically generate coordinates for applying mapped materials to the box.Default=clear.
The sphere is reduced to exactly the upper half, a hemisphere. If you use the spinner, the sphere changes in size.