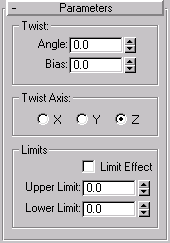


The Twist modifier produces a twist like a screws thread in an objects geometry. You can control the angle of the twist on any of three axes, and set a bias that compresses the threads relative to the pivot point. You can also limit the twist to a section of the geometry.

Twist modifier applied

Angle: Determines the amount of twist around the vertical axis.
Bias: Causes the twist rotation to bunch up at either end of the object. The parameter ranges from -100 to 100. When the parameter is negative, the object twists closer to the gizmo center. When the value is positive, the object twists more away from the gizmo center. When the parameter is 0, the twisting is uniform.
X/Y/Z: Select one of these to specify the axis along which the twist will occur. This is the local axis of the Twist gizmo.
LimitsThe twist will only be applied to vertices that lie in-between the lower and upper limits. The two spinners represent distance along the gizmo's Z axis (Z=0 is at the gizmo's center). When they are equal it is the same as turning off Limits.
Limit Effect: Check this to apply limit constraints to the Twist Modifier.
Upper Limit: Sets the upper limit for vertices that twist will be applied to.
Lower Limit: Sets the lower limit for vertices that twist will be applied to.
You can switch between axes at any time, but only one axis setting is carried with the modifier.
The object twists to this amount beginning at the lower limit, by default the location of the modifier’s center.
A positive value compresses the twist at the end away from the pivot point, a negative value toward the pivot point.
The twist offset is applied between these limits. The surrounding geometry, while unaffected by the twist itself, is moved to keep the object intact.
The limit settings remain on either side of the center as you move it. This lets you relocate the twist area to another part of the object.