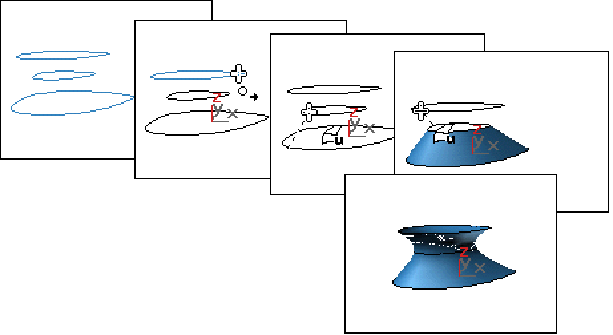


A U Loft surface interpolates a surface across multiple curve sub-objects. The curves become U-axis contours of the surface.

Using multiple curves to create a U Loft surface
Tips:
When you turn on the U Loft button, or while a U Loft sub-object is selected, a rollout with the U Loft parameters appears. This rollout appears only during U Loft creation, and when one U Loft sub-object is selected. It isn’t possible to edit more than one U Loft at a time, so unlike other NURBS sub-objects, the rollout doesn’t appear when multiple U Loft sub-objects are selected.
Tip: When you edit a U Loft sub-object, close the Surface Common rollout to see the U Loft Surface rollout more readily.
U Curves: This list shows the name of the curves you click, in the order you click them. You can select curves by clicking their names in this list. Viewports display the selected curve in blue. Initially the first curve is the one selected.
Arrow Buttons: Use these to change the order of curves used to construct the U Loft. Select a curve in the list, and then use the arrows to move the selection up or down.
Reverse Curve: When set, reverses the direction of the selected curve.
Insert: Adds a curve to the U Loft surface. Click to turn on Insert, then click the curve. The curve is inserted before the selected curve. To insert a curve at the end, first highlight the "----End-----" marker in the list.
Remove: Removes a curve from the U Loft surface. Select the curve in the list, and then click Remove.
Refine: Refines the U Loft surface. Click to turn on Refine, then click a U-axis iso curve on the surface. (As you drag the mouse over the surface, the available curves are highlighted.) The curve you click is converted to a CV curve and inserted into the loft and the U Curves list. As when you refine a point curve, refining a U Loft can change the curvature of the surface slightly. Once you’ve refined the surface by adding a U curve, you can use Edit Curve to change the curve.
Edit Curve: Lets you edit the currently selected curve without switching to another sub-object level. Click to turn on Edit Curve. The points or CVs of the curve are displayed, as well as the control lattice if the curve is a CV curve. You can now transform or otherwise change the points or CVs as if you were at the Point or Curve CV sub-object level. To finish editing the curve, click to turn off Edit Curve.
Tip: When you edit curves in a U Loft, turning off display of the U Loft itself can make the curves easier to see and improve performance as well. Use CTRL + D (while the Plug-In Keyboard Shortcut Toggle is on) to toggle display of dependent sub-objects, including U Lofts.
The U Loft surface can deviate from the curve if you edit a curve in a U Loft by increasing the weight of the curve CVs. You can work around this by refining the curve at the point where the surface deviates.
Display Iso Curves: When set, 3DS MAX displays the U Loft’s V-axis iso curves as well as the U-axis curves used to construct the loft. The V-axis curves are only for display. You can’t use them for surface construction.
3DS MAX creates the U Loft, "stretching" it across the curves you click. The order in which you click the curves can affect the shape of the U Loft surface. The names of the curves appear in the U Loft Surface creation rollout. You can turn off Display While Creating to prevent display of the surface until you’re done. This can speed up creation time.
While creating a U Loft, you can press BACKSPACE to remove the last curve you clicked from the list of U Loft curves.