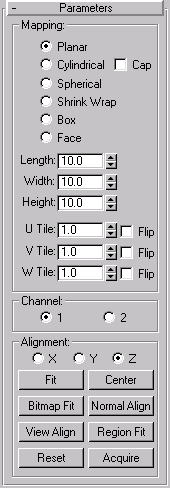


Provides functions to apply and edit mapping coordinates.You use a UVW Map modifier for two main reasons:
If you apply a UVW Map modifier to an object with built-in mapping coordinates, the applied coordinates take precedence. You can save memory and disk space by unchecking the Generate Mapping Coordinates box for any object to which you apply a UVW Map modifier

Planar, Cylindrical, Spherical, Shrink Wrap, Box: Determines the type of mapping coordinates used. The scale of the mapping icon defaults to being defined by the largest dimension of the object at the time the modifier is applied. You can animate the projection at the gizmo level.
Length, Width, and Height spinners: Let you specify the dimensions of the UVW Map gizmo. There are a few things to note about these:
Because the orientation of many of the primitives has been changed for 3DS MAX 2.0, the UVW Map in 3DS MAX 1.x files will load with the current orientation, but the Length, Width, and Height spinners might affect different axes than they would if the UVW Map were applied in 3DS MAX 2.0. For example, the Width spinner affects the X axis of a Box UVW Map assigned in 3DS MAX 2.0, whereas the Height spinner might affect the same axis for an object brought in from 3DS MAX 1.x..
U Tile, V Tile, W Tile: Controls the UVW tiling of the image. These are floating point values and are animatable for some unusual displacement effects over time. Let you specify the dimensions of the UVW Map
Cap: For cylindrical mapping, determines whether or not to apply planar mapping coordinates to the caps of the cylinder.
Flip: Flips the image about the given axis.
Vertex Colors: The second channel of UVW coordinates is shared by the new ability to assign colors to vertices. As a result, you can’t do both to the same geometry. If you adjust vertex colors in an editable mesh, you mess up the mapping in the second UVW channel for that mesh.
View Align: Click this to reorient the mapping icon to face the active viewport. The size of the icon is unchanged.
Region Fit: Click this button to enter a mode in which you can drag in the viewports to define the region of the mapping icon. The orientation of the icon is not affected.
Bitmap Fit: When used for Cylindrical mapping, this function has been altered so that the height rather than the radius of the gizmo is scaled to match the bitmap. For best results, first use the Fit button to match the radii of the object and gizmo, and then use Bitmap Fit.
X/Y/Z: Select one of these to flip the alignment of the mapping gizmo. Each specifies which axis of the gizmo is aligned with the local Z axis of the object. Note the difference between these options and the Flip checkboxes beside the U/V/W Tile spinners. The Alignment option buttons actually flip the gizmo orientation, while the Flip checkboxes flip the UVW mapping orientation.
Fit: Fits the gizmo (mapping icon) to the extents of the object and centers it so that it’s locked to the object’s extents.
Center: Moves the gizmo so that its center coincides with the center of the object.
Bitmap Fit: Displays the standard bitmap file browser so that you can pick an image. For planar mappings, the map icon is set to the aspect ratio of the image. For cylindrical mappings, the height is adjusted so that the circumference of the cylinder divided by the height of the cylinder equals the aspect ratio. (In other words, if you unrolled the cylinder as if it was a label on a soup can, you’d get the undistorted image.)
There are now two channels of mapping coordinates that can be assigned and carried by an object. This lets you have two different sets of coordinates, simultaneously, on the same face.
UVW channel 1 provides the original mapping coordinates found in 3DS MAX 1.x. These are also the coordinates that are assigned when you turn on the Generate Mapping Coordinates checkbox in the creation parameters of the object. UVW channels 1 or 2 are chosen using the two option buttons in the new Channel area of the UVW Map modifier. Since the UVW Map modifier defaults to channel 1, unless you switch to channel 2, the mapping will function as it always did.
To use the second channel, you must not only turn it on in the UVW Map modifier, but also assign it at the map level of the material assigned to the geometry.
The two UVW Map channels are accessed in various places in 3DS MAX. We’ll list and describe all of them here.
Generate Mapping Coords: This checkbox, in the creation parameters of most objects, assigns UVW Map channel 1 when checked.
UVW Map Modifier: As described, the UVW Map modifier has a new Channel area containing two options buttons, labeled 1 and 2. This lets you specify which UVW coordinates are used by this UVW Map modifier. The Modifier Stack can pass two of these channels simultaneously for any face. Put another way, the mapping coordinates for a face are determined by the last two items in the Stack that specify channels 1 and 2.
UVW Xform and Unwrap UVW’s: These two modifiers also contain the Channel option buttons.
Materials Editor Channel Assignment: You assign the channel to be used by a map in the Coordinates rollout at the map level in the Material Editor. The assignment varies depending on the type of map:
2D Maps: In the Mapping pop-up list for the Texture option, you can now choose Explicit UVW 1 or Explicit UVW 2.
3D Maps: At the top of the Coordinates rollout are three option buttons: XYZ, UVW1, and UVW2.
Materials Editor Sample-Slot Viewing: In the Options dialog of the Materials Editor are two options in the UVW 2 Mapping area that determine how the 2nd channel is displayed in the sample slots. When set to Generated by Object, the mapping used by the object is used. When set to Planar, the map from the second channel is displayed as a planar map.
Missing Texture Coordinates Alert: The Missing Texture Coordinates alert now lists not only the name of the object that’s missing coordinates, but prefaces it with the UVW channel that’s missing the coordinates. For example: (UVW 2): Torus01.
This function has been altered slightly so that it respects smoothing groups and uses the interpolated normal based on face smoothing. As a result, you can orient the mapping icon to any part of the surface, rather than having it “snap” to face normals.
This new method is also used for the Normal Align tool in the toolbar.
An additional Face option has been added to the Mapping area of this modifier. This lets you assign face mapping via the UVW Map modifier. It’s the same type of face mapping as that found in the Materials Editor. Having it in the modifier lets you easily assign face mapping to a selection of faces, and you can edit the mapping using the Unwrap UVW modifier.
Both coordinate channels are now assigned to the geometry. The next step is assign a mapped material that uses both channels.
The other map is already assigned channel 1 as a default.
You can only view one map at a time in the viewport, but you can switch between viewing the maps in the viewport. You can adjust the UVW Map gizmo to affect the mapping of channel 2 without altering the mapping of channel 1. If you’ve assigned two UVW Map modifiers, you can switch between them and adjust their respective gizmos to alter the map on channel 1 and that on channel 2. Render the scene to see both maps simultaneously.