Step 1 - Creating the Bin Outline
In this stage we create the outline of the bin model, a bit like a cross section.
Enter the Detail Editor by clicking Editor, Detail Editor. Add an axis: Object, New, Axis.
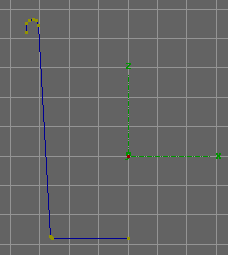
If the axis is not positioned at 0,0,0 then put it there using the Transformation requester: Object, Transformation, in the box click Position and change all values to 0 and click Perform. We now want to make the outline of the bin by adding lines to the axis. As we will only be working in the Front View you can maximize it by double clicking on the gray or blue vertical panel that says "Front". Add some lines to the axis: Mode, Add, Lines. Click in the View to add lines to the axis. The outline should look similar to the one below, although a different shaped outline will result in a different shaped bin. The yellow boxes show where I clicked to add the lines.
 You can load this as the background for your outline if you wish: Save the image (right click on image, choose save, choose location, click ok), then in Imagine click View, Backdrop, Load and select the image from the directory you saved it into. You can then trace it to get an identical outline.
Basic principles of a bin outline: The point in the base at the center should be directly below the axis. If it is not you will get a hole in the base of your bin. To make sure it's in the right place select the point by clicking Mode, Pick, Points, and clicking on the point. Then open the Transformation requester by clicking Object, Transformation, in the box click Position and change the x value to 0 and click Perform. The base of the bin should be flat and the side of the bin should be flat, you can achieve this by only using one line although I made rounded corners to my bin by using several lines at the corners. I also added a lip to the top of the bin to make it look more realistic.
You have now finished the bin's outline. Get back to the 'quad view' by double clicking on the vertical panel that says "Front" again. Enter Pick Groups mode: Mode, Pick, Groups and save the object by clicking Object, Save.
 You can load this as the background for your outline if you wish: Save the image (right click on image, choose save, choose location, click ok), then in Imagine click View, Backdrop, Load and select the image from the directory you saved it into. You can then trace it to get an identical outline.