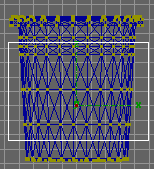
 When you let go of the mouse the faces inside the white box become a brighter blue. If these are not the faces you want to contain the holes or you didn't get all the faces you wanted then click outside the white box and try again.
We can now tell Imagine to remember which faces we have selected by making them a subgroup. To do this simply click Functions, Make, Make Subgroup type HOLES then click OK. Enter pick points mode (Mode, Pick, Points) and select one of the lowest points which you selected to contain the holes. Click Object, Transformation, click Position in the box that appears and write down the value next to the letter Z. This tells us where on the Z axis the point is located and so where on the Z axis the holes start. Click OK and repeat this for one of the highest points selected to contain the holes.
Get back in to pick groups mode (Mode, Pick, Groups), and edit the object's attributes (Functions, Attributes. Click on the Base Colour box and a colour requester should appear. Choose the colour of your bin (mine is Red: 58, Green:161, Blue:110) then click OK. Click Object by the small preview window and then Apply to update the preview window. Click the Specular Colour box and change it to white (this will make the bin look plastic) and change the Spec. Hardness to 204. Click Apply again to update the preview window.
Click on a tab at the top of the Attributes window called Maps. This will change the contents of the Attributes box so we can add the holes map. Click Add Brush and select the holes image you created in you paint program and click Open. The name of the map will appear in a blue box, double click on this to edit the way the map is used. Click on the Browse box next to the Subgroup box, select the subgroup you created and click OK. This tells Imagine to scale the maps so it only fits in the subgroup. Click the Wrapping tab at the top of the Attributes window. Select Cylinder around Z as the mapping type as the bin is very similar to a cylinder shape around the middle. Click the Usage tab at the top of the Attributes window and select Filter. Click Apply to update the preview window. It should now look like this in the preview window.
 Imagine has stretched the holes over the whole subgroup but we want to fit several holes into the subgroup. Now get out your calculator and work out the distance between the two points we measured. Mine are roughly -52 and 171 so I add 52 to 171 which equals 223. However if both values are positive you must minus the smallest number from the largest number (e.g. 171 and 52 = 171 -52), if they are both negative you must minus the smallest negative number from the largest negative number (e.g. -171 and -52 = -171 -52). Press divide on your calculator and enter number of strips of holes you want on your bin. Click on the General tab and click Transform Axes. Click Size and enter the value you have just found with your calculator in the Z box. Click Position and enter the Z value of the lowest point you found in the Z box. Click Perform and then Apply when you get back to the normal Attributes window. Click the Wrapping tab and click the Repeat box. Click Apply and the holes will look correct in the preview window.
 If it doesn't look like this check you've entered all the correct values and that your calculations are correct. Click OK to get back to the normal Attributes window. You've finished the basic bin with holes but we need to add some final touches for extra realism.