

| Intrinsic TowerBy Mick Sutton |
 Once a decision has been made to tower your A1200, there are two options that are open to you. The first being 'a do it yourself job' (if you're feeling brave!) is to buy a PC Midi tower and convert it. This may or may not be easy, depending on what unforeseen problems arise, such as if there is room to install the A1200 motherboard without fouling on the power supply, and the little problem of getting access to the Amiga ports via the back of the tower.
Secondly, you could go for the ready made solution such as the Power Tower (Ł129), Micronic (Ł149) , Eyetech (Ł149) or as in this case the ICS solution. This route to Amiga heaven may work out a little more expensive but in my opinion well worth it.
So what do you for your money?
On opening the package that arrived in the post, it consisted of two main parts.
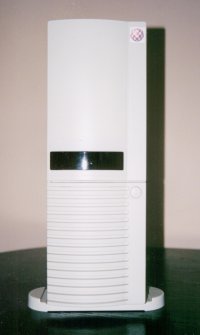
The tower with parts already assembled and in place.
The PC keyboard plus various cables such as 2.5" to 3.5" IDE HD (about 30cm long) and long (40cm) floppy drive cable.
On first inspection I was quite impressed with the build quality, but a little dismayed at the assembly instructions, a single sheet of A4 paper with a few diagrams and instructions!
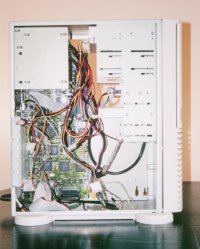
So first things first then, remove motherboard and all the top shielding from your A1200 (so far so good) then install it into tower, this part went surprisingly smooth with the motherboard fixing points lining up quite well with the ones on the tower carcass. The back of the motherboard lines up with a slot in the back of the tower (which has all the ports labelled) and is fixed to it by four of the port screws.
Next up is to install the keyboard interface, which is fitted into the tower (pop riveted) and has a 5 pin DIN type socket for the keyboard to plug into, four wires come away from the keyboard interface that go to a square device which sits over the keyboard chip on the motherboard, the instructions tell you how to correctly align with the chip and press home hard until a click is heard! Wow was that a worrying moment or what?
 Once this has been done the rest is a relatively easy task of installing the various peripherals into the casing, such as hard drive and floppy drive (extra long cables are supplied to reach the motherboard) which a blanking plate is supplied if you only have your original open faced floppy (if you don't have a blanking plate it resembles a Baboons arse to look at). Next install your CD-ROM (you have got one haven't you?) In this case a SCSI unit, which at the time I was using a Surf Squirrel interface so I also needed a PCMCIA right angle adaptor (available from Blittersoft or Power Computing) which plugs into the motherboard and just leaves enough room to plug in the Squirrel and fits into the bottom of the tower. A cable is fitted to the power, floppy and hard drive LED's on the tower which is connected to the motherboard. A reset button is ready cabled in (via the Ateo keyboard interface) so that reboots can be performed single handed if that's your thing!
The various power supplies (plenty of them) are plugged into the peripherals and the audio plug into the CD-ROM (the tower now has two audio outputs one from the Amiga and one from the CD-ROM).
The power supply to the A1200 is via a cable which exits the at the bottom of the tower and immediately turns back on itself and plugs into the normal Amiga power in socket.
The monitor is powered via a pass-thru port on the power supply like any other modern day computer. So time to power up for the first time and the Amiga booted up no problems! But for the first time in its life it could breathe, stretch it's legs so to speak. One thing remains to be done, install the Ateo Concepts keyboard software which re-maps the Windows keys (yuk) to Amiga keys (yeh!) and also the scroll lock key to the help key and that's it.
Now you have a towered Amiga with plenty of room for expansion due to the three 5 1/4 " bays, two 3 1/2" bays and two 3 1/2" floppy drive size bays and ample power supplies.
 In my opinion the tower was easy to build, and at the end of the day the single sheet of paper was quite adequate. I can fully recommend this product and add that it is one of the best items I have bought, and in my opinion makes my Amiga the best looking on the block. Time to go and buy those peripherals you have not had room for eh?