|
Overview
The Advanced Imagemap Designer helps you create Java-powered Imagemaps for your web pages visually, without requiring any Java programing knowledge.
This Advanced Imagemap Designer is a bundle that consists of two programs:
- The Advanced Imagemap Applet which is a Java applet that can be downloaded along with your web pages. This applet implements the Imagemap and its dynamic behaviour by reading the parameters included in your HTML page. However there is no need for you to set the paramaters by hand since you can use the next program to define them in a totaly visual manner.
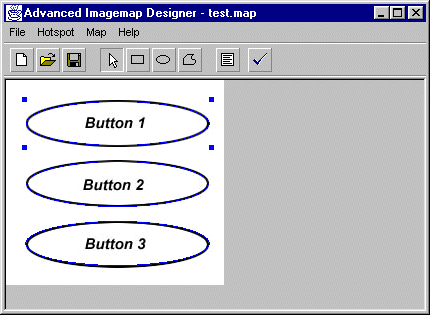
- The Advanced Imagemap Application which is a Java application that helps you design the imagemap visually by choosing a background image, define, move and resize the hotspots and set the properties. The output of this application is the appropriate HTML text that should be inserted in your page.

The Advanced Imagemap Application
Short Tutorial
Create an Imagemap in six simple steps
Step 1: Choose new from the file menu
Just in case you had already opened an existing imagemap.
Step 2: Define a Background Image
From the Map menu choose "Background Image" and select an image (jpg or gif) from your drive
Step 3: Define a Hotspot
From the Hotspot menu choose "Rectangle", "Oval" or "Polygon" to create rectangular, oval or polygonal Hotspots and define a Hotspot on your image using your mouse.
Step 4: Define the properties of the Hotspot
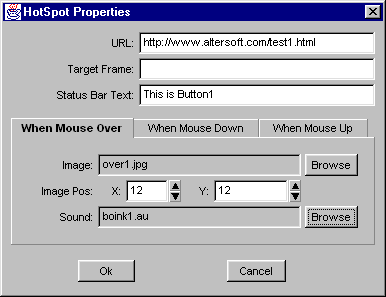
Select the Hotspot with your mouse (before selecting you must press the arrow tool on the toolbar) and choose the Properties command from the Hotspot menu. The Hotspot Properties Dialog Box will pop up.

The Hotspot Properties Dialog Box
Within this dialog box you define the page (Url) you want the browser to show when the Hotspot is clicked, the target frame in which the page should be displayed and the message to appear in the Status Bar when the mouse pointer passes over the HotSpot. In addition you can define three images (along with their position on the map) and three sounds to be dispayed and played when the user pass the mouse over the Hotspot, when he clicks on the Hotspot and when he releases the mouse button.
For more detailed information on this diolog box visit the Hotspot Properties Dialog Box page
Step 5: Test your Imagemap
From the Hotspot menu choose "Test Imagemap". This command will launch your browser and you will be able to see the imagemap you just created in action.
Step 6: Generate HTML
From the Hotspot menu choose "Generate HTML". This command will pop up a dialog box containing the HTML needed to embed your Imagemap in your web page. Copy the HTML and paste it into you page. Congratulations, your Imagemap is ready!!!
Important notice: For your imagemap to work porperly you have to copy all the images and sounds you use into a subdirectory called "imagemap". This subdirectory must be in the same directory your web pages reside. In the same subdirectory you should also copy the following two files:
that can be found in the Advanced Imagemap Designer directory under the "applet" subdirectory.
|