Using Qt Designer
Jesper K. Pedersen <blackie@klaralvdalens-datakonsult.se>
Introduction
The Qt library is a graphical user interface library for Linux, Microsoft
Windows, Macintosh and embedded devices. Being a cross platform library,
it makes it possible for you to develop an application which runs both on
Linux and on Windows, simply by recompiling your source code. This is,
however, not the only advantages of the Qt library; to name just a few
others: it is stable, it is well written, it is easy to use, and it is free
for non-commercial products (technically, it is licensed under the
GPL). Still, there is also a license for commercial use.
Qt is shipped with a graphical editor for building your applications,
called Qt Designer. With Qt designer you simply drag and drop draw the GUI of
your application. In the following, I will tell you how to use Qt Designer.
The Layout of Qt Designer
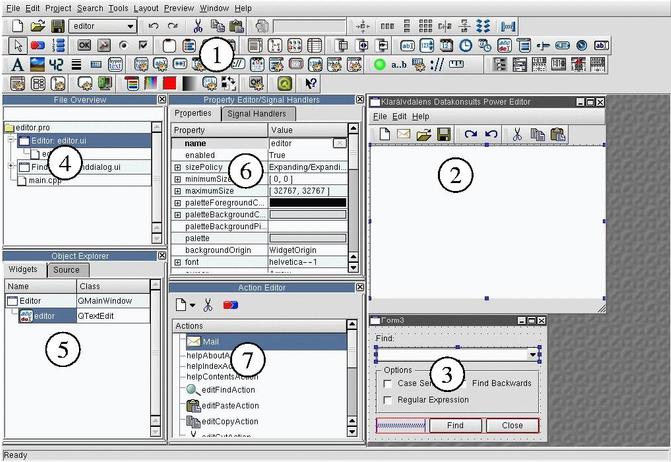
Figure
1: Qt Designer in action. (Click on image to show it in large.)
In figure one you see Qt Designer in action, the following
sections explain each of the parts in detail. In short, the items are:
- (1) Toolbars with functionality such as new/load/save, undo/redo,
copy/cut/past, plus buttons for layout managers and all the
available widgets.
- (2) and (3) are the dialogs currently being developed.
- (4) is the file overview, here you can select the available dialogs
and source files.
- (5) is the Object Explorer. This window contains two tabs, the
Widget tab which shows each of the widgets in the selected
dialog, and the Source tab, which shows a list of the
slot functions in the current dialog (We will get back to what a
slot is later).
- (6) is the property viewer. It contains two tabs, the
Properties tab showing properties for the current widget,
and the Signal Handlers tab showing the available
signals for the selected widget. (We will get back to
signals and properties later).
- Finally, (7) is the Action Editor, containing the available actions
when developing menus and toolbars.
Starting a new project
Qt comes with a tool called QMake. QMake is a makefile generator, which
allows you to write meta-makefiles that are independent of operating
systems, architectures and compilers. A very simple QMake project file looks
like this:
  HEADERS=editor.h finddialog.h
  SOURCES=main.cpp editor.cpp finddialog.cpp
Using the lines above, QMake can generate a real make file for you to
automatically build your source code.
Qt Designer has the capability to generate QMake project files for you
using information about which dialogs you have developed inside Qt
designer.
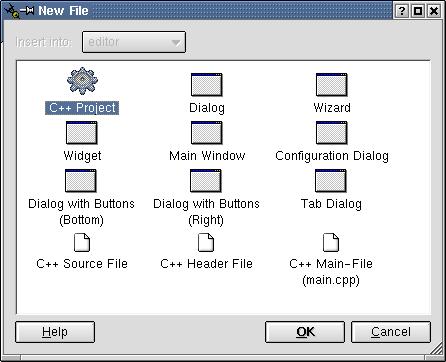
To create a new QMake project file, choose File->New or select the
new icon  A dialog will now appear looking
like figure 2. Select the item C++ Project.
A dialog will now appear looking
like figure 2. Select the item C++ Project.
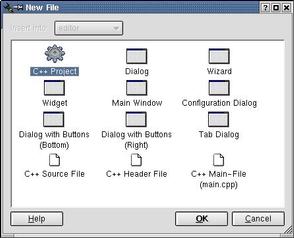
Figure 2: Dialog selecting type of new project
Before your application can compile, you need a main function (as any C or
C++ program does). You may choose to create one yourself, or simply select C++ -
Main-File from figure 2. You should, however, wait with creating this
file until you have developed the main window of your application, as Qt
Designer in that case can insert function calls for
creating and showing the window into main.cpp for you.
Developing dialogs
Having set up the project file, we are ready to create the dialogs for our
application [1]. To develop a new dialog or a main
window, select File->New, but this time select one of the
other available items. The most important options are:
- Dialog - A top-level dialog. [2]
- Widget - This is the most fundamental widget in Qt,
it offers no other functionality apart from hosting other widgtes [3]
- Main Window - This is a main window with menu
bars, tool bars, a status bar, and of course the contents in the
middle of the application.
- Wizard - This is a dialog for step-by-step execution.
- Tab Dialog - This is a dialog with a number of tabbed pages.
Developing the user interface is now a matter of selecting the appropriate
widget from the tool bars (see Figure 1, item 1),
and subsequently pressing the left mouse button in the location you want
it. This is how the find dialog in figure 1 (item 3)
is build.
The main window in figure 1 item 2, is a bit
different. Here, the content area is build just like for the find
dialog, but for
the menu and tool bars you must drag and drop actions from the Action
Editor (item 7). New actions may be created simply by selecting the new
action item in the menu bar of the action editor.
Actions are associated with code being executed when the user selects the
action (e.g. pushes a button to which the action belongs). This
connection is set up using the connect tool  . We will be talking about this in detail below.
When building the user interface, you can just place the widget at
the locations you want them. This has a few major drawbacks however, namely
that the dialog will not resize correctly, and that it does not work with
internationalization.
The alternative is to add geometry managers to your widgets. With
geometry managers, you specify the position of the widgets using the
following terms: these
widgets must be next to those, and these widgets must be on top of
those.
There are five layout managers:
-
 represents a vertical layout manager,
where the groups it manages are placed on top of each other.
represents a vertical layout manager,
where the groups it manages are placed on top of each other.
-
 represents a horizontal layout
manager, where the groups it manages are placed next to each other.
represents a horizontal layout
manager, where the groups it manages are placed next to each other.
-
 represents a layout manager which
orders groups of widgets in a grid.
represents a layout manager which
orders groups of widgets in a grid.
-
 and
and  lay out widgets vertically
and horizontal, respectively. The layout manager adds a splitter, which
lets the user select the fraction of the space, that the widgets in
the layout gets.
lay out widgets vertically
and horizontal, respectively. The layout manager adds a splitter, which
lets the user select the fraction of the space, that the widgets in
the layout gets.
To use a layout manager, select a number of widgets, and click the desired
icon.
When using a layout manager, you may wish to insert some space (as is the
case in the line containing the Find and Close button in figure 1 item 3. In order to achieve this, use a spring by
selecting the following icon: 
Widget Properties
If you try to build the find dialog from figure 1,
then you will use a QComboBox as the input field where the user
may type in the search string [4]. Doing so, you will
see that the combo box actually is readonly by default, which would not be
very useful in our situation.
The solution is to tell it that it should be editable, you do this in the
property editor, which you can see as item 6 in figure
1.
In the property editor you may set various properties for Qt widgets,
examples include the title [5], the name that the widget
will get when generated as C++ code [6], for a check box whether it
is checked, whether the widget is enabled, and for a combo box whether it
is editable.
The most fundamental feature a GUI toolkit must have is the capability for
the programmer to specify some code to be executed when the user does specific
things with the widgets like pressing a button, selecting an entry in a
list box, or changing the text of a line edit.
Qt implements this feature using signals/slots. It is outside the scope of
this article to tell you all the details of signal/slots, so I suggest that
you read my paper on Qt from Linux Tag 2001. In the
following I will, however, tell you how to use signals/slots from Qt
Designer.
Basically, when something happens to a widget, it emits a signal telling
what happened. you may implement a slot (which is just a C++ method), that
can be connected to the emitted signals. Signals may carry data from the
emitter to the receiver.
In our example, we want to start a search when the user presses the OK
button in the find dialog. To set up a connection from the OK button, press
the connection tool button . Now press
and hold the left mouse button on the OK button, and drag it to the
border of the find dialog box; this will
bring up the dialog you can see in figure 3.
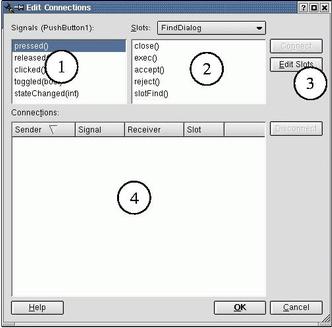
Figure 3: The connection tool
In (1), you can see the available signals for the widget in which the drag
started (the OK button). In (2), you can see the available slots for the
widget in which the drag ended (the find dialog) [7]. (4)
shows us the connections that have already been made.
If you just wanted to connect an existing signal with an existing slot,
then you would simply have to select one from each of the lists. In our
situation we do, however, want to create a new slot. To do this press the
Edit Slots button (item 3). This will bring up the dialog you can
see in figure 4.
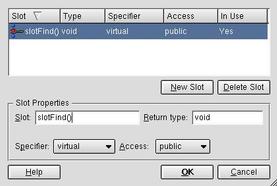
Figure 4: Edit Slots dialog.
I had already added a new slot called slotFind() when I took the
screen shot (otherwise everything would just have been grayed out). The
details of the dialog relate to the signal/slot mechanism and are thus out
of scope of this paper, but fortunately the defaults are just fine, so
when creating new slots, it is safe simply to fill out the name field.
Note that signals may bring data as parameters to slots, so if a signal for
example brings an integer and a QString, then the slot name would
look like slotDoSomething(int, QString).
After having created the slot and closed the dialog, we are back with the
dialog from figure 3. This time, however, our new
slot is listed in the slot list box. After having connected the
clicked signal (which is emitted when the user presses and
releases the left mouse button on the OK button) with our new slot, we are
ready to fill in the C++ code.
The object explorer (item 1 in figure 5) now
contains our new slot under the tab Sources. Clicking on the name
of the slot, will bring up the built-in source code editor of Qt Designer (item
2), and we can fill in the body of the function.
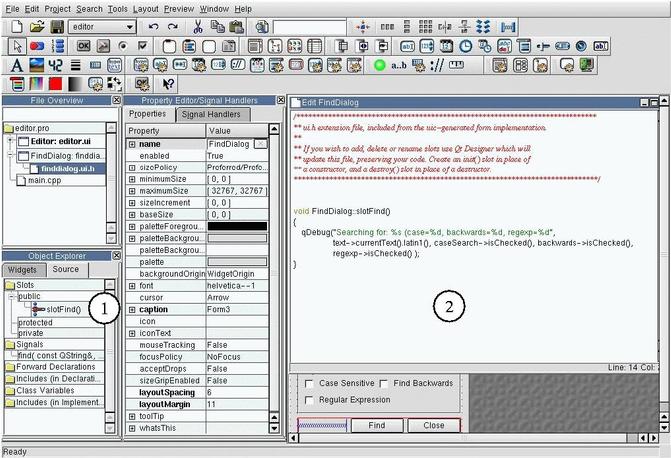
Figure 5: Editing the source code for our new slot.
Conclusion
You have now seen the basics of using Qt Designer for developing a
GUI. There is of course much more than this to Qt development. Let me
therefore suggest you to buy a book on Qt programming, take
a course
in Qt programming, or at least read the tutorial shipped with Qt
(located in the tutorial subdirectory).
Furthermore, simply because you now know how to develop a graphical user
interface, doesn't mean that you know how to develop a useful one. For this
I suggest reading the GUI Bloopers book.
Notes
- [1] If you do not want Qt Designer to take
control over your project by generating QMake project files for
you, then you can do without. In this situation you are, however, in
charge of converting the .ui files that Qt Designer creates
with your dialogs, to C++ header and source files. This is out of
scope for this paper, so please try setting up a QMake file, and see
what it does behind the screen for you.
- [2] In Qt you do not need a special class to
create top level windows, still if you want to point out that the
given dialog is a top level window, it is useful to use the dialog
class. Furthermore, the dialog class offers some extra functionality
as default buttons, dialog extensions ( A button labeled More
>>) etc.
- [3] Technically this is of course not true at all, but from a Qt
Designer point of view this statement simplifies our understanding.
- [4] If you really just want an input field, then
you may simply use the QLineEdit class instead. In our
example we use a QComboBox to give the user a chance to
reuse old search strings.
- [5] Normally, you will not set the title from the
property editor, but instead simply double-click on the widget to
set the title. Still, the title is an example of a property.
- [6] That is, if you give it the name cb,
then the generated code may look like this: QCheckBox* cb = new
QCheckBox( ... )
- [7] To be accurate, the slot list box only shows
the slot for which the signature matches the signature for the currently
highlighted signal.
References
About the author:
Jesper is the author of The Dotfile Generator, the book
Sams Teach Yourself Emacs in 24
Hours, and the Emacs package power macros. He has been the maintainer
of the KDE program Karm.
All of the above is past work, now he uses all his
spare-time programming time on KDE where he has developed a regular expression
editor. which is part of KDE 3.
Jesper works for
Klar舁vdalens Datakonsult AB, which is a small international
company specializing in designing and developing
platform-independent software (with particular focus on the Qt
library). Part of his job involves giving one-week Qt courses.