[Top] [Prev] [Next] [Bottom]
[Contents]
The Sapphire/Web Java Framework
The following section describes how to build projects using the Sapphire/Web Java Framework. The descriptions are brief and only provide detail about the new capabilities.
- 1. Start Sapphire/Web and create a new project named
jtut1.
- 2. Open the Document Manager and create a new document named
home.html. Click Style.
- 3. Choose
javafr1.html from the template styles list.
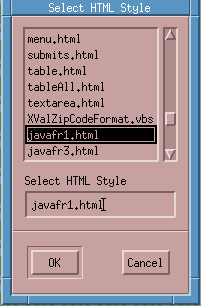
Figure 3-1 Select HTML Style
- 4. Now look at the HTML in your HTML editor. You should see the following:
<HTML>
<HEAD><TITLE>Java Tutorial, Chapter 3</TITLE></HEAD>
<BODY>
<applet code=Sa.SaJavaDrill.class
		codebase="/saclasses"
		width=390 height=320>
<param name="rsurl" value=" saact='master' ">
<param name="indexCols" value="1">
<param name="rsurl1" value=" saact='detail1' ">
<param name="label1" value="detail1">
</applet>
</BODY>
</HTML>
- 5. The contents are basically just an embedded Java Applet, just as you saw in the last chapter. The applet is
Sa.SaJavaDrill.class which is the entry point into the extensible Sapphire/Web Java Framework.
- 6. You customize this applet through its applet tags. The codebase tag indicates that the
Sa package (directory) is located in the saclasses directory of the root of the Web site.
Changing Class Locations
If you wish a different root directory just change the directory in the HTML file (also change the config/htmlstyle files javafr1.html, javafr3.html, and javafriud.html). Whatever the directory, you will need to copy the saclasses directory contents to the Web site directory.
The docs directory in the saclasses directory of the Sapphire/Web distribution contains the class descriptions in HTML form. The Sa directory in saclasses contains the class files and java source files for the Sapphire/Web framework. Additional example Java classes plus source are found in the saclasses directory.
The tags that the Applet responds to are divided into two basic types: those that belong to the master row set and those that belong to drill-down detail row sets.
numDetails
By default, the master will support up to 10 detail sets (numbers 0 to 9). You can use any or no details in the design of your Web application. You can increase the number of details with:
<param name="numDetails" value="30" >
The value can be any number between 10 and 30. In the above case, the detail numbers could be 0 to 29.
The most important parameter for the master row set is the source of data.
value=" saact='master' "
For example:
<param name="rsurl" value=" saact='master' ">
The parameter name is "rsurl". Notice the associated value for this parameter:
value=" saact='master' "
The Sapphire/Web tool will bind to the saact activator (a new keyword defined for the tool) and this new activator is embedded into a value tag. Sapphire/Web could have used the value tag itself as a new keyword but the value tag is used too extensively in HTML and other embedded applets.
This activator appears in the Project Viewer in just the same way as Form and Anchor activators. The ability to add new activator types to Sapphire/Web is a powerful feature that allows you to add your own objects or language extensions.
- Note: The use of double and single quotes must be consistent with the two examples above. The keywords can be in any case, but there must be no white space starting from the keyword to the end of the URL specification.
Binding to a server application
- 1. To bind the master set to a server application, open the Object Bind Editor. home.html will be the only document available and you will see the two activators. Select
saact=master.
- 2. The Object Bind Editor is opened for you, along with the Open DSQL dialog. Select
BD_Authors from the pubs2 database. If there isn't a BD_Authors, create one. The text to all the DSQL Objects is at the end of this chapter.
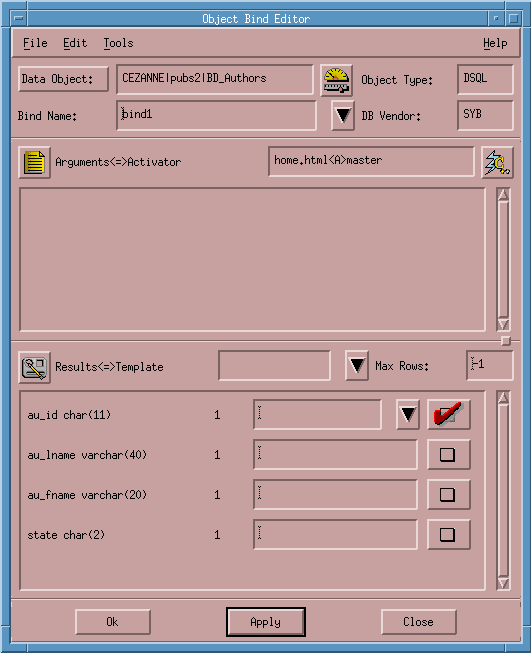
Figure 3-2 Binding to a server application
- 3. Choose the Detail button for the first column (
au_id). From the Callback combo box choose SaPopUrlRowSet as the callback function.
- Note: You should always chose this callback for the
rsurl parameter of any master or detail row set in the Sapphire/Web Java Framework.
- 4. Save your binding. Make sure your Makefile target is correct.
- 5.
Test your project.
- 6. You will need a Java enabled browser. You should see a Java applet.
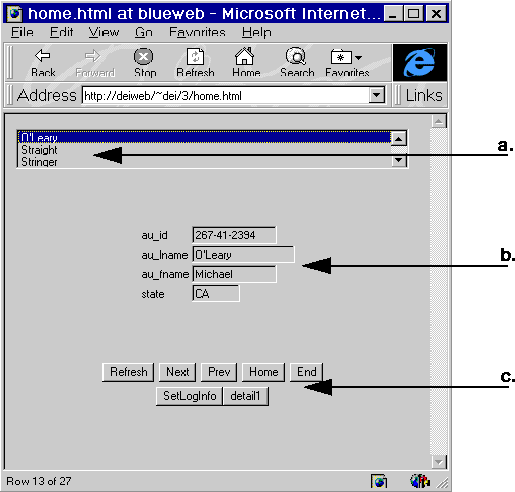
Figure 3-3 The Java Applet (Internet Explorer)
- a. At the top is a scrolled list of authors' last names.
- b. The middle part of the applet displays a row consisting of a label and a text box for each column in the master row set (4 in this case).
- c. The bottom part of the applet contains 2 rows of buttons. The first row of buttons operates on the data in the master row set. For the bottom row, the master builds a button for each detail set and includes a
SetLoginInfo button if necessary. If the master has insert, update, delete URLs defined then the appropriate buttons will appear. If there are enough rows in the rowset, paging navigation buttons will appear.
- 7. Navigate as fast as you want. No networking or Internet is involved so there's no network delay after the initial download. Such is the power of client objects.
- 8. Click on the detail1 button. Notice that the popup window contains no data and just the navigation buttons. That is because you have yet to hook up that functionality. Before you do that however, let's customize the master set.
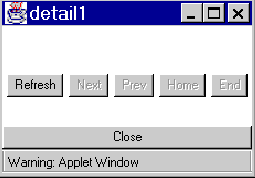
Figure 3-4 The detail pop-up window (Internet Explorer)
- 9. Click the large Close button to dismiss the pop-up. Note that the other three methods of closing windows do not function. This appears to be a bug in the most recent releases of both Microsoft Explorer and Netscape Navigator.
Master Set Customization
Change Index Column (1)
The scrolled list above displays last names only. This is controlled by the indexCols parameter. You will recall that it was set as follows:
<param name="indexCols" value="1">
The value indicates that column 1 (second column since we start counting at 0) is to be displayed. This parameter accepts a comma separated list of columns numbers or names (no mixing inside a value parameter). The names must match in case exactly. In row sets with duplicate column names, only the first occurrence is found. Choose which is appropriate for your application. Change the above parameter to:
<param name="indexCols" value="2,1">
Test the project.
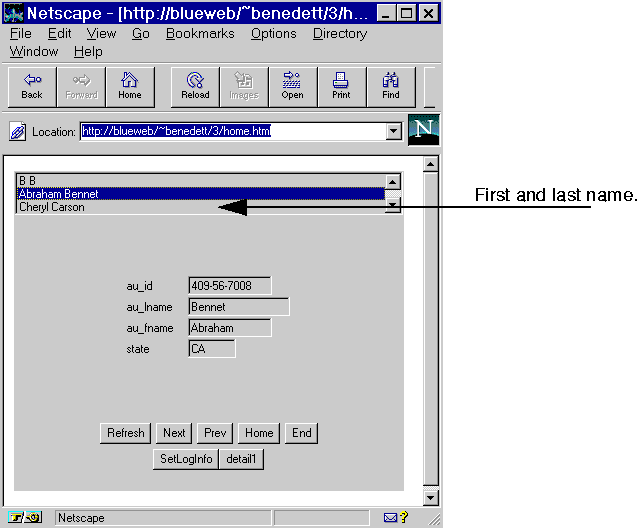
Figure 3-5 First and last names (Netscape Navigator)
You should see first name then last name in the scrolled list.
- Note: You may have to click "Reload" to force your browser to load any changes you make in your project. It may be convenient for you to disable your browser's caching, so that the most recent version will always be loaded.
Change Index Column (2)
Now change the same parameter to
<param name="indexCols" value="au_fname,au_lname">
Test your project. You should get the same result.
So, as you can see, you can specify the columns by position or by name. It is always better to use names than positions-it is "self-documenting," and allows your HTML documents to work with the database even if the database structure changes.
Change Index Column (3)
If you don't want a scrolled list at all, then remove this parameter completely. If you do this you will see that there is just a blank space left at the top of the applet area.
Change the label1 parameter from:
<param name="label1" value="detail1">
to
<param name="label1" value="Books">
Test your project. You should see new text on the detail button.
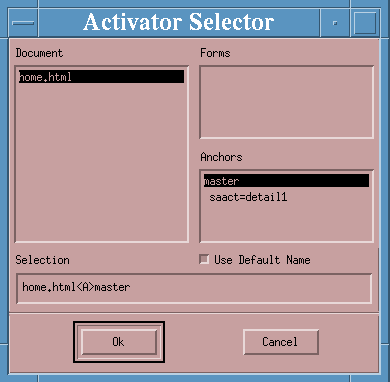
Figure 3-6 Activator Selector
Change the Detail Set
- 1. Open the Object Bind Editor again for another new activator, and select the second activator from home.html in the Activator Selector window (
saact = detail1). Then get the Object Bind Editor on screen.
- 2. Choose
BD_TitleByAuId from the list in the Open DSQL dialog. For the one argument for this DSQL choose SaGetNArg(0) from the combo box.
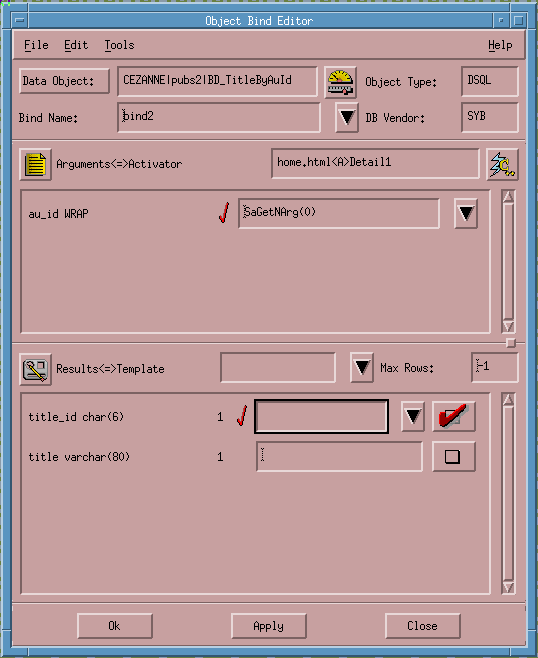
Figure 3-7 Changing the Detail Set
- The reason that we choose this is so that the Sapphire/Web Java Application framework will send information about the selected row in the master row set when displaying a detail. You can think of this as the master row set being a programmable Anchor Hotlist. The default column used is the first column (
title_id) which is the foreign key for the drill-down tables. Note, a detail could ignore the argument and produce a row set independent of the selected row.
- 3. For the results columns, choose the Detail button for the first column (
title_id) and from the Callback combo box choose SaPopUrlRowSet again as the callback function. Always use SaPopUrlRowSet.
- 4. Test your project.
- 5. Choose Cheryl Carson as an author and click the Books button. The pop-up should contain information about books for that author.
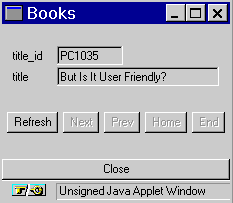
Figure 3-8 Books pop-up window (Navigator)
- 6. Choose Marjorie Green for an author and click the Books button again. The books for that author are displayed.
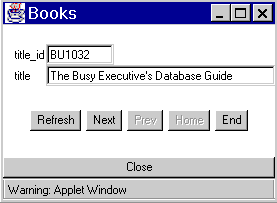
Figure 3-9 Books pop-up window (Internet Explorer)
- You'll see that the pop-up for Marjorie Green has the
Next and End buttons enabled, because she has more than one book published. On the other hand, Cheryl Carson has only one entry, so only Refresh is enabled.
- Notice you can have as many instances of all detail pop-ups on the screen as you want. Use the
Close button when you are done with a particular detail.
Detail Set Customization
Although the default column sent to a detail from a master is the first column the following two parameter specifications achieve the same thing:
<param name="rsargs1" value="0" >
and
<param name="rsargs1" value="au_id" >
The syntax for the values parameter is the same as that for indexCols described above. The default title for a popup detail is to use the text for the corresponding detail button on the master. The following parameters customize that:
<param name="title1" value="Authored Books" >
<param name="titleCols1" value="2,1" >
- 1. Add these two parameter lines within the
<applet> ... </applet> block.
- 2. Test.
- 3. Pop up a detail.
- 4. Notice the title for the popup (enlarge if necessary).
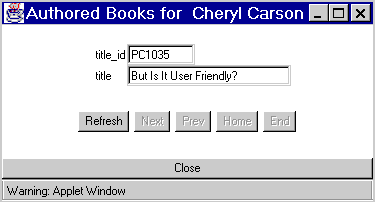
Figure 3-10 Books pop-up window with Title (Explorer)
The first part is the title parameter, then the word "for," and then the column values (based on the titleCols parameter) for the selected row of the master.
Again, the syntax rules for the titleCols parameter specification is the same as that for indexCols described above. In fact, it is consistent across the Java and ActiveX frameworks for column specifications. The following parameter will achieve the same result:
<param name="titleCols1" value="au_fname,au_lname" >
A Second Detail View
Finally, let's add another detail view.
- 1. Add the following parameters to the applet (note, you can copy from another detail or master and modify):
<param name="rsurl2" value=" saact=`detail2' ">
<param name="label2" value="Publishers">
<param name="title2" value="Publishers" >
<param name="titleCols2" value="au_fname,au_lname" >
- 2. Close your HTML file and save the project
- 3. Click the Object Bind Editor (New Activator) button and select the new activator in the list (
saact=detail2) to get the Object Bind Editor.
- 4. In the Open DSQL dialog, select
BD_PublisherByAuId from the list.
- 5. For the one Input Argument for this DSQL choose
SaGetNArg(0) from the combo box.
- 6. For the results columns, choose the Detail button for the first column (
pub_id).
- 7. From the Callback combo box choose SaPopUrlRowSet as the callback function. Always choose SaPopUrlRowSet. in this situation.
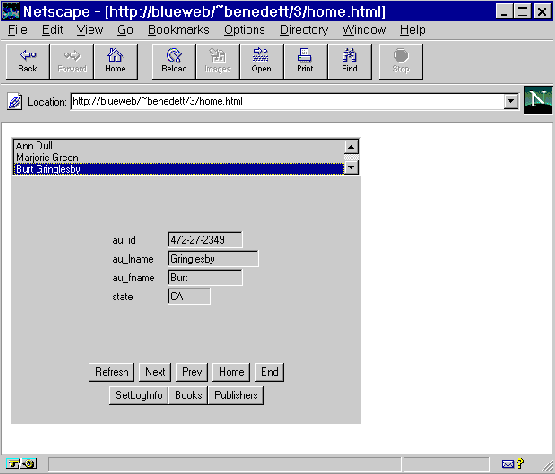
Figure 3-11 Java Applet with Publishers button (Navigator)
- 8. Save your binding. Test your project.
- a. Choose an author.
- b. Click the Publishers button.
- c. Notice that this detail uses the default view for pop-ups since the
rsview2 parameter was not set.
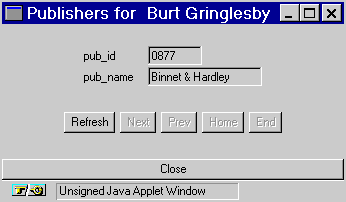
Figure 3-12 Publishers pop-up window (Navigator)
[Top] [Prev] [Next] [Bottom]
[Contents]
info@bluestone.com
Copyright © 1997, Bluestone. All rights
reserved.