[Top] [Prev] [Next] [Bottom]
[Contents]
Introducing the Sapphire/Web Java Framework
Using Insert, Update, Delete, and Login
The following sections describe how to build Web Applications using the Sapphire/Web Java Framework. It is assumed that you know how to use Sapphire/Web and have configured the tool. The descriptions are brief and only provides detail about the new capabilities. It is also assumed that you have completed the above Java tutorial.
Start up Sapphire/Web and create a new project. Name the project jiud. Choose Tools->Documents->Create. Choose javafriud.html from the template styles list. Now look at the HTML in your HTML editor. You should see the following:
<HTML>
<HEAD><TITLE></TITLE></HEAD>
<BODY>
<applet code=Sa.SaJavaDrill.class
		codebase="/saclasses"
		width=390 height=320>
<param name="rsurl" value=" saact='master' ">
<param name="indexCols" value="1">
<param name="insUrl" value=" saact='insert' ">
<param name="updUrl" value=" saact='update' ">
<param name="delUrl" value=" saact='delete' ">
</applet>
</BODY>
</HTML>
Modify the height to be 590 and the width to be 790. There are many buttons in this applet, and you must allow them room.
The contents are basically just an embedded Java Applet. This time only a master row set is used. To bind the master set to a server application:
- 1. Choose the Object Bind Editor (New Activator).
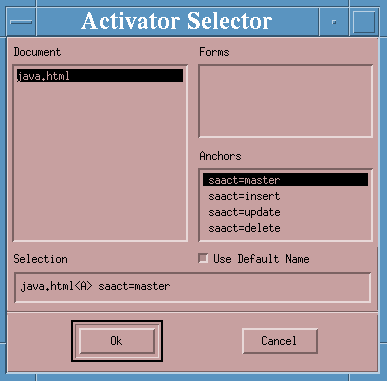
Figure 3-13 Binding the applet
- 2. In the Activator Selector dialog, select the first binding (saact=master) and click Ok.
- 3. The Object Bind Editor and the Open Procedure dialogs will pop up.
- 4. In the Open Procedure dialog select DSQL and open your tutorial database.
- 5. Double-click the activator
saact=master under home.html to bring up the Object Bind Editor.
- 6. Choose the DSQL object
BD_Authors.
- 7. Choose the Detail button for the first column (
au_id).
- 8. From the Callback combo box choose
SaPopUrlRowSet as the callback function.
- 9. Click Ok. Save your binding.
- 10. Save your project, build it, and test. You will need a Java enabled browser.
- You should see a Java applet. Note this time the master row set contains Insert, Update, Delete, and Reset buttons. These won't function yet, but will be hooked up in the next section.
Connecting "Insert"
The next sections will detail connecting the three editing buttons. In each section you will see how to connect one of the buttons that appear on the Java form to a DSQL object. There are two ways to perform each binding, and each is explained.
Do the following:
- 1. Open the Object Bind Editor. Select
saact=insert from your lone HTML document.
- 2. Select the DSQL object
D_InsertAuthor.
- 3. Notice on the Object Bind Editor the checkbox labeled "Use Sapphire Client Object Arguments...". Click this checkbox.
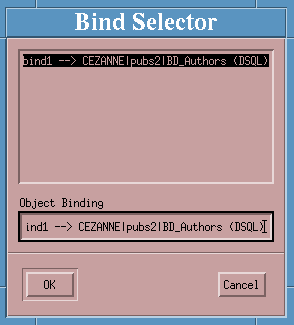
Figure 3-14 Bind Selector pop-up window
- 4. Choose the only binding from the Bind Selector (above). This corresponds to the data source for the master row set. Click
Ok.
- This allows the arguments for the insert to be attached to "form" arguments. The form is the master row set, simulating form post. The referenced binding produced that master set. The names of the form "fields" are the columns from the master row set.
- 5. Next, go to the Input Arguments table itself.
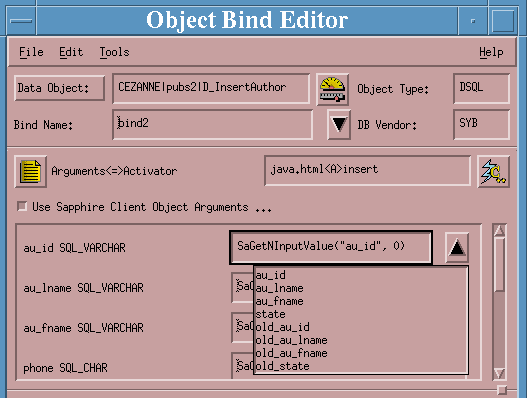
- 6. For each row, click on the Values field and drop down the combo-box that appears when that field gains focus. Choose the appropriate item from the argument combo box. For au_id you should choose
au_id, and so on. As this is an insert query, you'll see two instances of each field - for the first field there are both au_id and old_au_id. The former represents the newly entered value, and the latter the value as found immediately prior to the insert operation. This allows you to prevent some fields from being modified by the insert operation.
- 7. Do this for all 9 columns. If some arguments do not have corresponding values, then give those arguments the value
state-those arguments will not show up in your applet. As long as you give the DSQL object some non-NULL value for them, everything will work fine.
- 8. Save your binding. Test the project. Note, insert, update, and delete do not need a population callback. The rowset will just refresh the data source.
Testing "Insert"
- 1. Select an author.
- 2. Alter some of the text fields. You must alter the
au_id field, because you will be testing Insert, which inserts a new author. The author ID numbers in pubs2 are all Social Security numbers, but you can use any format you want for the ID numbers.
- 3. Click Insert.
- 4. Scroll through the name list. Your author is now listed.
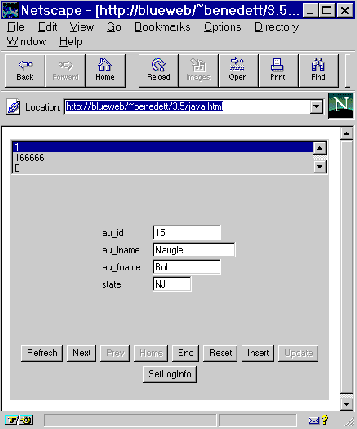
Figure 3-16 Inserting an author (Navigator)
Connecting "Delete"
- 1. Open the Object Bind Editor. Select
saact=delete from your lone HTML document.
- 2. Select the DSQL object
D_DELETE_AUTHOR.
- 3. Click the checkbox labeled "Use Sapphire Client Object Arguments ...".
- 4. Choose the first binding from the Bind Selector. This corresponds to the data source for the master row set. Click
Ok.
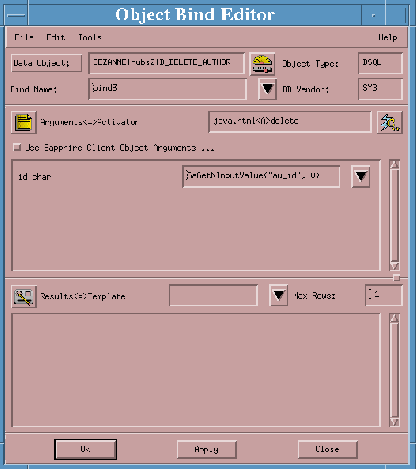
Figure 3-17 Binding to D_DELETE_AUTHOR
- 5. Choose the appropriate values for the arguments. If there is not a corresponding value for a certain argument, select any value except for
au_id (for example, state).Click Ok.
- 6. Test your project.
Testing "Delete"
Select the entry for the author you added in the last section. Click Delete. Click Prev. You will now find that the entry no longer exists. The view class, however, has been designed to leave the data in the text fields. The user can then see what was just deleted and could use Insert to correct a accidental Delete.
- 1. Open the Object Bind Editor. Select
saact=update from your lone HTML document.
- 2. Select the DSQL object
D_UPDATE_AUTHOR.
- 3. Click the checkbox labeled "Use Sapphire Client Object Arguments ..."..
- 4. Choose the first binding from the Bind Selector. This corresponds to the data source for the master row set. Click
Ok.
- 5. Do this for all columns except
au_id. You should be able to match the names one-for-one.
- 6. For the
au_id argument choose "old_au_id". The rowset sends the old data as well as the new data for update operations, allowing the developer to build arbitrary "where" clauses. The characters "old_" are prepended to the database column name.
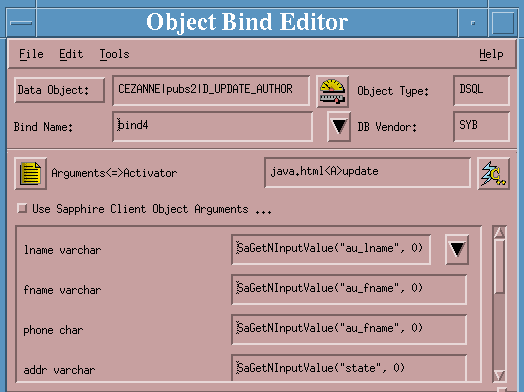
If some input arguments do not have corresponding values, then select state for those arguments.
- 7. Save your binding. Test your project.
Testing "Update"
- 1. Insert an author.
- 2. Now update one or more fields (except the
au_id field). Click Update.
- 3. When done, Delete.
Adding "Login"
To add login, you could add the following applet parameter:
<param name="login" value="true" >
When the applet sees this parameter, it enables the login button on the master and does not try to retrieve data. The user clicks the login button, logs into the login screen, and the application runs as usual.
- Note: The tutorial database will allow any login values.
If the parameter for login is not present, but the master fails to login, then the Login button will still become active and a message console appears indicating a bad login. Try this parameter out. To make the server application "login" aware, you will need to add the following line of code to the project's final code section:
SaSetupLogin();
- Note: The Sapphire/Web Java framework provides a simple graph view,
Sa.SaGraphRowSet. It plots the second column along the y-axis and the first column along the x-axis.
The Sapphire/Web framework also provides a mechanism where anywhere within the framework, a view can obtain its own parameters from the applet.
[Top] [Prev] [Next] [Bottom]
[Contents]
info@bluestone.com
Copyright © 1997, Bluestone. All rights
reserved.