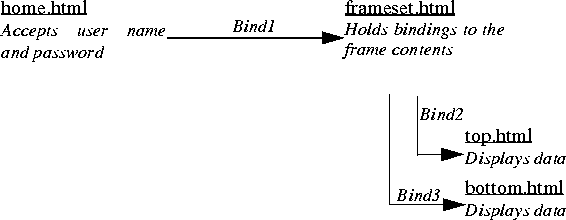
Below is a schematic of the project that you will build here.
When you look at the listing of the HTML of the login screen on the next page, you will notice that the two items that are returned by the form are given the names "SALOGIN" and "SAPASSWORD". These may considered as being keywords for Sapphire/Web; the values associated with them are retained by the server application and used automatically whenever a username and password are subsequently required. Other settings in the options editor - specifically Use Common Login and Use Native OS Login - determine which login requests should be satisfied by these strings and which should be passed out to the user.
SaKeyWds.ini file. It must be on a line of its own, and in capitals.
<HTML>
<HEAD><TITLE>Frame Login Demo</TITLE></HEAD>
<BODY>
<H5>Please Login:</H5>
<FORM ACTION="loginform" METHOD="post" >
<INPUT TYPE="INPUT" NAME="SALOGIN" VALUE=""><BR>
<INPUT TYPE="PASSWORD" NAME="SAPASSWORD" VALUE=""><BR>
<INPUT TYPE="SUBMIT" VALUE="Submit">
<INPUT TYPE="RESET" VALUE="Reset"><BR>
</FORM>
</BODY>
</HTML>
<HEAD>
<TITLE>Frame Login Demo</TITLE>
</HEAD>
	<FRAMESET rows="20%,*">
		<FRAME src="topframe" name="topframe">
		<FRAME src="bottomframe" name="bottomframe">
	</FRAMESET>
<body>
	<noframes><center>
		Sorry.<br> This page has frames<br>
	</center></noframes>
</body>
</html>
##Sa_Top## and ##Sa_Bottom## respectively). topframe activator to the ##Sa_Top## drop site.
bottomframe activator to the ##Sa_Bottom## drop site.
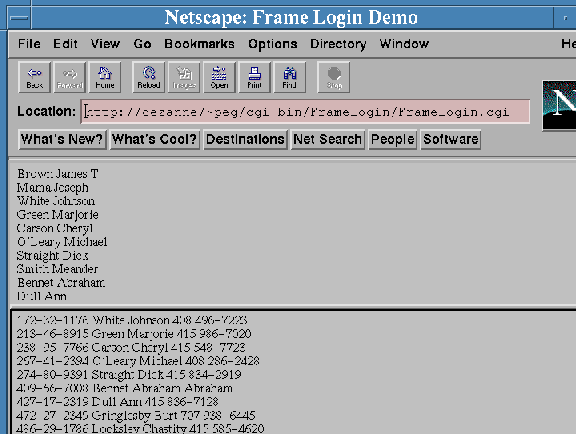
Here you can see that both frames are showing (different) data, and the application is logged in.
If login had failed, error messages would show in each of the frames.