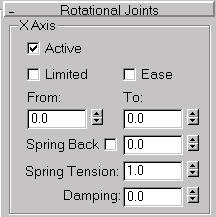


All joints operate by allowing motion on one or more axes and restricting motion on the remaining axes. You set whether an object can move or rotate about a given axis by using the Active check box in the joint rollouts. Joints have a maximum of six possible axes: three for rotation and three for position. You constrain the motion of a joint by setting which axes are active.
The setting of IK joint axes overrides any Inherit and Lock setting performed under Link Info.

The Sliding and Rotational Joints rollouts contain similar controls. Set these controls for position and rotation parameters accordingly.
Active: Turn on to activate an axis (XYZ). Allows the selected object to move or rotate along the activated axis.
Limited: Limits the range of motion or rotation allowed on an active axis. Use in combination with the From and To spinners. Most joints are limited in their range of motion along an active axis. For example, a piston only slides within the length of its cylinder.
From and To Spinners: Set values for position and rotation limits. Use in combination with the Limited function.
Visual aids in the Viewports are provided for rotational and positional limits using the IK Controller.
Ease: Causes a joint to resist motion as it approaches its From and To limits. Simulates an organic joint, or worn mechanical joint, moving or rotating freely in the middle of its range of motion but moving less freely at the extremes of its range.
Spring Back: Turn on to activate Spring Back.
Each joint has a rest position. As the joint moves further from the rest position, an increasingly larger force pulls the joint back to its rest position, like a spring.
Spring Back: Sets the rest position for the joint. For Rotational joints, this is the orientation of the joint in degrees; for Sliding joints, it’s the position in units. Adjusting this is similar to adjusting the From/To spinners. While performing the adjustment, you see the orientation/position, but then the object returns to its previous state when you release the spinner.
If you’re using the IK controller, you must check Show Initial State to see the affect on the geometry during the adjustment (Motion Panel, IK Controller Parameters rollout).
Spring Tension: Sets the strength of the “spring.” Higher values cause the spring to pull harder as the joint moves further from its rest position. A setting of 0 turns off the spring; very high settings can turn the joint into a limit because you can reach the point where the spring is too strong to allow the joint to move past a certain point.
Damping: Applies resistance over a joint's full range of motion or rotation. Simulates the natural effect of joint friction or inertia. As a joint corrodes, dries out, or is put under a heavy load, it resists motion along its active axes.
If you select Limited, specify limit values in the From and To fields. When setting limits, the object transforms to the position or rotation defined by the From or To field. When you exit the field or release the spinner, the object returns to its original position.
You can also view joint limits in the viewport by pressing and holding the mouse button on the From or To label of a limit field. The object will move or rotate to the limit value until you release the mouse button.