

This modifier lets you directly edit in UV space.
When the Unwrap UVW’s modifier is applied, it takes the current UVW’s applied to the object and stores them in the modifier. If no UVW’s have been applied, it does a planar mapping to create new ones. If the incoming data on the stack is face-level subobject selection, then only the UVW’s for the selected faces are brought into the modifier.
When the modifier is evaluated, its UVW’s are reassigned to the object flowing down the pipeline. So if the UVW’s upstream are changed, the changes won't make it past the Unwrap UVW’s modifier. Note that if the Unwrap modifier is operating on a selection of faces, then upstream changes to unselected faces will still be able to flow past the Unwrap modifier.
Tip: Although it’s not its primary purpose, the Unwrap UVW’s modifier can be used to freeze the UVW’s so you can apply a mapping after an animated deformation and have the mapping stick to the object.
To use the Unwrap UVW’s modifier, first determine whether you want to affect the entire object, or a subobject selection. Either apply the modifier directly to the object, or first apply a Mesh Select modifier, and select the faces to which you want to apply Unwrap UVW’s.

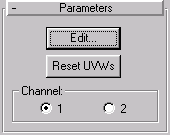
After applying the modifier, its panel appears, consisting of an Edit button, a Reset UVW’s button, and a Channel area.
Edit: Displays the Edit UVW’s dialog,
Reset UVW’s: Clicking on this resets the UVW coordinates in the Edit UVW’s dialog. Clicking this is almost the same as removing and reapplying the modifier, except that a map assigned in the Edit UVW’s dialog is not deleted. When you first apply the Unwrap UVW’s modifier, it’s important to have previously assigned the UVW coordinates to the geometry, because that’s what this modifier looks at. If you subsequently change the UVW coordinates, click the Reset UVW’s button to update the edit coordinates. As an example, if you forgot to turn on the Generate Mapping Coordinates checkbox for an object, and then applied the Unwrap UVW’s modifier, the modifier would have no UVW coordinates to use and its settings would be wrong. If you then go back in the Stack and turn on Generate Mapping Coordinates, you’d need to click the Reset UVW’s button. When you click this button, an alert warns you that you’re losing any edits you’ve made.
Options 1 and 2: Select one of these to specify which UVW channel to use for the mapping. Note that, when you switch channels, you should reset your edits, since the edits for one channel usually won’t work for the other channel. An alert appears that lets you choose between resetting the coordinates or leaving them as they are. In almost all cases, its’ best to reset them. For more information on channels, see UVW Map Modifier.

Toolbar: Contains all the controls for manipulating the UVW points in the view window, navigating within the window, and setting various other options.
Move: Use one of these three modes (all, vertical, horizontal) to move the selected UVW points. Press SHIFT while moving to constrain the movement to a single axis. Note that right-clicking from the other modes automatically switches to the Move mode.
Rotate: Use this mode to rotate the selected points.
Scale: Use this mode to scale the selected points.
Pan: This mode lets you drag/pan the image in the view window.
Zoom : Lets you drag/zoom the image in the view window.
Region Zoom: Lets you zoom into a specified rectangular region.
Zoom Extents: Click to zoom to the extents of all UVW points.
Pick Map: Clicking on this displays the Browser, set to Show Maps. From here, you can select a map to display behind the UVW points. Assuming you select the same map as that assigned to the mapped material on the object you’re modifying, the UVW points will correspond correctly with the material map on the object. After selecting a map, turn on the Show Map button to see it in the view window.
Update : The map you pick to display is cached and instanced from the original. However, to speed things up, it is not automatically updated when it’s changed. (An animated map, for example, could really slow things down when you move from frame to frame.) Click the Update button to re-render the view window display to match the current version of the map.
Show Map : Clicking on this toggles the display of the map in the view window.
UV/VW/UW : As a default, the UV portion of the UVW coordinates are displayed in the view window. However, you can switch the display to edit the UWs or the VWs.
Options: Click on this to displays a subdialog that lets you set various options.
Contains color swatches to customize the display of the UVW lattice. With certain maps, the default colors may become difficult to see. Use these swatches to choose colors that work better for your specific map.
Line Color: Specifies the color of the UVW lattice lines. The default is white.
Specifies the color of the UVW points. The default is red.
Contains controls affecting the map display in the view window.
Render Width: Use this to specify width resolution of the image displayed in the view window. This does not change the size of the image, but only the resolution.
Render Height : Specifies the height resolution.
Constant Update in Viewports: Check this to effect the adjusting of UVW points in the viewport while moving the mouse. By default, the effect of adjusting the UVW points does not appear in the viewport until you release the mouse.
OK/Cancel/Defaults: Click on OK to accept, or Cancel to cancel the changes in the subdialog. Click the Defaults button to restore all of the settings in this dialog to their default values.
The view window displays a lattice made up of UVW faces and UVW points. There is a UVW face for every face in a mesh. A UVW face has 3 pointsthese are UVW points instead of world space points. The view window displays the UVW’s in the 2D image space of the map. A black rectangle displays the boundaries of a texture map as it would appear in image space (the lower left corner of the rectangle has the coordinates (0,0) and the upper right has the coordinates (1,1). Within this window, you manipulate the UVW coordinates relative to the map (or mesh) by selecting the lattice vertices and moving them.
The following steps show how the Unwrap UVW’s modifier can be used to animated the map on one side of a box.
Because of the way boxes are mapped, a repeat of the map appears on each side of the box.
The UVW lattice is a rectangle of two triangles, matching the selected faces of the side of the box.
The map appears in the view window under the lattice.
When you release the mouse, the display in the viewport changes to show that the map on one side of the box has magnified.
Move all four points so the lattice is in one corner of the map
The map moves across the one side of the box.