

Coordinates control how the bitmap is applied to the object or environment.
Often when you apply a bitmap, especially as a texture pattern, you want the pattern to repeat. This effect is known as tiling, as in a tiled floor or fountain.
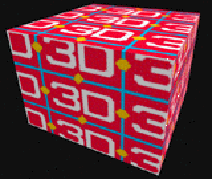
Object with tiled bitmap
In default mapping, tiling is enabled but because the bitmap is scaled to fit the object, you don’t see the effect of tiling unless you offset the UV coordinates or rotate the map—in this case, the portions of the surface from which the bitmap has moved away are filled by other portions of the map. Tiling wraps the object with the bitmap image.
You can control tiling directly, using the Coordinates rollout for the bitmap.
The Tiling value is the number of times the bitmap repeats along the specified dimension. A value of 1.0, the default, maps the bitmap exactly once; a value of 2.0 maps the bitmap twice, and so on. Fractional values map a fractional portion of the bitmap in addition to copies of the whole map. For example, a value of 2.5 maps the bitmap two and a half times.
Tiling values less than one increase the size of the map relative to the object. For example, a value of 0.5 maps half of the bitmap.
Tiling is uniform if both the U and V dimensions are tiled by the same amount.
Mirroring a map is an effect related to tiling. It repeats the map and flips the repeated copy.
As with tiling, you can mirror in the U dimension, the V dimension, or both, and the Tiling parameter for each dimension specifies how many copies of the map are shown. Each copy is flipped relative to its neighbors.
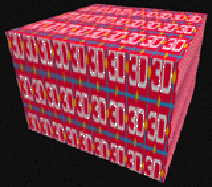
Mirroring a map
Because mirroring defaults to two reflected images of the map, the meaning of the Tiling value differs when Mirror is set. In a single mapping dimension (U or V), a value of 1.0, the default, shows two copies of the bitmap; a value of 2.0 shows four copies; a value of 1.5 shows three copies; and so on. Mirroring in both dimensions multiplies the effect.
A bitmap used as a decal appears only once, and is not repeated as with tiling. Wherever the decal doesn’t appear on the surface, the surface is rendered as a basic material—that is, with the component colors specified at the material level.
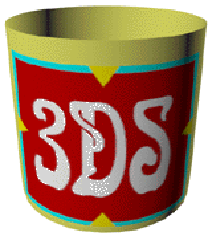
Decal mapping
Decals are useful for mapping single designs, small elements such as stickers or light switches, and so on.
With map trees, as described in the following chapter, a decal might appear on top of a different bitmap or other map type.
For a Bitmap, you can set or modify the following parameters under Coordinates:
Texture: Click to use the bitmap as a texture map applied to a surface.
Environ Mapping: Click to use the bitmap as an environment map. Then select the type of environment coordinates from the list: spherical, cylindrical, shrink-wrap, or screen. The bitmap is projected into the scene as though it were mapped to an invisible object in the background. Select screen if you want the image to be a flat backdrop in the scene.
Mapping Dropdown List: Lets you choose whether the settings in this rollout wii be Explicit UVW 1, Explicit UVW 2, or Planar from Object XYZ.
Planar from Object XYZ uses planar mapping based on the object’s local coordinates (disregarding the pivot point location). For rendering purposes, planar mapping doesn’t project through to the back of the object unless you turn on Show Map on Back.
Show Map on Back – When on, planar mapping (Planar from Object XYZ) projects through to render on the back of the object. When off, planar mapping doesn’t render on the object’s back. Default = off.
The effect of this toggle is visible only when you render the scene. In viewports, planar mapping always projects to the back of the object, whether Show Map on Back is turned on, or not.
Offset: Changes the position of the bitmap in UV coordinates. The bitmap moves in relation to its size. For example, if you want to shift the bitmap its full width to the left, and half its width downward from its original position, you enter -1 in the U Offset field and 0.5 in the V offset field.
UV/VW/WU: Changes the mapping coordinate system used for the bitmap. The default UV coordinates project the bitmap onto the surface like a slide projector. The VW and WU coordinates rotate the bitmap so that is perpendicular to the surface.
Tiling: Determines the number of times the bitmap is tiled (repeated) along each axis.
Mirror: Mirrors the bitmap left-to-right (U axis) and/or top-to-bottom (V axis).
Tile: These toggles turn tiling on or off in the U or V axis.
Angle U/V/W: Rotate the bitmap the about the U, V, or W axis (degrees).
Rotate: Displays a schematic Rotate Mapping Coordinates dialog that lets you rotate the map by dragging on an arcball diagram (similar to the arcball used to rotate viewports). The Angle UVW values change as you drag in the dialog.
Blur: Affects the sharpness or blurriness of the bitmap based on its distance from the view. The farther away the map is, the greater the blurring. Blur is primarily used to avoid aliasing.
Blur Offset: Affects the sharpness or blurriness of the bitmap without regard to its distance from the view. Blur Offset is the option to use when you want to soften or defocus the details in a map to achieve the effect of a blurred image.
See Blur/Blur Offset for more information.
The material preview changes to show the tiling value you chose.
Mirror and Tile are exclusive settings -- if one is set when you choose the other, the original setting turns off.
The material preview changes to show the Tiling value you chose.
The button you choose changes tiling in the active sample slot to 1.0, 2.0, 3.0, or 4.0 in both U and V.
The flyout setting has no effect on the material or its mapping. It does not change the Tiling value or check box setting. It only helps you preview the effect of changing these settings.
Changing the Tiling value changes the size of the mapped bitmap as it does when you tile the map, but with Mirror and Tile unchecked, the bitmap appears only once.
Note: You can also use the Bitmap Parameters rollout’s Cropping and Placement controls to achieve a decal effect.
On the surface of the object, the map shifts in the directions you chose.
UV offsets are especially useful when you have turned tiling off and want the bitmap to appear in a single location.
Positive angles rotate the map in the clockwise direction; negative angles rotate it counterclockwise.
The angle can be up to 360 degrees - which rotates the map completely and has no visible effect unless you are animating the map's rotation.
The button you choose changes tiling in the active sample slot to 10, 20, 30, or 40 in both U and V.
The flyout setting has no effect on the material or its mapping. It does not change the Tiling value or check box setting. It only helps you preview the effect of changing these settings.
For texture maps and other maps besides bump maps (described below), the Blur value is most effective in the 0.5-20 range. Lower values decrease antialiasing; higher values increase it.
The Blur Offset parameter adjusts the image before antialiasing Blur is applied. If all you need is antialiasing, leave Blur Offset at its default of 0.0.
Blur Offset is a very strong parameter. The Blur Offset spinner has increments of 0.001 Values greater than 0.1 are likely to be too high.
The negative Blur Offset value sharpens the image.