

The Motion Capture utility lets you drive your animation via peripheral devices, such as MIDI keyboards, joysticks, the mouse, and so on. While driving the animation, you can record it in real time.
The motion capture system in 3DS MAX is handled in the following way:
The following motion-capture devices ship with 3DS MAX:
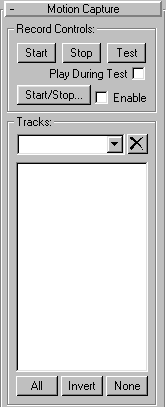
The buttons in the Record Controls area let you test and record your animation. The first three buttons let you control the recording directly, while the Start/Stop button lets you use a MIDI device to control the recording.
Start: Starts a recording, using the values set in the Record Range area below the track list window. In our example, you click Start, and the time slider begins to move. While this is happening, you move the mouse to flap the wings. At the specified Out frame, the recording stops. Note that the state of the Animate button is ignored.
Stop: Click this button to stop the recording before the Out frame is reached. You can also stop a recording by pressing ESC, or by pressing the right mouse button.
Test: Click on this to test your motion. No recording takes place, but you can, in the example below, move your mouse and watch the wings flap. Exit this mode either by clicking Test again, or pressing ESC or the right mouse button.
Play During Test: When this is checked, and you click Test, the animation in the scene plays in a loop while you test your motion. Note that tracks in the Motion Capture list that are selected (marked red) will not play back because they’re awaiting input from the assigned peripheral device.
Start/Stop: Click to display the Start/Stop Trigger Setup dialog. Here, you can choose the type of MIDI device that will control the recording. The dialog contains the following controls:
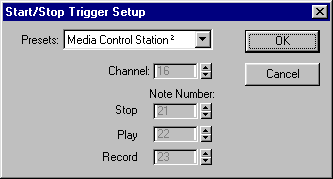
Presets: Choose the type of MIDI device. If the Media Control Station 2 is chosen, you can use its buttons to Stop, Play, and Record. (The Media Control Station is a MIDI device containing standard VCR-style playback buttons along with a jog wheel.) By choosing Custom, you enable the remaining spinners in the dialog, where you can set specific channels and note numbers. You can also use Custom to customize the controls used by the Media Control Station.
Channel: Use this to specify the channel to which your MIDI device is assigned.
Note Number: The spinners in this area let you specify which note event triggers which function.
Stop: This note event stops the playback or the recording. On the Media Control Station, this would be the square button. This is the equivalent of clicking the Stop button under Recording Controls.
Play: Plays the animation. This is the arrow button in the Medial Control Station.
Record: When this note is sent by itself, it’s the equivalent of clicking the Test button under Record Controls. To actually record the motion capture, you must press both Play and Record at the same time (the equivalent of clicking the Start button under Record Controls). Note that you can press the Play button before or after the Record button and release the Play button before or after the Record button. When releasing one of these two buttons, the other button is pressed. The recording starts when the button is released.
Enable: Check to use the assigned MIDI device for recording, instead of the Start, Stop and Test buttons.
Tip: In the Time Configuration dialog, you can reduce the viewport playback speed, test or record at the lower speed, and then reset the speed to normal to view the results.
The Tracks area displays all tracks that have been assigned Motion-Capture controllers. Here, you select the tracks that will be affected by the three buttons in the Record Controls area. Click a track to toggle its selection box on or off. Only the selected tracks displaying the red box are affected by the Record Controls.
You can select the tracks either by clicking them, or by using the All, Invert, None buttons. In addition, you can create named selection sets of tracks. To create a named selection, click the tracks you want, and then enter a name in the edit field above the track list. To select a previously named set, open the edit window, and select it from the list. To delete a named set, select it from the pop-up list, and then click the delete button to the right.
Important: A specific track can be in only one named selection at a time. Put another way, you can’t have the same track in more than one named selection.
All: Assigns all tracks to the Record Controls Area
Invert: When tracks are selected, assigns the unselected tracks to the Record Controls Area.
None: Assigns none of the tracks to the Record Controls Area.
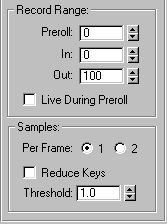
The Record Range area specifies the frame range affected by the recording. You can also set a preroll range of frames.
Preroll: Specifies the frame number at which the animation begins playing when you press the Start button. Note that if this number is the same or greater than the In number, the Preroll number is ignored. For example, if In: 0 and Out: 200, then a Preroll of -100 would give you 100 frames before the recording started, while a Preroll of 50 would be meaningless. If the range defined by Preroll and Out is larger than the current segment, the segment is temporarily enlarged during the recording.
In: Specifies the frame number at which the recording begins after you click the Start button.
Out: Specifies the frame number at which the recording ends after you click the Start button. You can stop the recording before this by clicking the Stop button.
Live During Preroll: When this is active, the motion capture is live through the preroll frames. That is, it’s the same as when the Test button is on. The motion occurs, but is not recorded. Note that this can cause sudden motion shifts at the In frame because your live motion might not match the animation when you reach the In frame. When this option is inactive, the motion is disabledor frozen until you reach the In frame.
When the motion data is captured, it is sampled at a rate relative to the current frame rate, which defaults to 30 frames per second. Increasing the frame rate increases the sample rate. The two radio buttons in this section allow you to choose 1 or 2 samples per frame. This is a short cut to let you sample at a field rate. If you’re rendering to fields, you don’t necessarily need to capture at 60 frames per second. Controllers will interpolate between the samples.
Reduce Keys: When selected, the keys generated by the motion capture are automatically reduced.
Threshold: The value you enter in the Threshold field constrains how much 3DS MAX changes the selected track. The difference between the new animation and the original animation, at any frame, will be less than the threshold value.
Note: When Reduce Keys is active, there is additional calculation time after each completed recording.
As mentioned, the first step in using motion capture is to assign motion-capture controllers to the tracks you want. We’ll use a simple example of a bird with segmented wings that you want to flap using your mouse. The pivot point of each wing segment has been moved so that the segments rotate as hinges about their local Y axis.
You’ll set it up so that the vertical motion of the mouse rotates only the wing segments attached to the bird’s body, while horizontal mouse motion rotates the remaining segments, making the wings curl.
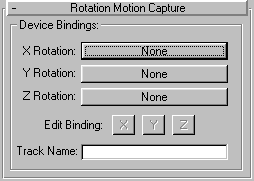
When you assign a Motion-Capture controller, the previously assigned controller is maintained as a child of the Rotation controller. This lets you continue to adjust the rotation of the object using standard transform controls, while still making motion-capture control available.
After assigning a motion-capture controller, you next determine the type of device that will drive the motion. Depending on the type of controller, you might be able to bind one or more devices. For example, a Rotation motion-capture controller can have three devices, one for each axis of rotation. On the other hand, a controller for the radius of a cylinder would have only one device to control the radius value.
You bind the devices in the Properties dialog for the track.
The properties dialog for rotation motion capture includes three binding buttonsone for each axis. In this example, you want to drive the Y rotation with the mouse.
The lower half of the Properties dialog display controls specific to the new device. Assuming this is a wing segment that is not attached to the body, you want the horizontal mouse movement.
The Scale spinner lets you adjust the relative effect of the mouse movement to the rotation. The Flip checkbox reverses the rotational direction with respect to the mouse movement.
You would next repeat the above steps for each wing segment. On the two segments linked to the bird’s body, you would specify Vertical instead of Horizontal mouse movement. You might also lower the Scale for these two segments so the wings don’t react to quickly to your mouse movement.