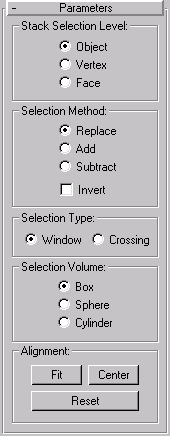


The Volume Select modifier lets you make a sub-object selection of vertices or faces, then apply one or more modifiers and animate those parameters. Since no Edit Mesh is involved, the sub-object selection is totally separate from the underlying parametric geometry of the object.
Volume Select uses one of three gizmos to define a volume of space as the selection area, allowing you to apply modifiers to the selected geometry. The selection can be moved over an object and animated.
When applied, Volume Select begins with the current geometry in the objects stack whether its a whole object or a sub-object selection from an Edit Mesh or another Volume Select modifier.
The Volume Select gizmo now scales along with its object. Thus, if you apply a Volume Select modifier, and then change the scale of your object (via the toolbar Scale function) the selection doesn’t change. Put another way, all three transforms affect the Volume Select gizmo and its object identically.
To maintain compatibility, objects that have the old Volume Select modifier will still function the way that they did. In other words, if you scale an object containing an old Volume Select modifier, the gizmo will not scale with it.
The Volume Select modifier now has a center as well as a gizmo. Note that this lets you alter the center for non-animated transforms. However, if you animate a rotation about the offset center, you achieve animation of both rotation and translation.

Object/Vertex/Face: Volume Select provides three selection levels. Vertex and Face levels put the modifier stack in sub-object selection. You can make one sub-object selection for each Volume Select modifier. You can then toggle the one selection between Face and Vertex level to send either up the stack. Object level lets you modify the whole object while retaining any sub-object selection.
Replace: Selecting this clears the selection, then selects geometry within the volume.
Add: Selecting this, selects all geometry within the volume, adding to any previous selection.
Subtract: Deselects all geometry within the volume.
Invert: Reverses the entire selection set. Geometry that was deselected is now selected.
Window: Selects only faces with all three of its vertices within the selection volume.
Crossing: Selects faces with only one of its vertices within the selection volume.
Box/Sphere/Cylinder: To define the selection space, you choose any of three gizmos: Box, Sphere, or Cylinder. You then scale, rotate, or move the gizmo anywhere around the object. Various controls help you determine what gets selected.
The selection depends on a volume intersecting the object. If a gizmo is scaled down and moved inside an object, no selection occurs because no geometry is within the volume of the gizmo.
Applying Volume Select: Like other selection methods in 3DS MAX, Volume Select works with single or multiple objects.
These controls are generally used when the gizmo has been transformed out of its original orientation to the object.
Fit: Resizes the gizmo to fit around the object or previous selection in the stack. Maintains any previous rotation.
Center: Recenters the gizmo on the object or previous selection in the stack. Maintains any previous scale or rotation.
Reset: Returns the gizmo to its default size and orientation. Cancels the effect of all previous transforms.
The Parameters rollout appears.
This example begins by applying Volume Select to an object. The next steps are as follows:
On playback, you see the effect of an animated geometric modifier moving over the object.